
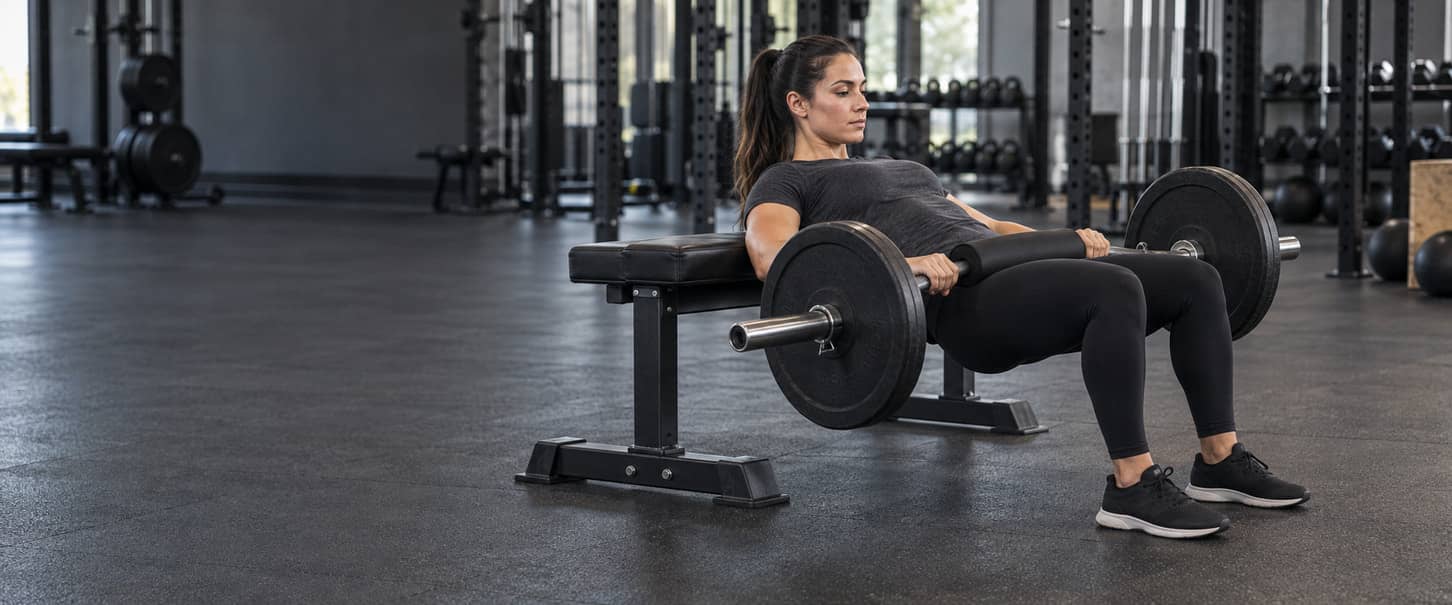
Hip Thrust: Form and Equipment at a Glance
A hip thrust raises the pelvis through controlled hip extension with the upper back on secure elevated support, both feet planted, and a suitable load centered at the hip crease. Finish where the hips are extended without gaining extra height through a larger lower-back arch. A floor glute bridge keeps the head and upper back on the floor, so its support and lower position are different. Hip thrusts are one useful supported hip-extension option, not a compulsory glute exercise. Choose a version only when its support, load handling, entry, working range, and exit can all be controlled.
| Variation | Useful feature | Essential setup check | Load record |
|---|---|---|---|
| Barbell Hip Thrust | Shared-bar loading with upper-back support. | Secure bench, pelvic padding, access, and controlled removal. | Total bar-plus-plate mass and unit. |
| Floor Glute Bridge | Floor-supported hip extension without a bench. | Head and upper back supported; feet stable; no neck bridge. | Bodyweight or actual added load, foot position, and floor range. |
| Dumbbell Hip Thrust | One pelvic load when a bar is inconvenient. | One controllable dumbbell, two stabilizing hands, and secure bench support. | Mass of the single dumbbell and unit. |
| Smith Machine Hip Thrust | Guided bar when the actual rail path fits. | Permitted pelvic loading, reachable hooks, effective stops, and bench fit. | Exact station, settings, and verified resistance convention. |
| Hip-Thrust Machine | Purpose-built back support and pelvic restraint. | Actual belt or pad, platform, release, and resting procedure. | Exact machine, support settings, and displayed load or added plates. |
| Bodyweight Single-Leg Hip Thrust | Optional per-leg work without another external load. | Fixed upper-back support, one planted foot, and pelvic control. | Working leg, bodyweight setup, reps, and rest after each side. |
The table is a route to the six detailed tutorials, not a six-exercise session. Use the barbell, one-dumbbell, Smith, purpose-built machine, floor-bridge, or bodyweight single-leg instructions that match the equipment and support you can manage. Check the support before considering load: it must stay secure, contact the upper back comfortably, and leave a controlled way to position and remove the resistance. The load must stay at the hip crease without rolling, and the feet must remain stable through the chosen range. For broader squat, hinge, curl, calf, and hip-extension choices, use the leg exercise selection guide. Your workout plan determines whether a hip thrust belongs in the schedule and how the work is prescribed.
How to Do the Barbell Hip Thrust
Barbell Hip Thrust
Use a barbell hip thrust for supported bilateral hip extension when the upper-back support, padded bar, foot contact, and entry and exit can all be controlled. Both legs work together, and one controlled lift to hip extension followed by the return to the selected lower position counts as one working repetition.
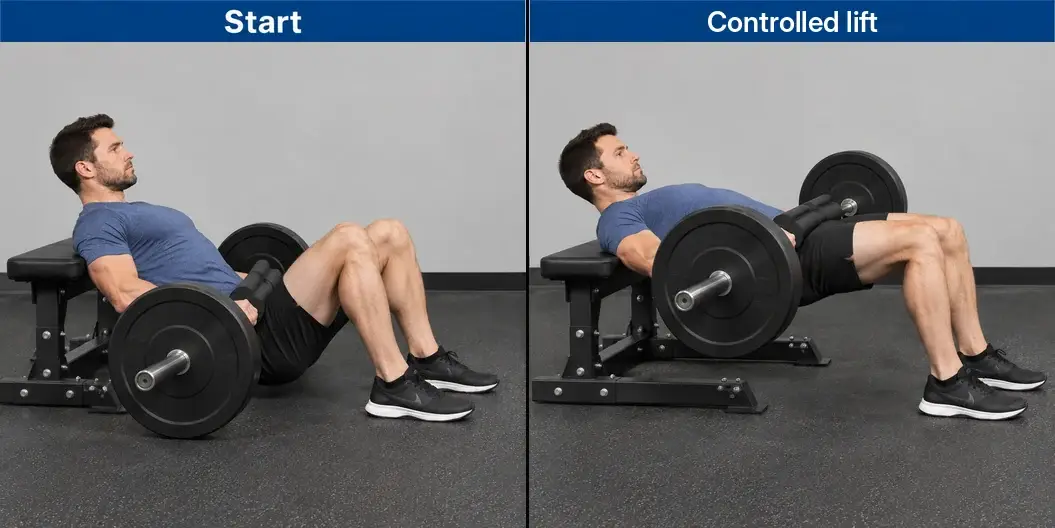
- Set a purpose-built hip-thrust support or a rated exercise bench on level nonslip flooring and secure it against sliding or tipping in the intended loading direction. Rehearse without the bar. The support should contact the upper back near the lower shoulder-blade region rather than press into the neck.
- Prepare a manageable bar, compatible pelvic padding, equal plates, and secured collars. With the resistance resting safely, confirm there is enough clearance to position the legs beneath the bar and guide it to the hip crease. Use an appropriate demonstrated support or competent assistance when plate diameter limits access. Do not add unnecessary weight merely to obtain larger plates.
- Settle against the support with the padded bar centered across the front of the pelvis at the hip crease, not across the abdomen, stomach, or knees. Keep fingers clear of pinch points and use both hands to stabilize the one shared bar and prevent it from rolling. Recheck the padding and the planned removal route before lifting.
- Plant both whole feet at a comfortable width and toe angle. During a light rehearsal, choose a foot distance that permits a controlled finish with the knees tracking over the feet. Approximately upright shins can be explored as a fit check, but no single shin angle, bench height, or foot position is compulsory.
- Prepare the trunk and extend the hips while the upper back remains in contact and pivots against the support. Keep the bar centered, both feet planted, and the head moving comfortably with the torso. The hands stabilize the bar; they do not press it upward. Do not throw the head back or force the chin into the chest.
- Finish where the hips have extended and the trunk and thighs form a broadly continuous line without gaining extra height through a larger lower-back arch. A natural back contour does not need to become perfectly straight. Hold only the pause assigned by the workout plan while maintaining ordinary breathing or a brief controlled reset.
- Lower the pelvis through the same controllable range while the feet, padding, and upper-back support remain secure. Use a deeper lower position only while clearance, bar control, support contact, and trunk position remain repeatable. The bar and plates do not need to touch the floor on each repetition.
- End the set while the planned exit is still available. Lower the resistance onto its secure resting support, keep both hands controlling the bar until the pelvis is unloaded, and guide it away through the rehearsed clearance or with trained assistance. Do not release an unsupported bar, twist out from beneath it, or rely on a failed repetition as the removal method.
Regress by using less total load, a lighter training bar, a shorter controlled range, or a bodyweight bench-supported rehearsal. Use the taught floor glute bridge when elevated support or bar access does not fit. These are practical setup choices rather than compulsory stages. Progress only while the support, padding, foot placement, lower endpoint, hip-extension finish, and entry and exit remain comparable. Record total bar-plus-plate mass with lb or kg, the exact support and height, padding, foot position, lower endpoint, finish, and any entry or exit assistance. The broader workout plan supplies the working sets, repetitions, rest, and effort target.
Bench Height, Bar Placement, and Foot Position
Fit the barbell hip thrust with an unloaded or lightly loaded rehearsal before working sets. First secure a rated fixed bench against sliding and tipping, then test upper-back contact near the lower shoulder-blade region. Position the padded bar at the hip crease while the resistance is fully supported, check plate clearance and the planned unload route, and only then explore foot placement through the complete lift. Bench height is unsuitable when comfortable upper-back contact and pivoting cannot be established through the intended range. That is different from an insecure bench. Changing body position cannot make a bench acceptable when it slides, tips, or shifts under the intended loading direction. A machine with a purpose-designed pivoting back pad uses a different support system and is fitted through that station's instructions.
| Observation | Check or adjustment | What not to do |
|---|---|---|
| Support presses into the neck or the upper back cannot pivot comfortably | Rehearse with a different suitable support height or use the floor bridge. | Do not force the body to fit a compulsory bench height. |
| Bench slides, tips, or shifts during rehearsal | Stop and secure suitable rated support for the intended loading direction. | Do not treat a moving bench as acceptable because the weight is light. |
| Bar or pad pressure is uncomfortable or migrates upward | Fully support the resistance, then check hip-crease placement, padding, and load. | Do not push through pressure on the abdomen or rely on more padding to fix unstable contact. |
| Feet are so close that whole-foot contact or a controlled finish is lost | Rehearse a modestly greater foot distance and reassess knee tracking and support. | Do not lift the heels or force the knees to a printed angle. |
| A long stance brings cramping or loss of finish control | Rest, reduce demand, and test a modestly closer stance while maintaining whole-foot contact. | Do not diagnose inactive glutes from a sensation or assume foot distance is the only cause. |
| Extra height comes from rib flare or a larger lower-back arch | End the lift at controllable hip extension and reduce load or range as needed. | Do not use the highest possible bar position as the goal. |
| The bar cannot be positioned or removed with the available plate clearance | Use a suitable demonstrated support, competent assistance, or another implementation. | Do not add excessive plate weight, use unstable improvised blocks, or crawl out under an unsupported bar. |
Fit the bar and feet in a controlled order
Secure the support and confirm access first. With the bar resting safely, center the padding and load at the hip crease, check that it does not migrate toward the abdomen, and verify that the plates leave enough clearance for positioning and removal. Recheck these details after settling beneath the load rather than adjusting the bench or feet while supporting an uncontrolled bar. Change only one fitting variable at a time during light rehearsals. A practical sequence is support height, padding and bar placement, foot distance, stance width, toe angle, and then working resistance. Keep the selected variable long enough to judge the full lift and unload route rather than changing several features after one repetition.
Use the top position to explore foot placement
Approximately upright shins at the intended top can be a useful starting check, but they are not a compulsory angle. Adjust foot distance, width, and toe angle until both whole feet stay planted, the knees track comfortably with the feet, and hip extension can finish without the pelvis losing support or the lower back arch increasing to create height. Whole-foot contact does not mean lifting the toes to force a heel-only drive. A wider stance does not isolate one glute region, and adding a band above the knees does not create an isolation switch. A longer or shorter stance is not automatically wrong. Judge it by its effect on support, range, knee tracking, control, comfort, and the ability to return and unload the resistance securely. Rest when a rehearsal produces cramping or excessive discomfort. Reduce the demand and test a modest change after the sensation settles. Foot distance alone does not diagnose the cause. Keep a comfortable head-to-torso relationship while the upper back and pelvis move naturally as the torso pivots against the support.
Verify the complete repetition before loading further
Rehearse the selected lower position, controlled lift, hip-extension finish, return, and unload route with the same bench, padding, and foot setup. A shorter intended range can be valid when it is repeatable. Progressively losing that range under fatigue is not unchanged progression. Add working resistance only after the full setup remains secure and reproducible.
Hip Thrust Muscles Worked and Benefits
Glutes lead the supported hip-extension task
The gluteus maximus is the main muscle producing hip extension as the pelvis rises and returns under control. The hamstrings and adductors can assist at the hip, while the quadriceps help maintain the bent-knee position and stable foot pressure. Bent knees do not switch every hamstring off, but a hip thrust still does not train knee flexion in the same way as a seated or lying leg curl. Muscle involvement is not equal direct-set credit. The hip thrust is primarily a supported hip-extension exercise, not isolated training for every muscle that contributes.
Support changes the task without removing trunk demand
The upper back rests against elevated support, but the trunk and spinal muscles still help organize the torso and pelvis as the body pivots. The feet, knees, and pelvis also have to remain stable while the load stays centered at the hip crease. External support can make handling and positioning more manageable, but it does not reduce spinal or trunk demand to zero. This differs from the standing hinge taught in the Romanian deadlift technique guide. An RDL uses a standing hip hinge with hand-held resistance and a modest, broadly stable knee bend. Hip thrusts emphasize supported hip extension through a different range and support arrangement. Squat and split-squat selection remains part of the broader leg-exercise decision.
Benefits depend on repeatable loading, not one peak position
The practical benefit of the hip thrust is repeatable loaded hip-extension practice with a setup that can be progressed when support, padding, range, and exit remain consistent. A controlled top pause can help the lifter reproduce the finish, but it is an execution choice rather than proof that lockout always provides the greatest resistance or muscle tension. In a 2021 biomechanical study of the barbell hip thrust, the measured hip-extensor moment decreased during the lifting phase. A nine-week comparison in relatively untrained adults found that both squats and hip thrusts supported glute growth under the tested conditions. Squats produced greater thigh growth, and strength changes favored the exercise that participants practiced. That finding supports both as useful options, not a universal winner or a guarantee that hip thrusts transfer to sprinting, deadlifting, or every athletic task. Acute muscle-excitation findings describe the tested exercise at that moment. They do not create a long-term growth ranking, prove identical outcomes for all lifters, or justify a numerical muscle-growth table. Use the movement when its support and loading fit the role assigned by the workout plan.
Hip Thrust vs. Glute Bridge: Support, Range, and Technique
A bench-supported hip thrust elevates the upper back so the torso pivots against secure support. The floor glute bridge taught here keeps the head and upper back on the floor and returns the pelvis to the floor after each repetition. The exercise name is not defined only by whether a barbell is present, because either support arrangement can use external resistance when that load can be positioned and removed safely.
| Feature | Bench-supported hip thrust | Floor glute bridge |
|---|---|---|
| Upper-body support | Upper back on a secure elevated support; torso pivots at that contact. | Head and upper back remain supported on the floor. |
| Lower endpoint | Set by controllable hip motion, support, and implement clearance. | Pelvis returns to the floor in the version taught here. |
| Loading and handling | Barbell, one dumbbell, or a purpose-built station can change setup. | Bodyweight first; a suitable controlled added load is a separate recorded setup. |
| Progress comparison | Compare the same support, foot placement, range, and loading method. | Do not convert its bodyweight or added load into a bench-thrust equivalent. |
The floor version may be easier to access because it does not require elevated upper-back support, but it is not a compulsory starting exercise. It also is not a pain treatment, a barbell-load equivalent, or a proven equal-growth substitute for every bench-supported thrust. Choose the support and loading method that fit the role already assigned by the workout plan.
Floor Glute Bridge
A floor glute bridge keeps the head and upper back on the floor instead of elevating the upper back on a bench. Start with bodyweight to establish support and controlled hip extension; floor contact defines a different bottom position from a bench-supported hip thrust.
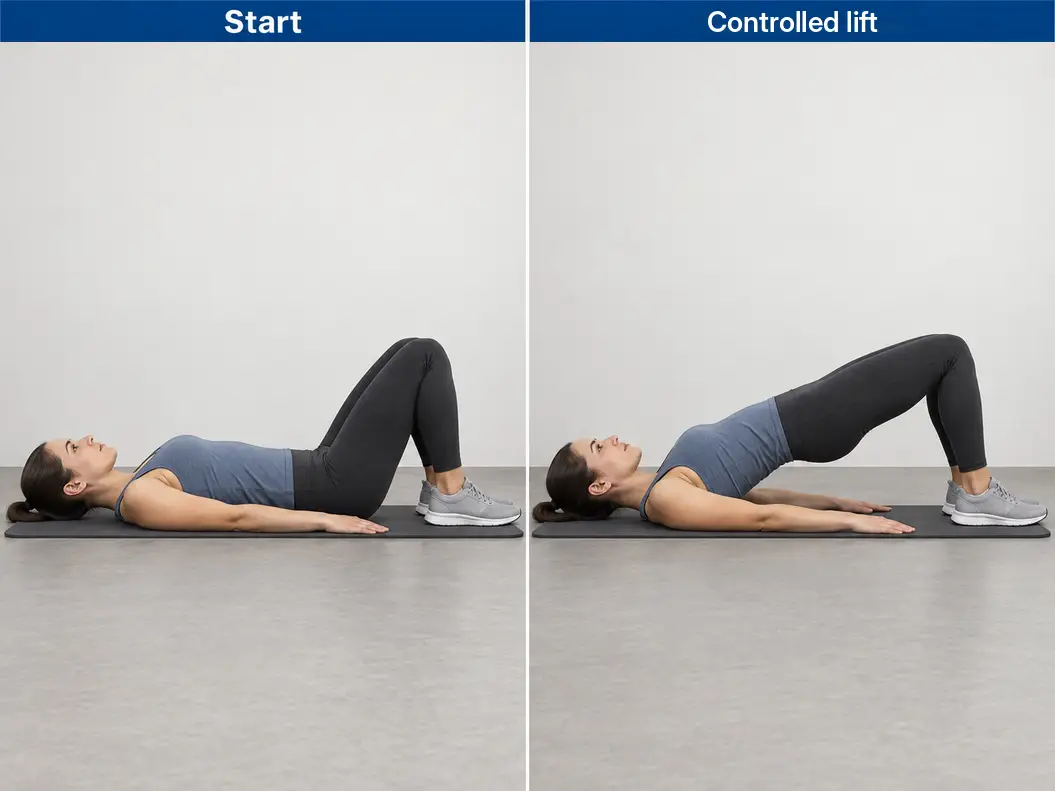
- Lie on a nonslip floor or mat with the head and upper back comfortably supported, knees bent, and both feet flat. Place the arms beside the body with relaxed hands for light balance support; do not brace on the neck.
- Choose a comfortable foot width and distance. Rehearse a modest lift to check whole-foot contact and knee tracking, then reset the pelvis on the floor. Do not force a numerical knee angle or lift the toes to make the exercise heel-only.
- Prepare the abdomen and lift the pelvis by extending the hips, keeping the head and shoulders supported. Let the trunk move as needed without pushing its weight onto the neck or throwing the ribcage upward.
- Stop at a controllable hip-extension finish, with a broadly continuous shoulder-to-hip-to-knee line rather than a progressively larger lower-back arch. The feet remain planted and the knees follow the feet.
- Lower smoothly until the pelvis returns to the selected floor start without bouncing. One lift and return is one repetition. Breathe comfortably and reset before the next lift.
- End while the position remains controlled, settle the pelvis fully, and leave the floor position normally. Regress the range or take a rest when control or comfort changes.
Use a smaller comfortable lift or another bodyweight rehearsal when the full selected range cannot be repeated. The floor setup can simplify access, but it does not guarantee pain relief or mean every lifter must begin here. Record bodyweight or the exact external load, bilateral or per-side use, foot placement, arm support, floor contact, range, and top pause separately from a bench-supported thrust. When bodyweight becomes too easy for the intended work and one suitable dumbbell can be positioned and removed securely, use a separate loaded floor-bridge setup. Sit with the dumbbell controlled across padding at the hip crease, keep both hands securing it, and lower the torso to the floor without twisting or letting the weight migrate. Perform the same bilateral bridge while both hands prevent rolling. After the final controlled lowering, settle the pelvis on the floor, keep the dumbbell secured, remove it through the rehearsed route, and set it down before leaving the position. Use competent assistance or a lighter alternative when the weight cannot be handled safely. Do not stack unsecured weights, place the dumbbell on the abdomen, or convert a barbell-thrust load into a floor-bridge load. The bodyweight and one-dumbbell versions have different load records, and both remain distinct from elevated upper-back support. Fixed dumbbells can also create a loading ceiling; slower repetitions or longer pauses may change the demand but do not provide unlimited external resistance.
How to Do Dumbbell Hip Thrusts
Dumbbell Hip Thrust
This version uses one manageable dumbbell centered across the hip crease, with both legs working together and the upper back on a secure rated bench. Both hands steady the single weight throughout the set. It is not a two-dumbbell exercise, an arm press, a floor bridge, or unilateral work.
- Place the rated bench on level nonslip flooring and secure it against sliding or tipping in the intended loading direction. Clear the placement and removal area, rehearse the hip thrust without load, and plan how the dumbbell will reach and leave the lap without twisting or losing support.
- Inspect the dumbbell, including any selector, collar, or other retention mechanism. Confirm that its shape and manufacturer-permitted orientation allow secure contact at the pelvic crease and control with both hands. Add suitable padding without covering an unsecured adjustment or hiding unstable contact.
- With the pelvis low and the upper back supported near the lower shoulder-blade region rather than the neck, position the one dumbbell across the hip crease. Use both hands or competent assistance, keep fingers clear of pinch points, and settle the weight before lifting. Choose another implementation when placement cannot be controlled.
- Plant both whole feet at a comfortable width, distance, and toe angle. Keep the dumbbell centered while both hands prevent rolling, and establish a repeatable trunk and pelvic position before beginning the lift.
- Extend the hips while the upper back pivots against the bench and both feet remain planted. Finish at controlled hip extension without lifting higher through a larger lower-back arch or using the arms to press the dumbbell upward.
- Lower the pelvis through the same repeatable range without letting the dumbbell roll, a dumbbell head dig into the body, or the bench move. Maintain the selected padding, foot support, and upper-back contact across the planned repetitions.
- End the set while removal remains secure. Lower the pelvis fully, control and remove the dumbbell through the rehearsed route, and set it down before leaving the bench. Do not drop it, stack unsecured weights onto it, or force another repetition after handling control changes.
Regress with a lighter dumbbell, bodyweight on the same secure support, a shorter controlled range, or the taught floor glute bridge when elevated loading does not fit. Switching to a barbell is optional, not a required progression. When the next available dumbbell is too large to place, hold, or remove securely, continue building repeatable work within the range supplied by the workout plan or choose another safely loadable implementation. Progress repetitions before increasing the single dumbbell when support, padding, stance, range, finish, and handling remain comparable. An ordinary load increase within that unchanged setup remains part of the same exercise history. A material change in upper-back support, lower range, foot arrangement, or handling method begins a new comparison. Record the mass and unit of the single dumbbell, not a per-hand value or a number obtained by halving a barbell load. Keep the support, padding, stance, range, and entry and exit method with that load record. Do not convert a machine setting into a dumbbell prescription.
Smith Machine and Hip-Thrust Machine Technique
Machine-based hip thrusts can simplify some load handling, but the actual station still has to fit the body, support, movement path, and exit. A Smith carriage and a purpose-built hip-thrust machine use different restraints, paths, and load records, so learn the controls of the exact equipment before adding working resistance.
Smith Machine Hip Thrust
A Smith hip thrust uses a guided bar only when the particular station permits pelvic loading, usable bench placement, reachable hooks, and effective safety stops. Rail direction, hook operation, and starting carriage resistance vary, so fixed rails do not make every station or facing direction suitable.
- Read the station instructions or ask facility staff to demonstrate whether pelvic loading is permitted, which way the rails travel, how the hooks operate, where the safety stops belong, and what starting carriage resistance has been verified. Identify the supported entry and exit positions before placing a bench beneath the bar.
- With the carriage secured, position a rated bench so the upper-back contact, planted feet, pelvic pad, guided bar path, reachable hooks, and safety stops can all coexist. Set both permitted stops to a tested position that protects the lower range while leaving usable clearance. Do not remove protection merely to obtain more depth.
- Place compatible padding at the hip crease and test the complete path with manageable resistance, including the release, lift, lower, re-engagement, and unload route. An unloaded or counterbalanced carriage can still be unsuitable, and its mass must not be assumed from another station.
- Plant both feet and establish secure upper-back support. Release the hooks only through the demonstrated station-specific action after every contact is stable. Keep both hands in the intended control position and clear of rails, hooks, and moving contact points.
- Extend the hips through the available guided path without letting the bar migrate toward the abdomen or gaining height through a larger lower-back arch. Lower under control with the bench, feet, padding, and bar contact unchanged. Do not move the bench, shuffle the feet, or alter the catches while the carriage is loaded to rescue an incompatible setup.
- Re-engage the required hooks or resting mechanism exactly as demonstrated and confirm that the carriage is fully supported before unloading pelvic contact or leaving the bench. Select another implementation when the rail path, release, stops, bench placement, and controlled repetition cannot all fit together.
Regress by reducing added resistance or using a shorter permitted range while retaining effective safety stops. Use another taught implementation when the carriage, hooks, rail path, or support cannot be fitted; guided motion is not a reason to remove protection or persist with unsuitable equipment. Record the exact station, rail orientation, bench location, pelvic padding, hook and stop settings, foot position, range, added plates, and separately verified carriage-resistance convention. Do not convert the Smith load into a free-bar number.
Hip-Thrust Machine
Use a purpose-built hip-thrust or glute-drive station when its back support, foot platform, pelvic belt or pad, movement path, and resting controls fit. Machines with fixed pads and machines with pivoting backrests are different implementations rather than one universal design.
- Identify the exact station and read its setup and loading instructions, or ask facility staff to demonstrate them. Locate the intended entry route, back support, foot platform, pelvic restraint, adjustment controls, load mechanism, release or catch, and the position where resistance fully rests.
- Keep the resistance supported while selecting a manageable load through the permitted method. Load the designated horns as directed on a plate-loaded station, or change a weight-stack selector only while the stack is at rest. Confirm every seat, pad, belt, and start-position adjustment is fully engaged.
- Enter through the designed steps or access space. Fit the feet to the intended platform and place the back against the station's fixed or pivoting support. Secure the pelvic belt or pad over its manufacturer-designated contact area rather than an arbitrary abdominal position, and keep fingers clear of hinges and moving pad gaps.
- Use the intended handles and take up the resistance through the demonstrated release procedure. Maintain the back contact and pelvic restraint the station is designed to provide. A purpose-designed pivoting backrest may move with the torso, so do not force it to remain stationary or impose free-bench geometry on it.
- Extend the hips through a controllable path while the feet remain supported and the restraint stays secure. Stop at the repeatable hip-extension finish before rib flare, excessive lower-back extension, pad migration, or lost contact changes the movement.
- Lower smoothly to the selected bottom without bouncing against a mechanical stop or crashing the weight stack. Retain the same foot placement, back contact, belt or pad position, and controllable range throughout the set.
- Return the resistance to the machine's designated catch or fully resting position and verify that it is supported. Only then open the pelvic belt or pad and leave the station. Never release the restraint while it is still resisting the lift.
Regress by reducing the station load or permitted range, obtaining fitting help, or selecting another taught hip-extension implementation when the machine cannot be adjusted to a secure path. External support can simplify access without removing every trunk or positioning demand. Record the exact machine model, fixed or pivoting back-support arrangement, belt or pad setting, foot-platform position, start and finish range, displayed load or added plates, and the station-specific resistance convention. Machine displays, Smith carriages, and free-bar mass are not interchangeable load scales. Read why gym machine weights differ for the broader explanation.
Single-Leg Hip Thrusts and Per-Side Counting
Bodyweight Single-Leg Hip Thrust
This optional bench-supported version uses one working foot and no external weight. Begin after a bilateral bodyweight rehearsal is controllable. The hands provide only light contact on the secure bench edges while the working hip raises the pelvis without rolling.
- Secure a suitable rated bench on level nonslip flooring and establish comfortable upper-back support near the lower shoulder-blade region. Rehearse a bilateral bodyweight repetition first, including a controlled return to the low starting position.
- For left-leg work, keep the whole left foot planted in a repeatable position. Raise the right foot and hold the right hip and knee comfortably bent. Keep that foot off the floor during the working repetitions. The hands may touch the fixed bench edges lightly, but they must not press the body upward like a triceps dip.
- Prepare the trunk and extend the left hip to raise the pelvis. Keep the pelvis broadly level, the left knee tracking with the foot, the upper back securely supported, and the free leg quiet. Do not swing the right leg, push from the right toes, or twist the torso to finish the lift.
- Finish at controllable hip extension without rotating the pelvis or gaining height through a larger lower-back arch. Use a smaller range when necessary to preserve foot pressure, pelvic alignment, upper-back contact, and a repeatable finish.
- Lower smoothly through the same controlled range. One lift and return counts as one repetition for the left working leg. Stop before the raised foot repeatedly lands, the pelvis rolls, the torso twists, or the hands begin pushing the body through the movement.
- Settle at the low position, place both feet down, and take the stated rest. Then mirror the complete arrangement for right-leg work: keep the right foot planted, raise the left leg, and use the same support, range, counting, and finish standard.
Regress to a bilateral bodyweight hip thrust on the same secure support or use the taught bilateral floor glute bridge when balance, pelvic control, or effort makes the single-leg version unsuitable. Single-leg work is optional rather than a mandatory advancement. A B-stance or kickstand hip thrust keeps the second foot on the floor so it can contribute during the repetition. That is a different setup and performance record. Do not assign a fixed 70/30 split or another percentage of bodyweight to either leg. Progress by improving controlled repetitions and range under the same bodyweight setup. Record the working leg, planted-foot position, support height, free-leg position, range, repetitions, and actual rest after each side. This tutorial does not add external weight.
Count the original single-leg illustration by working leg
This standalone illustration uses 2 sets of 8–12 reps per working leg, 90–120 seconds after EACH side, a 2-1-1-2 tempo, and approximately 2–3 technically sound reps in reserve. It is separate from both bilateral examples and from the three-set Full Body source choice, so it is not another required block or an automatic substitution. The tempo is written as lower for two seconds, pause for one second at the bottom, lift for one second, and hold the controlled top for two seconds. The first repetition begins from the low position with the lift even though the four-part notation lists the lowering phase first. Keep the free foot raised and the free leg still; the hands provide light balance contact rather than pressing the body upward. At 10 repetitions per set, two left-leg sets provide 20 left-leg repetitions and two right-leg sets provide 20 right-leg repetitions. That produces four side-specific work bouts and 40 total working-leg repetitions. Perform one side, settle into the low position, rest 90–120 seconds, switch the complete leg arrangement, perform the other side, and rest again. Repeat until each working leg has completed two sets. The same rest applies after the final side before a following exercise. Four work bouts do not mean four isolated sets for every assisting muscle. The upper-back support, hands, trunk, and free leg still contribute. Do not halve a bilateral load, assign a bodyweight-force percentage, or silently replace the Full Body source row with this illustration. The complete workout plan determines whether this optional per-side example is used.
Common Hip Thrust Mistakes and How to Fix Them
Correct an observable change in support, pelvic contact, foot position, range, or load handling rather than treating every hard repetition as faulty. Natural spinal curvature is not automatically an error, and an intentionally shorter range remains valid when it is recorded and repeated under the same standard.
| Observed problem | Practical correction |
|---|---|
| Bench or foot support moves | Stop and secure the support before continuing. |
| Bar, belt, or pad rides toward the abdomen | Rest the resistance and refit the intended pelvic contact before the next repetition. |
| A larger back arch creates the apparent lockout | Reduce demand and finish through controlled hip extension. |
| Feet shuffle or heels lift as the set continues | Restore a repeatable whole-foot stance and reduce the load when needed. |
| Knees collapse or rotate away from the selected foot direction | Use a comfortable stance and keep knee tracking controlled without forcing maximum outward pressure. |
| Range shrinks while the load record is presented as unchanged progress | Use the same endpoints or record the shorter-range variation separately. |
| The lift bounces off the floor or the head pushes into support | Control the turnaround and keep pressure on the intended upper-back contact, not the neck. |
| The restraint opens or grip releases before the load rests | Support the resistance fully before removing the bar, opening the restraint, or exiting. |
Match the correction to the actual limitation
Hamstring cramping, front-thigh effort, lower-back effort, and surface pad pressure are different observations. Rest first, then review the support, load, foot distance, working range, and accumulated fatigue. A sensation by itself does not diagnose inactive glutes or prove that one foot position is wrong. Surface pressure may call for refitting the pad or pelvic contact, while muscular effort may reflect the selected stance, range, load, or fatigue.
Review repeated performance drops before adding exercises
When repetitions or control repeatedly decline across comparable sessions, check the actual rest taken, earlier squats, hinges, split squats, carries, or other lower-body work, the recorded setup and range, and current recovery. The guide to why reps drop between sets explains the broader fatigue factors. Restore recovery, reduce an excessive demand, or return to a repeatable setup before adding another hip-thrust variation to the workout plan. Settle the resistance immediately when the bench, restraint, grip, foot support, machine control, or planned exit fails. Sharp, worsening, or radiating pain, numbness, or unexpected weakness needs appropriate assessment rather than forced repetitions or another exercise trial.
Hip Thrust Sets, Reps, Weight, and Progression
The two rows below are alternative original examples for hip-extension work already allocated by a complete workout plan. Choose the barbell example or the bilateral one-dumbbell example. Do not combine them into five working sets or treat either row as a complete workout. The dumbbell row uses the mass of one centered weight, not a per-hand value, and neither bilateral row is doubled because both legs work.
| Exercise | Sets & Reps | Rest | Tempo | Target Muscles | Notes |
|---|---|---|---|---|---|
| Barbell Hip Thrust | 3 sets of 8–12 reps | 120–180 seconds | 2-1-1-2 | Glutes; hamstrings and other muscles assist | Use one total-bar load with the same support, range, and controlled top pause. |
| Dumbbell Hip Thrust | 2 sets of 10–15 reps | 90–150 seconds | 2-1-1-2 | Glutes; hamstrings and other muscles assist | Use one dumbbell centered at the hip crease; both legs work together. |
Start with resistance you can rehearse and exit securely
Use non-fatiguing movement rehearsal and ramp-up sets as needed, outside the working-set count. Begin with fewer working sets, less load, or bodyweight practice while learning. Select resistance that allows the lower repetition target with approximately 2–3 technically sound reps in reserve, consistent support and endpoints, the assigned pause, and a controlled finish. Do not derive the starting load from male or female standards, an assumed bar mass, a percentage of bodyweight, another machine, or another exercise. Support, restraint, grip, or load-handling failure ends the set before an effort estimate does.
Use straight sets, full rest, and the same repetition standard
Perform straight sets and take the listed rest after every working set, including the final set before another exercise when one follows. Use 120–180 seconds for the barbell example and 90–150 seconds for the one-dumbbell example. Take more recovery when needed and record the actual interval rather than shortening it to preserve a schedule. The 2-1-1-2 tempo means lower for about two seconds, pause for one second at the selected bottom, lift in about one second, and hold for two seconds at controlled hip extension. A repetition can begin from the low setup position, so the first working action is the lift even though the notation lists the lowering phase first. One lift and controlled return counts as one repetition. Positioning or removing the resistance is handling, not an additional repetition. The top pause is a repeatable hip-extension standard. It does not mean lifting higher through a larger lower-back arch, and it does not prove that the top is always the point of greatest mechanical demand.
Progress the original three-set Barbell Hip Thrust example
The progression log below applies to the original Barbell Hip Thrust example, 3 sets of 8–12 reps. Exposures A through C use the same total-bar load, support, foot placement, range, top pause, typical rest, and intended effort. Exposure D shows one possible result after an appropriate increase. These are constructed exposures, not customer data or guaranteed calendar-week results.
| Exposure | Set 1 | Set 2 | Set 3 | Decision |
|---|---|---|---|---|
| A | 10 | 9 | 8 | Keep the load and build repetitions at the same range and pause. |
| B | 12 | 12 | 11 | Keep the load; the final set has not reached 12. |
| C | 12 | 12 | 12 | Consider the smallest suitable increase only when technique, rest, and intended effort also qualify. |
| D | 9 | 8 | 8 | One possible result after an appropriate increase, not a promised outcome. |
Add technically acceptable repetitions within the selected range before increasing the resistance. In this original example, all three sets must reach 12 with comparable support, range, top pause, planned rest, and intended effort before the smallest suitable total-bar increase is considered. One qualifying exposure is the teaching rule for this example; a complete workout plan may use a different progression criterion. When the next available increase prevents the lower target, shortens the range, removes the pause, requires forced assistance, or threatens an orderly exit, return to a manageable load or use a smaller permitted increase. Record the work actually completed rather than rewriting a missed target as success. Ordinary load increases under the same setup stay in the same exercise history. A different machine, support arrangement, limb-use convention, or deliberately changed range requires a labeled comparison.
Keep one concise, comparable training record
Record the implement and unit, total-bar or single-dumbbell convention, support and foot setup, selected range, completed repetitions, actual rest, estimated effort, and the factor that ended the set. This record supports comparison within the chosen implementation; it does not create a weekly set quota or override the frequency and progression rules of the complete workout plan.
Fit Hip Thrusts Into Your Workout Plan
The Full Body Workout Plan provides the source application. In Workout C: Hypertrophy-Biased Full Body Session, the hip-extension choice is the fourth of seven rows, after the selected knee-dominant lift, Incline Dumbbell Press, and one-arm row. The extract below is one exercise choice from that session, not the full workout.
Workout C: Hypertrophy-Biased Full Body Session
| Exercise | Sets & Reps | Rest | Tempo | Target Muscles | Notes |
|---|---|---|---|---|---|
| Hip Thrust or Glute Bridge | 3 sets of 8–12 reps | 2–3 min | 2-1-1-2 | Glutes, hamstrings | Finish with hip extension without excessive lumbar movement |
The source lists Hip Thrust or Glute Bridge as one choice and does not specify barbell, machine, bodyweight, or one-dumbbell equipment. Select one controllable implementation that fits the available support, loading, range, and exit. These three sets are one slot in one Workout C occurrence, not a weekly total, the complete session, or three equal direct sets for every muscle named in the row. When starting, the Full Body guidance uses about three reps in reserve on the first working set. Its double-progression load-selection cue uses about two to three reps in reserve on the first set. Neither statement is a blanket effort target for every later set. The plan's separate later-set guidance and its warm-up, recovery, progression, and scheduling rules remain controlling. For this row, the numerical upper target is 12 repetitions on all three prescribed sets while the plan's technical and rest standards remain intact. Use the source's actual progression rule rather than importing the separate original examples from this guide.
Choose one source option and keep its three-set allocation
| Choice for the source slot | Working sets in that slot | Interpretation |
|---|---|---|
| Hip Thrust selected | 3 sets of 8–12 reps | One of the source-listed options; select a suitable implementation and load. |
| Glute Bridge selected instead | 3 sets of 8–12 reps | The other source-listed option; support, range, and load history change. |
| Both options performed | 3 + 3 = 6 working sets | Three additional sets, not an unchanged three-set slot. |
Choosing a suitable glute bridge instead of a hip thrust preserves the source's three working sets, but it changes the support, lower position, range, handling, and load record. A source-listed bridge option does not mean an unchallenging bodyweight rehearsal automatically matches a loaded thrust. Select resistance or a bodyweight variation that provides the intended work without inventing a conversion between implementations. When one dumbbell is selected for this source slot, keep 3 sets of 8–12 reps, 2–3 min rest, and 2-1-1-2. Do not replace that prescription with the separate original one-dumbbell example of 2 sets of 10–15 reps. Single-leg work also changes side counting, rest, support, and time, so it is not silently substituted into this bilateral source row. Performing the thrust and bridge options in full creates six working sets, which adds three sets rather than preserving the original slot. Keep the other six Workout C rows and all Workout A and Workout B allocations in the complete workout plan. Their exercise order, recovery, and schedule still determine how this one choice fits the wider training week.
Hip Thrust Alternatives and Home Equipment Limits
Choose an alternative for the training role or equipment problem it actually solves. A different support, implement, or joint action changes what the exercise provides, so replace the allocated task deliberately instead of treating every lower-body movement as an interchangeable hip thrust.
| Need or limitation | Useful option | What changes |
|---|---|---|
| No secure elevated support | The taught floor glute bridge. | Floor support and the lower endpoint replace bench support. |
| Bar positioning is the main obstacle | The taught one-dumbbell thrust or a suitable purpose-built machine. | Pelvic contact, handling, and the load record change. |
| A standing hip hinge is required | A suitably taught Romanian deadlift. | Standing support, grip, and hamstring demands differ. |
| Knee-dominant leg work is needed | A suitable squat, split squat, or leg press from the Leg guide. | Knee motion, support, and fatigue demands are not the hip-thrust task. |
| Direct knee-flexion work is needed | A fitted leg curl within the complete plan. | A curl is not interchangeable supported hip-extension work. |
Match the replacement to the missing setup or movement
Use the taught floor glute bridge when secure elevated upper-back support is unavailable. Bodyweight can be useful when it supplies enough demand, and one safely positioned manageable load can extend that setup. Keep its floor support, lower endpoint, and load record separate from a bench-supported thrust. There is no bodyweight-to-barbell conversion, and longer pauses or slower repetitions do not create unlimited external loading. When the bar is the handling problem rather than the supported hip-extension task, use the taught one-dumbbell hip thrust or a fitted hip-thrust machine if its access, restraint, path, and resting mechanism work for you. Select resistance directly for that implementation instead of converting a barbell number. Choose a Romanian deadlift when the plan needs a standing hip hinge with grip and hamstring demands. Choose a squat, split squat, or leg press when knee-dominant work is required, and use a fitted leg curl when direct knee flexion is the missing task. The detailed RDL and Leg guides introduced earlier supply the complete technique for those choices; the exercise names alone are not full instructions.
Respect home-equipment and loading limits
Do not prop the upper back on furniture that slides or tips, stack unsecured weights at the pelvis, attach bands to unsupported objects, balance on loose steps, or use an unstable support merely to keep the hip-thrust name. When the available floor-bridge load no longer provides suitable work, choose a safely loadable implementation or another movement that serves the planned role. The Upper Lower Workout Plan is a complete routine with conditional glute-focused substitution guidance when grip or spinal fatigue limits the planned work. A hip thrust can address that specific constraint, but it does not preserve deadlift-specific strength practice, standing load handling, or every hamstring task. Use the complete plan's exercise order, sets, repetitions, progression, and recovery rather than appending another routine or treating the substitution as universal.
Hip Thrust FAQs
What muscles do hip thrusts work?
Hip thrusts primarily train the gluteus maximus through supported hip extension. Hamstrings, adductors, quadriceps, and trunk muscles can assist with hip motion, foot pressure, and body control. Their involvement does not make the exercise complete isolation or give every assisting muscle the same direct-set credit. Hip thrusts also do not replace direct knee-flexion work such as a fitted leg curl.
How high should the bench be?
Use a rated, secure support that lets the upper back contact near the lower shoulder-blade region, permits a controlled range, and leaves a practical entry and exit. No single height fits everyone. A bench is unsuitable when the contact or pivot cannot be fitted, and it is insecure when it slides, tips, or shifts. Changing body position does not fix unstable support.
Where should the bar and pad sit?
Center the bar and suitable padding across the hip crease, not the abdomen. Keep both hands available to control rolling and keep fingers clear of pinch points. Adjust the bar or pad only while the resistance is fully supported. Persistent pressure in the wrong area is a reason to refit the contact, reduce the load, or choose another implementation.
Where should I put my feet?
Choose a comfortable foot distance, width, and toe angle that maintain whole-foot contact, controlled knee tracking, and a repeatable hip-extension finish. Approximately upright shins at the top can be explored as a fitting check, not a compulsory angle. A longer, shorter, or wider stance is judged by its effect on support, range, control, and comfort, not by a universal glute-isolation rule.
What is the difference between a hip thrust and a glute bridge?
A hip thrust uses secure elevated upper-back support, while the floor glute bridge taught here keeps the head and upper back on the floor and returns the pelvis to the floor. Either setup can use external resistance when it can be positioned and removed safely. Their support, lower endpoint, range, and load histories are different. When a workout plan lists Hip Thrust or Glute Bridge, choose one suitable option rather than automatically performing both.
Should I use a barbell, dumbbell, Smith machine, or hip-thrust machine?
Choose the version whose support, load handling, movement path, increments, and exit you can reproduce. A dumbbell hip thrust in this guide uses one weight centered at the hip crease with both hands controlling it. Smith rail direction, hooks, stops, and carriage resistance are station-specific. A purpose-built machine must fit through its actual belt or pad, back support, platform, and resting mechanism. None is universally superior.
Why do I feel my hamstrings, quads, or lower back?
Those muscles can assist with hip extension, knee position, foot pressure, and trunk control. Their effort does not prove the glutes are inactive or the repetition is automatically wrong. Recheck support, foot distance, load, range, top position, and accumulated fatigue when one area repeatedly becomes the limiter. A natural spinal curve is not itself an error, but gaining height through a progressively larger lower-back arch changes the movement.
How much weight should I hip thrust?
Begin with an unloaded or lightly loaded rehearsal, then choose resistance that preserves the assigned repetitions and effort, stable support, consistent range, controlled top pause, and secure removal. There is no universal male or female starting load, bodyweight percentage, standard bar assumption, or conversion from squats, deadlifts, dumbbells, Smith machines, or hip-thrust machines. Reduce the load when setup or handling fails before the intended work.
How many sets, reps, and sessions per week should I do?
Follow the complete workout plan that assigns the exercise. This guide's original barbell example uses 3 sets of 8–12 reps, while its original one-dumbbell example uses 2 sets of 10–15 reps; they are alternatives, not five combined sets. The separate Full Body source choice uses 3 sets of 8–12 reps for Hip Thrust or Glute Bridge in one Workout C occurrence. Single-leg work has separate per-side counting. Use established workout plans when you need the full frequency, effort, exercise order, and recovery context.
Are hip thrusts better than squats or RDLs for glute growth?
There is no universal winner. Hip thrusts provide supported hip-extension practice, squats combine knee and hip extension with different thigh and support demands, and Romanian deadlifts use a standing hinge with grip and hamstring demands. Limited training evidence supports both squats and hip thrusts as glute-training options under tested conditions, not guaranteed superiority for every lifter. Keep the movement that fits the goal, equipment, progression, and recovery already available in the workout plan.