
Beginner Gym Workout Plan: Start With Two Days
Start with two non-consecutive gym visits each week. First learn how to identify, adjust and leave the equipment under control. Then build a repeatable A/B routine, record the work you actually complete and learn when to keep, increase or reduce resistance. The twelve-week framework contains three phases, but the calendar does not decide when you are ready. Repeat a phase while setup, movement, recovery or recording still needs practice. You do not need to train to failure, test a maximum lift or move to a more complicated split to complete the learning process. This plan is for adults beginning general gym training. It uses fitted machines, manageable dumbbells and floor exercises, with specific alternatives where equipment does not fit. The goal is to leave you able to follow and adjust a suitable workout plan, not simply finish a list of sessions.
Your First Gym Visit and When to Ask for Help
Make the first visit about understanding the equipment and completing a manageable first session, not exhausting every machine. The useful outcome is being able to find the equipment used in Foundation, adjust it, begin with a light setting and return it safely.
Arrange the induction
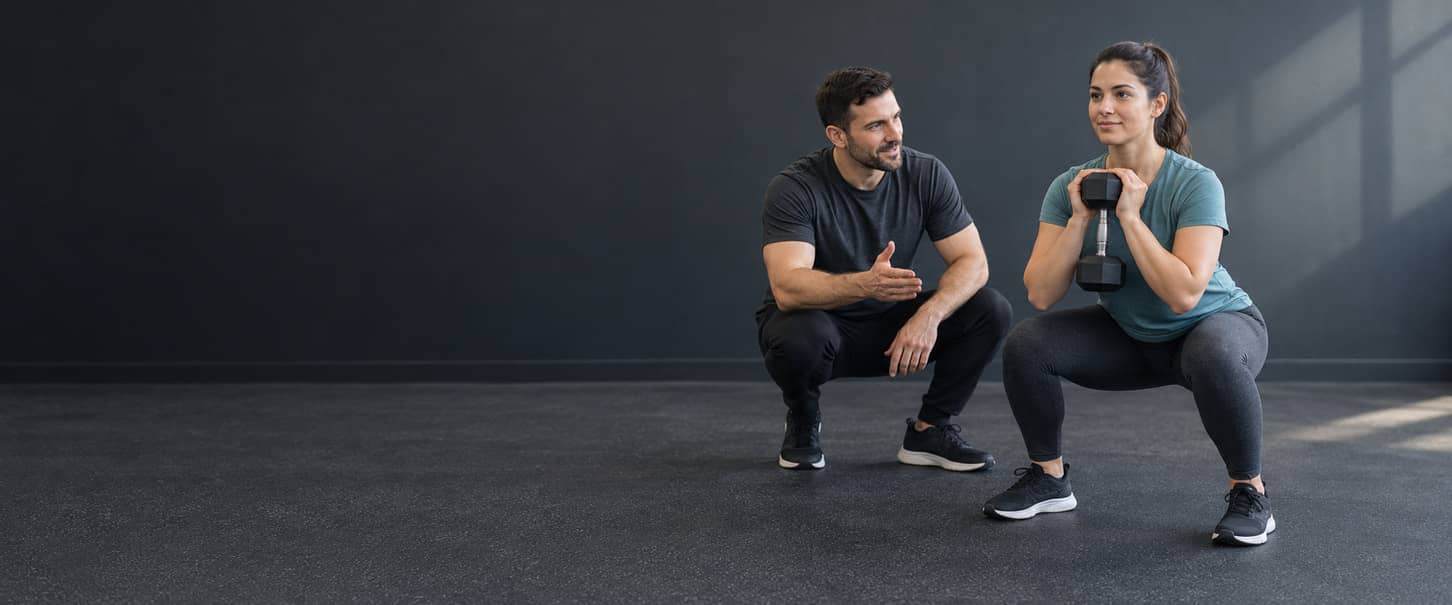
Book the gym's induction, find a qualified instructor and locate the equipment used in Foundation. Ask how to request help, share equipment, store belongings, keep walkways clear and return each item as that gym requires. Follow the facility's actual rules rather than assuming every gym works the same way, and do not try to reserve all six stations at once. Use a clear request: “I am new to resistance training. Please show me how to adjust this machine, select a light setting, start the exercise and return it safely. Then watch me repeat the setup using my notes.”
Separate equipment instruction from health advice
If you have not exercised for some time, or you have medical conditions or concerns, speak to a GP before starting. The activity should be appropriate to you. A gym induction and this guide can teach equipment use, but neither provides medical clearance. This is general adult onboarding, not rehabilitation or a pregnancy, postpartum or condition-specific prescription. Stop for concerning symptoms rather than trying another attachment or a heavier repetition. Sudden chest discomfort that persists, pain spreading beyond the chest, or chest pain with sweating, sickness, light-headedness or breathlessness warrants immediate medical help. In the UK, call 999; elsewhere, use the local emergency number. Do not delay help to finish the session or complete your notes.
Demonstrate the setup back
After the instructor demonstrates the equipment, repeat the setup yourself while they watch. Use your own notes and explain what you are doing so you can reproduce the task at the next visit.
- Identify the adjustment controls.
- Change the settings only while the resistance rests.
- Demonstrate the entry and secure return.
- Record the settings in words you can use next time.
Questions and notes remain useful after you can set up independently. Watching an instructor once does not show that you can reproduce the task without guidance. Keep preparation separate from the Foundation work assigned later. Do not turn the induction into a second hidden workout.
Recognise the Equipment and Record Its Settings
Recognise the equipment before selecting the largest displayed number. A machine name is only a starting clue: the seat, pads, supports and movement path must fit the exercise being taught.
| Equipment | How to recognise the required setup | What to record or confirm |
|---|---|---|
| Leg press | A supported seat/backrest and intended footplate | Machine identity, seat, usable range and actual release/resting procedure |
| Machine chest press | A back-supported pressing seat with reachable handles | Seat, handles, starting position, resistance label and controlled exit |
| Chest-supported machine row | A pad contacting the chest while the handles are pulled | Seat, chest-pad setting, grip and reachable start |
| Seated leg curl | A thigh restraint and moving roller behind the lower legs | Seat, knee/pivot fit, thigh restraint, roller and starting range |
| Seated calf-raise machine | A seat, intended forefoot support and pads on the lower thighs | Foot position, pad setting, release/resting procedure and ankle range |
| Lat-pulldown station | Overhead attachment, fitted seat and intended thigh restraint | Grip, seat, thigh restraint and reachable attachment |
| Dumbbells and floor area | Secure retained weights and clear, nonslip working space | Weight per dumbbell, permitted grip, pickup/set-down route and floor space |
A seat is not chest support, and a high cable outlet without a fitted seat and thigh restraint is not the seated pulldown station taught in this plan. A seated leg curl has a thigh restraint and a moving roller behind the lower legs; do not confuse it with an extension pad in front of the shins. Record the actual machine identity and displayed units. A setting from another machine is not an equivalent resistance. Read why gym machine weights differ for the fuller explanation; do not halve every cable display or convert a stack reading into a dumbbell prescription. Keep the record practical: machine name or identifying location, seat and pad numbers, handle choice and usable endpoints. Change settings only while the resistance rests. Do not use an unapproved support or assume an empty sled is light enough. Use the controls and instructions on the actual machine, with help from the gym instructor when needed.
Three Learning Phases Across a Twelve-Week Framework
Train on two non-consecutive days each week throughout all three phases. Complete the Foundation session on both weekly visits during Phase 1. In Phases 2 and 3, alternate Session A and Session B while preserving their order across weeks. There is no automatic third training day.
| Phase | Illustrative teaching window | Weekly sessions | Main task |
|---|---|---|---|
| 1: Orientation | Weeks 1–2 | Foundation twice | Recognise equipment, reproduce settings and record learning sets |
| 2: Build a routine | Weeks 3–6 | Session A, then Session B | Maintain the routine, learn pulldown and hinge handling, and select appropriate resistance |
| 3: Independent progression | Weeks 7–12 | Session A, then Session B | Manage the full prescribed sets, review the log and make justified next-session decisions |
Monday and Thursday are example days, not mandatory weekdays. Keep at least one full non-lifting day between the sessions and allow additional recovery when needed. Moving the days must not create consecutive full sessions or a catch-up double workout. The twelve-week framework provides a place to organise learning and review. It does not guarantee competence, a body-composition result or a required switch on day 85. Repeat the current phase while its setup, execution, logging or recovery checks are not met. The detailed advancement checks appear beside the relevant sessions rather than only in this overview. Keep independence realistic. Use your notes, read the machine instructions and request help when a new apparatus or symptom warrants it. Independence is not a ban on asking questions. Use this programme's own sessions, rest guidance and advancement checks. A similar weekly frequency in another plan does not make its schedule, two-day adaptation or training rules interchangeable with this one.
Warm Up and Find a Manageable Starting Weight
A repetition is one complete controlled movement and return. A set is the assigned group of repetitions, and rest is the recovery period before more work. A rehearsal is preparation. A resistance setting is the actual load or apparatus setting used. A prescribed Phase 1 learning set still counts as performed work. Do not follow it with another unannounced “real” set.
Prepare without turning the warm-up into another workout
- Begin with approximately five to eight minutes of easy walking or cycling when suitable. This is a practical preparation option, not a mandatory fitness test.
- Before an unfamiliar exercise, learn its adjustment and return procedure with the resistance resting.
- Use a light rehearsal of approximately four to six controlled repetitions. An unloaded sled or the lowest machine setting is not automatically light enough.
- Rest, then perform the prescribed set at a setting expected to leave the phase's effort margin.
- Stop early when movement or handling changes. Record an incomplete set honestly; do not add forced repetitions to reach the printed target.
- When uncertain, use a more manageable setting and ask for instruction instead of conducting repeated exhausting load-finding attempts.
Later familiar exercises may need only an appropriate brief rehearsal. This procedure is not six exhausting trials for every machine. Add preparation according to the actual task and recovery, and do not count it twice.
Learn effort without failure testing
Reps in reserve is an estimate of how many additional repetitions you could complete with the same intended quality. Repetitions achieved by shortening the range, heaving or losing support are not the target standard. Use the estimate alongside the observed movement, secure handling and actual completed repetitions. It is not a direct measurement or a test to prove by failing. Phase 1 is deliberately easy and ordinarily leaves at least four further controlled repetitions. Phase 2 aims for approximately three to four, and Phase 3 approximately two to three. Dead bugs use reach, breathing and trunk control rather than a forced RIR estimate. No sex-specific starting weight, one-repetition-maximum percentage or universal pin setting is required.
Read rest and tempo before starting
Use the session's listed rest between sets and as a starting recovery allowance before the next exercise. Extend recovery when necessary and record the interval actually used. Repeated inability to reproduce the task requires reviewing the load, preceding work or setup. Do not cut rest to fit an unmeasured session-duration promise. A four-number tempo lists the controlled lowering phase, lower-endpoint pause, lifting phase and upper-endpoint pause. The row, pulldown and leg curl begin with a pull or curl and return during their controlled lowering phase. A standing squat or Romanian deadlift starts by lowering. Seated calf raises lower and lift the heels. A chest press follows its controlled return and press. A zero pause means no deliberately timed pause, not a bounce. Dead bugs use a two-second reach, one-second pause and two-second return. A floor bridge starts by lifting even though its notation still lists lowering first. These timed phases are repeatability cues for this workout plan, not proof of an optimal biological tempo. Ask the instructor to demonstrate the phases when a machine's starting position makes the notation unclear.
Phase 1: Learn the Foundation Session
Perform Foundation on two non-consecutive days. Read each selected tutorial before the first learning set; exercise names in the table link to the corresponding local tutorial. Keep the work deliberately easy, ordinarily with at least four additional technically controlled repetitions available. These are prescribed learning sets, not a warm-up followed by another undisclosed workout. Complete one allocated set per row, with the required rest and secure handling.
| Exercise | Sets & Reps | Rest | Tempo | Target Muscles | Notes |
|---|---|---|---|---|---|
| Leg Press | 1 set of 8 reps | 120 sec | 3-1-1-0 | Quadriceps, glutes, adductors | Reproduce support, foot position and a controlled lower endpoint |
| Machine Chest Press | 1 set of 8 reps | 120 sec | 2-1-1-0 | Chest, anterior delts, triceps | Retain back support and demonstrate the exit |
| Chest-Supported Machine Row | 1 set of 8 reps | 120 sec | 2-1-1-1 | Upper back, lats, elbow flexors | Keep chest contact and control the forward return |
| Seated Leg Curl | 1 set of 10 reps | 90 sec | 2-1-1-1 | Hamstrings | Secure the thighs; the roller contacts the backs of the lower legs |
| Seated Calf Raise | 1 set of 10 reps | 90 sec | 2-1-1-1 | Calf muscles | Keep forefoot support and learn the resting procedure |
| Dead Bug | 1 set of 4 reps per side | 60 sec after the complete set | 2 sec reach, 1 sec pause, 2 sec return | Trunk-control muscles | Alternate sides inside one set; shorten the reach before control changes |
Learning task: reproduce the setup
Before the second visit, use the previous notes to identify the same equipment and settings. Ask the instructor to check uncertain adjustments rather than relying on memory or appearance. Record the actual load and repetitions, including a stopped or incomplete set.
When to move to Phase 2
Advance when two consecutive Foundation visits show that you can reproduce the selected setups using notes, complete the prescribed controlled repetitions, return the equipment securely and record actual performance. Recovery must permit normal movement and the next planned visit. These practical learning criteria are not a clinical screening test, an exact RIR exam or a requirement to avoid all mild soreness. The calendar does not override these checks. Repeat Foundation or seek instruction when an exercise still cannot be performed or exited securely. Use a taught fitting alternative rather than force an unsuitable machine; keep the choice and the limits of the substitution visible. Six prescribed sets per visit make twelve across a two-visit week. They are not twelve isolated sets for every muscle. Four alternating dead-bug repetitions per side form one set containing eight individual reach-and-return repetitions, followed by the listed rest.
Phase 2: Build a Repeatable A/B Routine
Alternate Session A and Session B on the two weekly non-consecutive visits. Use approximately three to four technically controlled repetitions in reserve, with the same secure handling and actual rest. Introduce the pulldown and dumbbell RDL with instruction and light rehearsal before their first prescribed sets.
Session A
| Exercise | Sets & Reps | Rest | Tempo | Target Muscles | Notes |
|---|---|---|---|---|---|
| Leg Press | 2 sets of 8–12 reps | 120 sec | 3-1-1-0 | Quadriceps, glutes, adductors | Preserve the Phase 1 setup |
| Machine Chest Press | 2 sets of 8–12 reps | 120 sec | 2-1-1-0 | Chest, anterior delts, triceps | Complete both sets without losing support |
| Chest-Supported Machine Row | 2 sets of 8–12 reps | 120 sec | 2-1-1-1 | Upper back, lats, elbow flexors | Retain chest contact and the selected grip |
| Seated Leg Curl | 1 set of 10–15 reps | 90 sec | 2-1-1-1 | Hamstrings | Keep the restraint and roller settings repeatable |
| Seated Calf Raise | 1 set of 10–15 reps | 90 sec | 2-1-1-1 | Calf muscles | Avoid bouncing or changing knee position |
| Dead Bug | 1 set of 4–6 reps per side | 60 sec after the complete set | 2 sec reach, 1 sec pause, 2 sec return | Trunk-control muscles | Alternate sides with the same reach |
Session B
| Exercise | Sets & Reps | Rest | Tempo | Target Muscles | Notes |
|---|---|---|---|---|---|
| Leg Press | 2 sets of 8–12 reps | 120 sec | 3-1-1-0 | Quadriceps, glutes, adductors | Use the same fitted machine when practical |
| Machine Chest Press | 2 sets of 8–12 reps | 120 sec | 2-1-1-0 | Chest, anterior delts, triceps | Retain the chosen support and range |
| Lat Pulldown | 2 sets of 8–12 reps | 120 sec | 2-1-1-1 | Lats, upper back, elbow flexors | Use the fitted seat and thigh restraint |
| Dumbbell Romanian Deadlift | 1 set of 8–12 reps | 120 sec | 3-1-1-0 | Hamstrings, glutes, spinal erectors | Rehearse pickup and set-down; record weight per dumbbell |
| Seated Calf Raise | 1 set of 10–15 reps | 90 sec | 2-1-1-1 | Calf muscles | Retain foot support and controlled ankle range |
| Dead Bug | 1 set of 4–6 reps per side | 60 sec after the complete set | 2 sec reach, 1 sec pause, 2 sec return | Trunk-control muscles | One complete set includes both alternating sides |
Each session contains nine prescribed sets. One A plus one B gives eighteen exercise-set allocations, not eighteen equivalent sets for each muscle. The first three exercises use two sets; the final three each use one. Never quietly add Phase 3's second accessory sets here.
Learning task: make the next decision
Select a manageable setting using the previous record, distinguish preparation from prescribed work, and write a reasoned next-session decision after training. Keep the same apparatus and setup where possible. A different machine needs a new manageable baseline, not the copied display of its neighbour.
When to move to Phase 3
Advance after at least two complete A/B cycles with the assigned lower repetition boundaries met, controlled handling, usable records and adequate recovery. You should be able to explain why a setting should be retained or changed without relying on the date alone. Do not require a load increase to pass: keeping the right load is a successful decision. A taught substitution remains labelled. A floor bridge in the RDL slot does not certify a loaded standing hinge; record that skill as not yet learned. Additional work for skipped equipment does not appear later as a hidden finisher.
Phase 3: Train and Review the Plan Independently
The frequency remains two days. Phase 3 adds one set to each of the final three exercises rather than adding visits or exercise varieties. Use approximately two to three technically controlled repetitions in reserve; retain dead-bug control-based stopping instead of a fabricated RIR value. On entering this phase, retain manageable loads and work near the lower end of the repetition ranges. Do not simultaneously add sets and increase every load. The new set allocation is a new comparison: one-set qualifications from Phase 2 are not proof of two-set readiness at a heavier load.
Session A
| Exercise | Sets & Reps | Rest | Tempo | Target Muscles | Notes |
|---|---|---|---|---|---|
| Leg Press | 2 sets of 8–12 reps | 120 sec | 3-1-1-0 | Quadriceps, glutes, adductors | Compare the same support and depth |
| Machine Chest Press | 2 sets of 8–12 reps | 120 sec | 2-1-1-0 | Chest, anterior delts, triceps | Use the progression rules for both sets |
| Chest-Supported Machine Row | 2 sets of 8–12 reps | 120 sec | 2-1-1-1 | Upper back, lats, elbow flexors | Retain chest contact and controlled return |
| Seated Leg Curl | 2 sets of 10–15 reps | 90 sec | 2-1-1-1 | Hamstrings | The second set is new work, not a warm-up |
| Seated Calf Raise | 2 sets of 10–15 reps | 90 sec | 2-1-1-1 | Calf muscles | Keep the same ankle range and knee position |
| Dead Bug | 2 sets of 4–6 reps per side | 60 sec between complete sets | 2 sec reach, 1 sec pause, 2 sec return | Trunk-control muscles | Each complete set includes both sides |
Session B
| Exercise | Sets & Reps | Rest | Tempo | Target Muscles | Notes |
|---|---|---|---|---|---|
| Leg Press | 2 sets of 8–12 reps | 120 sec | 3-1-1-0 | Quadriceps, glutes, adductors | Retain the selected machine and range |
| Machine Chest Press | 2 sets of 8–12 reps | 120 sec | 2-1-1-0 | Chest, anterior delts, triceps | Keep support and handling repeatable |
| Lat Pulldown | 2 sets of 8–12 reps | 120 sec | 2-1-1-1 | Lats, upper back, elbow flexors | Preserve grip, restraint and return |
| Dumbbell Romanian Deadlift | 2 sets of 8–12 reps | 120 sec | 3-1-1-0 | Hamstrings, glutes, spinal erectors | Retain the standing start and controlled hinge endpoint |
| Seated Calf Raise | 2 sets of 10–15 reps | 90 sec | 2-1-1-1 | Calf muscles | Keep the same machine configuration |
| Dead Bug | 2 sets of 4–6 reps per side | 60 sec between complete sets | 2 sec reach, 1 sec pause, 2 sec return | Trunk-control muscles | Count complete sets, not separate left and right sets |
Each session contains twelve prescribed sets; the two-day week contains twenty-four exercise-set allocations. These are mixed exercise tasks, not twenty-four identical muscle-specific sets. At six dead-bug repetitions per side, two complete sets give twelve repetitions per side and twenty-four individual reach-and-return repetitions overall. They remain two sets and two work bouts, not four. Each complete alternating set ends before the sixty-second recovery interval begins.
Learning task: review rather than merely attend
Use two recent complete A/B cycles to check independent setup, suitable effort, honest logging, justified progression and recovery. Identify any exercises that still need instruction. Keep the normal record and use help for unfamiliar controls or uncertain handling; that does not invalidate progress.
Complete the learning process, not a compulsory graduation
Completion does not certify barbell squat, bench-press or conventional-deadlift technique. Continue this two-day plan when it still fits and progresses, or choose the next plan using its own requirements. Do not infer readiness or promised physical results from having reached week twelve.
Learn the Five Supported Machine Exercises
These five supported-machine instructions are used in Foundation and the later sessions. Machine-specific adjustment, support and exit still need instruction; a guided path does not remove the need to learn technique. Seat numbers, catches and release controls differ between machines.
Leg Press
Use a fitted leg-press station with a supported seat and backrest, an intended footplate and model-specific controls. Learn how this particular machine starts and rests before selecting working resistance.
- With the resistance secured, ask for the actual adjustment and release procedure. Set the seat, permitted stops and manageable resistance.
- Sit with the pelvis and back supported. Put both whole feet on the intended footplate.
- Take the resistance using the demonstrated procedure. Do not assume an empty sled is easy or force the knees backwards.
- Bend the knees and hips to lower through a range that preserves foot contact and pelvic support.
- Press along the machine's path without bouncing or pushing on the knees with the hands.
- Engage the supports or settle the resistance as that machine requires. Confirm it is supported before leaving.
Reduce resistance or the permitted range when control fails. Record the machine, settings, foot position and range. Use the leg exercise selection guide for broader lower-body choices, not as a reason to add every alternative to this session.
Machine Chest Press
Use a back-supported chest-press machine whose handles can be reached around chest level without losing support. Seat settings, starting positions and assisted-entry controls differ between machines.
- Adjust the seat, permitted starting position and resistance while the load rests.
- Learn any provided assisted-entry control. Do not invent a release-pedal procedure.
- Sit with feet, pelvis and back supported. Take full comfortable grips.
- Press and return along the fitted path without lifting from the pad, repeatedly driving through the legs or forcing the handles farther back.
- Settle the resistance and use the demonstrated exit procedure before changing settings.
Record the exact machine, seat, grip and endpoints. A different chest-press machine needs its own starting baseline. The chest exercise selection guide explains wider pressing choices; retain one suitable option for the allocated work.
Chest-Supported Machine Row
A chest-supported machine row has actual chest-pad contact while the handles are pulled. A seat alone does not make another rowing station chest-supported.
- Adjust the seat, chest pad, handles and resistance with the load resting.
- Establish chest contact, supported feet and a reachable starting grip without restricting breathing.
- Bend the elbows and move the upper arms back while keeping chest contact.
- Return the handles under control as the elbows straighten and the shoulder blades move naturally.
- Settle the resistance before releasing the handles or leaving.
Reduce the load or refit the station when repeated pad separation replaces the pull. Do not force a maximal shoulder-blade squeeze. The back exercise selection guide compares other support and pulling arrangements.
Seated Leg Curl
A seated leg curl bends the knees against a moving lower-leg roller while a separate restraint holds the thighs. The moving roller belongs behind the lower legs; a pad on the fronts of the shins describes a different task.
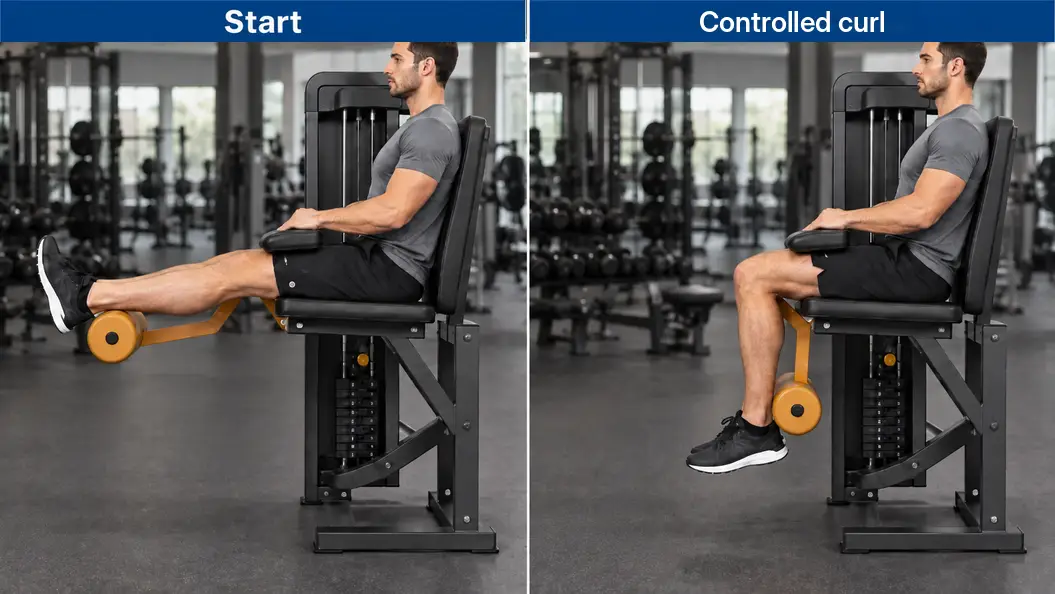
- Adjust the seat and backrest so the knees fit the intended pivot and the torso is supported.
- Position the moving roller against the backs of the lower legs above the heels, not the fronts of the shins.
- Secure the stationary thigh restraint and establish a manageable starting angle.
- Bend both knees smoothly while keeping the thighs and pelvis supported.
- Return towards the selected straighter-knee position without kicking, lifting from the seat or crashing the stack.
- Settle the resistance and release the restraint as designed before exiting.
Retain the same seat, restraint, roller and range when comparing results. Refit or use less resistance when the hips lift or the return cannot be controlled. Do not turn this knee-bending exercise into a leg extension.
Seated Calf Raise
Use a purpose-built seated calf-raise machine with intended forefoot support and pads on the lower thighs. Learn its release and resting controls before starting.
- Fit the seat and pads with the resistance resting. Keep pressure off the kneecaps.
- Place both forefeet securely and learn the actual release and resting procedure.
- Lower the heels through a comfortable ankle range while retaining support.
- Raise the heels without bouncing, lifting the hips or changing knee position to move the pads.
- Engage the support or settle the load before removing the legs.
Record the machine, pads, foot position and ankle range. Do not balance loose weights across the knees. Use a manageable load that permits the same controlled lowering and raising.
Learn the Pulldown, Dumbbell Hinge and Dead Bug
The pulldown, standing dumbbell hinge and dead bug teach different skills. The first two enter the A/B routine with their own setup and handling practice; the dead bug remains the same alternating within-set trunk-control task. Learn the exercise before trying to progress it.
Lat Pulldown
A lat pulldown uses a fitted overhead station with a seat and intended thigh restraint. The restraint and reachable attachment are part of this implementation, not optional details supplied by any high cable.
- With the stack resting, select a compatible handle and manageable resistance. Adjust the seat and thigh restraint.
- Learn how to reach the attachment and sit down without jumping, climbing or being dragged upwards.
- Establish supported thighs, stable feet and a comfortable grip and starting reach.
- Pull towards a controlled upper-front-torso endpoint as the elbows bend. Do not pull behind the neck or create the finish through a growing backward swing.
- Return the arms upwards under control, retaining the seat and restraint arrangement.
- Settle the resistance through the demonstrated return procedure before releasing the attachment and leaving.
Use the lat-pulldown technique guide for deeper grip and station comparisons. Record the actual handle, seat, restraint and range. Reduce resistance when the body lifts, the torso swings or the attachment cannot be returned securely.
Dumbbell Romanian Deadlift
This is a standing-start hip hinge with one securely retained dumbbell in each hand. The initial pickup establishes the standing start, and the final set-down ends the handling sequence; neither is an extra working repetition.
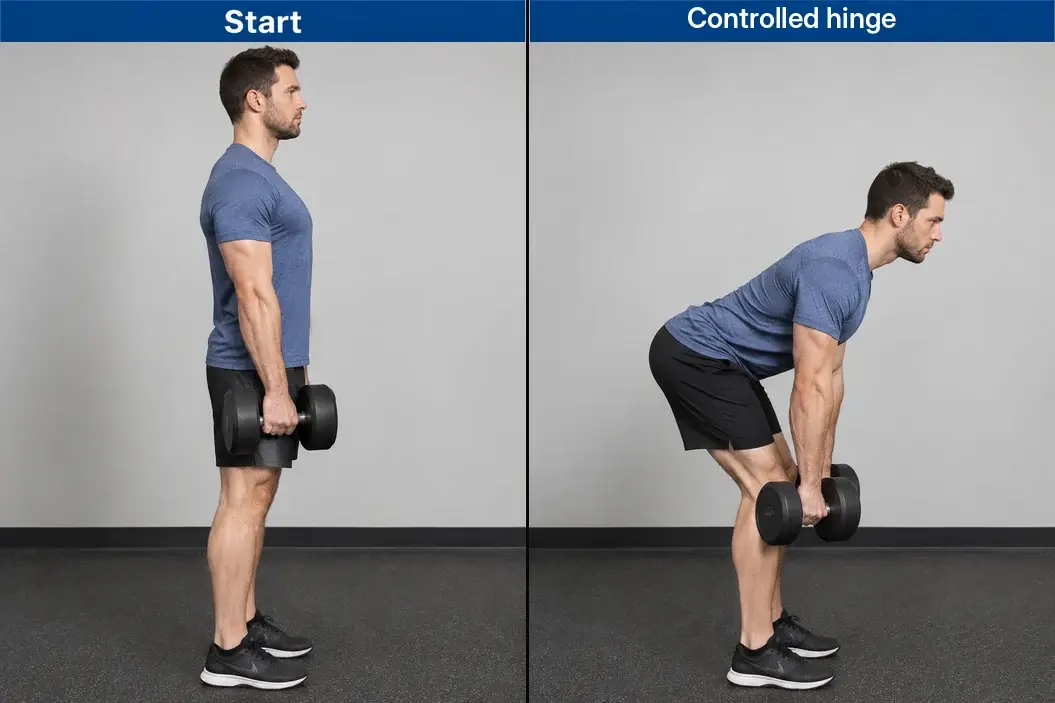
- Inspect both weights and rehearse a suitable pickup and set-down route. Use manageable weights or intended stable supports; a difficult floor pickup is not part of every working repetition.
- Stand with whole-foot contact, long arms and a small knee bend.
- Move the hips backwards while the torso inclines and the dumbbells remain close to the legs.
- Stop before extra depth requires lost balance, substantially more knee bend or a changed trunk position.
- Extend the hips to stand without leaning backwards or shrugging.
- Finish while both weights can still be returned securely. The initial pickup and final set-down are handling, not additional working repetitions.
Record weight per dumbbell, the usable range and handling route. Use the Romanian deadlift technique guide for further hinge and equipment detail. The floor is not a required endpoint; reduce resistance or range when the selected position cannot be maintained.
Dead Bug
Use a stable floor or mat for a short opposite-arm-and-leg reach. Alternate the two sides within each complete set, keeping a repeatable reach rather than reaching as far as possible.
- Lie on your back with the head, trunk and pelvis supported. Lift both feet, keeping the knees comfortably bent above the hips, and raise the arms towards the ceiling above the shoulders.
- Establish a ribcage and pelvic relationship that permits normal breathing.
- Reach one arm and the opposite leg away only as far as that relationship remains controlled.
- Return the pair, then alternate to the other pair.
- Continue until each side reaches its assigned repetitions, then rest. Shorten the reach or stop when breathing, pelvic control or the intended movement changes.
One set contains the alternating work on both sides. Do not turn two prescribed complete sets into two sets for each separately performed side. The ab exercise selection guide compares other trunk tasks. A shorter repeatable reach is preferable to gaining distance through a changed trunk position.
Make a Suitable Substitution Without Adding Work
Choose a taught alternative only when its equipment, handling and task fit. Replace the allocated exercise rather than performing both versions for the full prescription. Retain the current phase's set count, repetition target and rest unless the stated exception explicitly changes a field.
| Allocated exercise | Taught alternative | What stays | What changes |
|---|---|---|---|
| Leg Press | Goblet Squat | Current phase's sets, repetitions and rest | Support, holding demand, load record and squat implementation |
| Machine Chest Press | Hands-Elevated Push-Up | Current phase's sets, repetitions and rest | Bodyweight lever, fixed support height and resistance |
| Chest-Supported Machine Row | Seated Cable Row | Current phase's bilateral row allocation | Chest support is removed; station and load baseline change |
| Seated Leg Curl | Lying Leg Curl | Current phase's knee-flexion allocation | Hip position, pads, machine fitting and load baseline |
| Seated Calf Raise | Supported Standing Floor Calf Raise | Current phase's sets, repetitions and rest | Knee position, ankle range and available loading |
| Dumbbell Romanian Deadlift | Bodyweight Floor Glute Bridge | Current phase's allocated sets, repetitions and rest for that slot | A different supported hip-extension task; use 2-1-1-1, not the RDL tempo |
The bridge is not proof that you have learned a loaded standing hinge. The standing calf alternative is not identical to seated work. Every substitution needs its own manageable starting baseline. Keep the original row's tempo for the first five replacements; the bridge explicitly uses 2-1-1-1 instead of the RDL's 3-1-1-0. The six alternatives below are complete instructions, not six extra exercises. The primary exercise links in the table identify the allocated work; each alternative link leads to its actual local tutorial.
Goblet Squat
Use one manageable dumbbell in a secure manufacturer-permitted goblet hold near the chest. This is an unsupported standing squat, not a leg press with the same resistance number.
- Select one dumbbell with a secure, permitted goblet grip and a controllable pickup and set-down.
- Hold it near the chest and establish comfortable feet and whole-foot contact.
- Bend the knees and hips together, allowing the knees to follow the feet.
- Reverse at a depth that preserves balance and control, then stand without bouncing or leaning backwards.
- Return the weight securely. Use the same squat without a dumbbell as a bodyweight rehearsal when appropriate; record that change rather than counting both versions as prescribed sets.
Keep the allocated leg-press set count, repetition target, rest and 3-1-1-0 tempo when selecting this replacement. Record the single dumbbell and repeatable depth. The hold may limit the exercise before the legs; seek a suitable alternative rather than adding unstable loading.
Hands-Elevated Push-Up
Place the hands on a fixed, rated gym support and keep the feet on a stable floor. Raising the hand support changes the bodyweight lever and can make the pressing task more manageable.
- Use a fixed, rated gym support that will not move. Set hands comfortably and establish a body line with stable feet.
- Lower the chest and trunk together with a comfortable elbow path.
- Press back while allowing normal shoulder-blade movement, without hip sag or neck reach.
- Return to supported rest. Use a higher fixed support when necessary and record its height; do not use unstable furniture or loose weights.
Keep the allocated chest-press sets, repetitions, rest and 2-1-1-0 tempo. Record support height and foot position instead of inventing an equivalent machine load. Change one support variable at a time and keep the exit controlled.
Seated Cable Row
Use an intended low-cable rowing station with a stable seat and foot supports. Unlike the primary machine row, this version has no chest pad and still requires active torso control.
- Use an intended seated rowing station with foot supports. Fit the handle and resistance while the stack rests.
- Sit with stable feet, comfortably bent knees and a controlled forward reach.
- Row and return while retaining the selected torso angle and allowing normal shoulder-blade motion.
- Settle the stack before releasing the handle. Do not improvise foot bracing against a weight stack or turn the set into repeated rocking.
Keep the allocated bilateral row sets, repetition target, rest and 2-1-1-1 tempo. Record the new station, handle and settings and select resistance by rehearsal. Removing chest support is a real change, not a reason to copy the old display.
Lying Leg Curl
Use a purpose-built prone leg-curl machine. Both knees bend against the roller while the torso and pelvis remain supported; this is not a loose-dumbbell leg curl.
- Fit a purpose-built prone curl station with the resistance resting.
- Align the knees as intended and position the roller behind the lower legs above the heels.
- Keep the torso and pelvis supported while bending both knees.
- Return through the same controlled arc without lifting the hips or crashing the stack.
- Settle the resistance before leaving or adjusting the machine. Do not trap a loose dumbbell between the feet.
Keep the allocated knee-flexion set count, repetitions, rest and 2-1-1-1 tempo. Rehearse a new load and record the changed hip position, pad fit and range. A lying curl is a different implementation, not a matched seated-curl load.
Supported Standing Floor Calf Raise
Use bodyweight on a level nonslip floor with light contact on an intended fixed hand support. This floor-range, straighter-knee version differs from the seated machine task.
- Stand on a level nonslip floor with both feet supported and light contact on an intended fixed hand support.
- Raise both heels while keeping a broadly stable knee position and upright balance.
- Lower both heels to the floor without bouncing or pulling the body upwards with the arms.
- Finish standing securely. Record this bodyweight, floor-range version; seek a suitably loaded alternative when it no longer provides the intended challenge.
Keep the allocated calf-raise sets, repetitions, rest and 2-1-1-1 tempo. Do not add an improvised platform or unsecured load to prolong this option. Record the different knee position and ankle range rather than claiming equivalence to seated work.
Bodyweight Floor Glute Bridge
Keep the head and upper back on the floor and lift the pelvis through a controlled hip-extension task. This is a temporary supported alternative for the allocated RDL slot, not a demonstration of standing hinge competence.
- Lie on a stable mat with head and upper back supported, knees bent and both feet flat.
- Lift the pelvis through controlled hip extension without pushing weight onto the neck.
- Stop before extra height requires a larger lower-back arch, then lower the pelvis steadily.
- Settle on the floor and leave the position under control. Record foot position and range; do not add unsecured weights.
Keep the allocated RDL sets, repetitions and rest, but use the stated bridge tempo of 2-1-1-1: controlled lowering, lower pause, lift and top pause. Starting on the floor means the first working movement is a lift. This replacement does not establish RDL technique or equal hamstring loading.
An unavailable pulldown or repeated equipment gap
When appropriate, the already taught row can temporarily replace the unavailable pulldown allocation with the same current-phase set count, repetition target, rest and 2-1-1-1 tempo, but it changes the pulling task. Do not invent a restraint-free version of the fitted pulldown. Keep the vertical-pull skill marked as not yet learned. Use the cable exercise library to understand outlet, attachment and support differences, not to substitute an arbitrary cable exercise without a defined allocation. Repeated equipment gaps require a better-fitting plan or individual help, not endless invisible substitutions. Keep work already completed in the log. For example, one completed set before changing equipment remains one completed set; the change does not restore the entire allocation as extra work. Establish a manageable baseline for the remaining work and do not count the altered exposure towards unchanged-setup progression qualification.
Decide Whether to Keep, Increase or Reduce the Weight
Apply progression to each exercise separately. A larger displayed number is useful only when the assigned repetitions, setup, range, rest, effort margin and secure handling remain comparable. During Phases 2 and 3, increase resistance only after every prescribed set reaches the upper repetition boundary on two comparable exposures, with the phase's effort margin and the same execution standard retained. This is this programme's conservative learning rule, not a universal research threshold. One-set exercises in Phase 2 qualify against their one assigned set; two-set exercises must qualify both sets. A new phase, exercise, machine, support arrangement or substantial range change starts a new comparison. Do not carry a one-set qualification into a newly prescribed two-set task. Phase 1 uses its fixed learning targets and deliberately easy loads rather than an extra load-testing programme.
A worked Machine Chest Press log
The following hypothetical log belongs to Phase 3 Session A Machine Chest Press, prescribed for two sets of 8–12 with 120 sec rest and 2-1-1-0 tempo. Exposures A to D use the same manageable load, machine, settings, range, intended effort and comparable rest. E is one possible result after a suitable increase.
| Exposure | Set 1 | Set 2 | Decision |
|---|---|---|---|
| A | 8 | 8 | Retain the load and build controlled repetitions |
| B | 10 | 9 | Retain the load |
| C | 12 | 12 | First qualifying exposure; retain and confirm |
| D | 12 | 12 | Second comparable qualification; consider the smallest suitable increase |
| E | 9 | 8 | Possible result after the increase; rebuild within the range |
These are hypothetical results, not a promised timetable or client record. A result of 12/11 does not qualify; the first 12/12 exposure confirms one success, not two. Consider the smallest practical permitted increase only after the second comparable qualification. No universal kilogram increment is imposed on every implement.
When the result falls short
A final-set result below the lower boundary is still performed work and must be logged. Review recovery and execution. An isolated late miss can be repeated; an early miss, persistent shortfall or unstable handling calls for a more manageable load or setup. Do not erase the attempted set or add forced repetitions to reach the printed number. Stop first when a secure return becomes uncertain. For bodyweight alternatives, change only one defined lever, support or range variable at a time. For dead bugs, build the assigned repetitions with a stable reach, then consider a modest controllable reach change with a new baseline rather than adding weight or forcing a breath hold. Do not use endless repetitions outside the programme to disguise an inadequate loading option.
Keep a Log You Can Use at the Next Visit
Keep planned work next to what actually happened. The record must help you reproduce the setup and make the next decision, not merely mark a visit as completed. A notebook or an ordinary digital note is sufficient; no new app, account or printable download is required.
| Field | Record |
|---|---|
| Date | The actual training date |
| Phase and session | Foundation, Phase 2 A/B or Phase 3 A/B |
| Exercise | The version actually performed |
| Equipment | Machine identity or dumbbells used |
| Setup | Relevant seat, pad, grip, support and range |
| Planned work | Sets, repetition range, rest and tempo |
| Resistance | Displayed setting and units, or weight per dumbbell |
| Actual sets | Completed repetitions in each set; dead-bug sides separately |
| Execution and recovery | Actual rest, estimated effort and stopping reason |
| Next decision | Keep, increase, reduce, seek help or review the setup |
Record an incomplete set honestly
Use this worked example: Phase 3 A, Machine Chest Press. Planned: two sets of 8–12. Actual: eight and seven repetitions, with 120 seconds between sets. The second set ended because another repetition would require changing the movement. Record two performed sets and fifteen completed repetitions, not sixteen. Retain or adjust the next load according to the progression rules; do not increase it. Planned repetitions are not completed repetitions. An unattempted set is not a zero-repetition attempt and should be labelled as not performed. Preparation remains distinct; a stopped learning or working set that actually occurred remains in the record. Use the guide to counting workout sets for wider counting conventions. For this plan, retain the stated bilateral and alternating-dead-bug units rather than inventing fixed fractional credit for every assisting muscle.
Learning task: plan the next visit from the record
Before training again, identify the exact exercise, equipment, intended first setting and reason for that decision from the previous entry. Copy these fields into your notebook or digital notes: date; phase/session; exercise/version; equipment/settings; planned work; resistance/unit; actual set results; actual rest; effort/control notes; next decision.
Manage Soreness, Recovery and Everyday Activity
Unfamiliar training can leave muscles sore, but soreness is not a required target or proof of successful muscle growth. Judge recovery by whether normal movement is preserved, whether the next rehearsal remains controlled, and whether symptoms improve or interfere with everyday activity. Recovery time varies, so do not treat one timetable as a guarantee. Do not push through joint pain, altered walking or a movement that becomes less controllable. Stop the exercise and seek appropriate assessment for persistent, worsening or concerning symptoms. Use the earlier urgent-help guidance when relevant rather than repeatedly testing new attachments. Support recovery with regular meals, hydration and enough opportunity for sleep. This plan does not require a calorie target, compulsory supplement or guaranteed recovery schedule. Use the nutrition guide to help plan meals around your training and other needs. Resistance sessions do not replace all aerobic activity. Build everyday activity gradually and avoid abruptly adding demanding intervals to every non-lifting day. NHS adult guidance treats strengthening and broader aerobic activity as distinct parts of general activity guidance, but that does not mean jumping immediately to an unfamiliar workload. A rest day does not have to mean enforced inactivity, and these resistance sessions do not contain a hidden cardio finisher.
Resume After a Missed or Incomplete Session
For a completely missed visit, continue with the missed session at the next appropriate slot. Do not combine two complete sessions, compress them into consecutive days to save the calendar or reset automatically to A every Monday. Foundation simply resumes at its next suitable visit. The example assumes Phase 2 or Phase 3 A/B, Monday and Thursday availability, and a missed visit caused by scheduling rather than unresolved illness or symptoms. Existing recovery and handling still need to fit.
| Training slot | Original plan | After a missed visit |
|---|---|---|
| Week 1 Monday | A | A completed |
| Week 1 Thursday | B | Missed; no workout |
| Week 2 Monday | A | B |
| Week 2 Thursday | B | A |
| Week 3 Monday | A | B |
| Week 3 Thursday | B | A |
The first two weeks contain three completed visits rather than four. The order continues across weeks instead of being restarted by the weekday name.
When some of the session was completed
Record a partially completed visit as partial. Continue the normal A/B sequence at the next suitable visit rather than appending the missing sets. A partial visit does not count as a complete session for phase advancement. Repeated omissions require reviewing time, equipment and the plan's fit rather than routinely dropping the same movement.
Return after illness or a longer interruption
Do not assume the old loads remain suitable. Rehearse the movements and use a reduced return visit when appropriate: one set per exercise with manageable resistance and the normal rest intervals. Label it as reduced work, not a completed full Phase 3 session or an automatic reset of the entire programme. Persistent symptoms require appropriate individual advice, not permission from this schedule. The missed-workout guide explains wider scheduling choices. Its examples do not replace this plan's specific distinction between completely missed, partially completed and deliberately reduced visits.
Continue This Plan or Choose Your Next One
Review the actual learning record, goal, available days, equipment and recovery before changing plans. Completing a calendar block alone does not require a new split. Continuing Phase 3 can be the correct outcome.
| Situation | Appropriate direction | Check before changing |
|---|---|---|
| Two days still fit and the plan remains useful | Continue Phase 3 | Progression, equipment, recovery and goals still fit |
| Three days and broader full-body training fit | Consider Full Body | Learn every newly selected movement and adopt that plan's actual prescriptions |
| Barbell strength is the specific goal | Consider 5x5 | Learn the required lifts, rack procedures and load handling first |
| A suitable three- or four-day upper/lower arrangement is preferred | Consider Upper/Lower | Check its actual variant, workload, schedule and exercise requirements |
Choose one suitable plan rather than combining their full routines. Read its entry requirements and follow its own exercise order, sets, repetitions, rest, tempo and progression rules instead of transferring this page's prescriptions into it. The existing 5x5 plan assumes competence in its basic lifts. Machine practice here is not automatic preparation for rack setup, barbell squats, bench presses, deadlifts or overhead work. Full Body and Upper/Lower likewise require instruction for every newly selected movement, not an assumption that the page title makes it beginner-ready.
Final learning task
Write one justified next action using recent records: continue the two-day plan, resolve a specific setup/skill problem, or choose one appropriate next plan and learn its missing requirements. “Continue the current two-day plan” is an acceptable answer. Using a floor bridge instead of an RDL does not teach the standing hinge, and finishing twelve weeks does not demonstrate a lift you have not practised.
Beginner Gym Workout FAQs
Do I need to be fit before joining a gym?
The learning phase is intended for beginners, but equipment and activity still need to fit the person. Use an induction and seek individual guidance when health, mobility or symptoms require it. This plan does not establish universal suitability or medical clearance.
Are two gym days enough to start?
They are the baseline for this programme. Complete the assigned work consistently before considering another schedule. More visits are not a condition for finishing the learning process.
Must I spend exactly twelve weeks on this plan?
No. The calendar organises teaching. Readiness, recovery and the learning checks control advancement, so a phase can take longer than its example window.
What weight should I start with?
Use the actual machine or implement, light rehearsal and the phase's effort margin. Do not copy another person's kilograms or assume the lowest setting always fits.
What does two sets of ten mean?
Perform ten controlled repetitions, rest, then perform another ten at the prescribed standard. Preparation is separate, and completed repetitions must be recorded honestly.
Should beginners train to failure?
This programme does not require it. Stop with the specified margin and before movement or handling changes. The effort estimate is not a reason to test a failed repetition.
Do machines mean I do not need to learn technique?
No. Machines still require fitting, support, controlled movement and a safe return. Their settings and load displays are specific to the apparatus.
Do I have to move from machines to barbells?
No. Equipment should fit the goal and task. Barbell work requires its own instruction when it is selected; machine competence does not certify every barbell lift.
What happens when a machine is occupied?
Wait, use a taught suitable alternative or record a deliberate adjustment. Do not improvise missing supports or complete both alternatives for the full allocation.
How do I count dead bugs?
Alternate sides within one complete set. Four repetitions per side means eight individual reach-and-return repetitions, not eight sets. Rest after the complete set.
Do I need supplements or a special tracking app?
Neither is a requirement of this programme. Use ordinary meals and an ordinary usable training record; individual nutrition needs are separate.
When should I change plans?
When the goal, schedule, equipment or required training no longer fits, after checking the next plan's actual requirements. Finishing a calendar block alone does not require a change.