
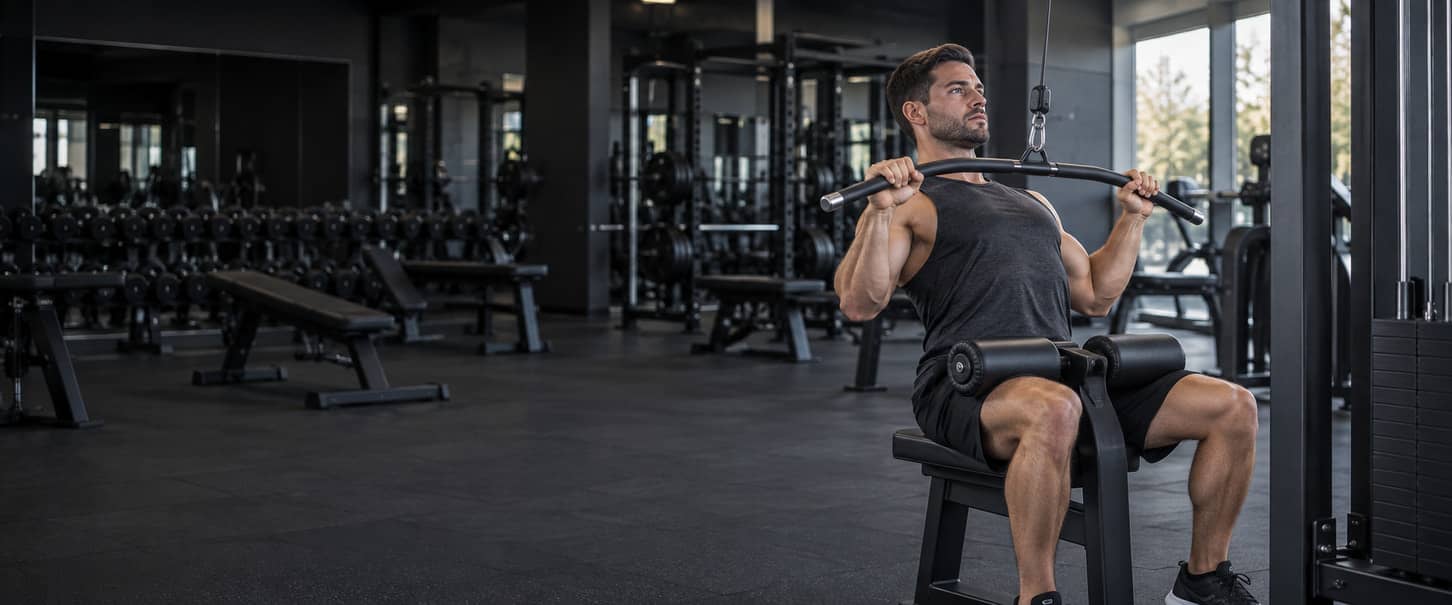
How to Do a Lat Pulldown
For a seated lat pulldown, choose a load you can control and an attachment that allows a comfortable overhead reach. Adjust the thigh pad to hold you securely, plant your feet and brace your trunk with a small backward lean that stays steady. Pull your upper arms down as your elbows bend, guiding the attachment in front of your head. Use a comfortable finish rather than forcing the bar to touch your chest. Guide the attachment upward smoothly as your arms straighten, allowing your shoulder blades to move with the overhead reach instead of pinning them back and down. End the set if you cannot maintain that movement or if it causes pain. This adjustable vertical pull can suit someone who needs a manageable load for the intended repetitions, including when unassisted pull-ups are too demanding. It is also a useful choice in its own right, not an exercise you must graduate from. It fills a vertical-pulling role within your plan, not every role supplied by rows, accessories and hip hinges. The sections below explain machine setup, grip orientation versus hand spacing, and checks for torso position and range. The later progression example combines the existing Full Body Workout Plan prescription with fictional set records to show what to check before increasing load. Keep the wider schedule and workload with your complete workout plan. This is general adult exercise instruction, not pain rehabilitation or a new weekly routine.
Set Up the Lat Pulldown Machine
Identify the high cable, the bar or handles connected to it, the weight stack and selector, the seat, the pad that restrains your upper thighs, and a stable place for your feet. Read the station's operating directions before adjusting it. Your setup needs to let you get into position, move the attachment and finish safely, not simply match someone else's settings.
Check the station before loading it
Work through these checks before your working sets. Look for secure contact and a comfortable overhead reach you can control, rather than a universal seat number, grip-width measurement or starting load.
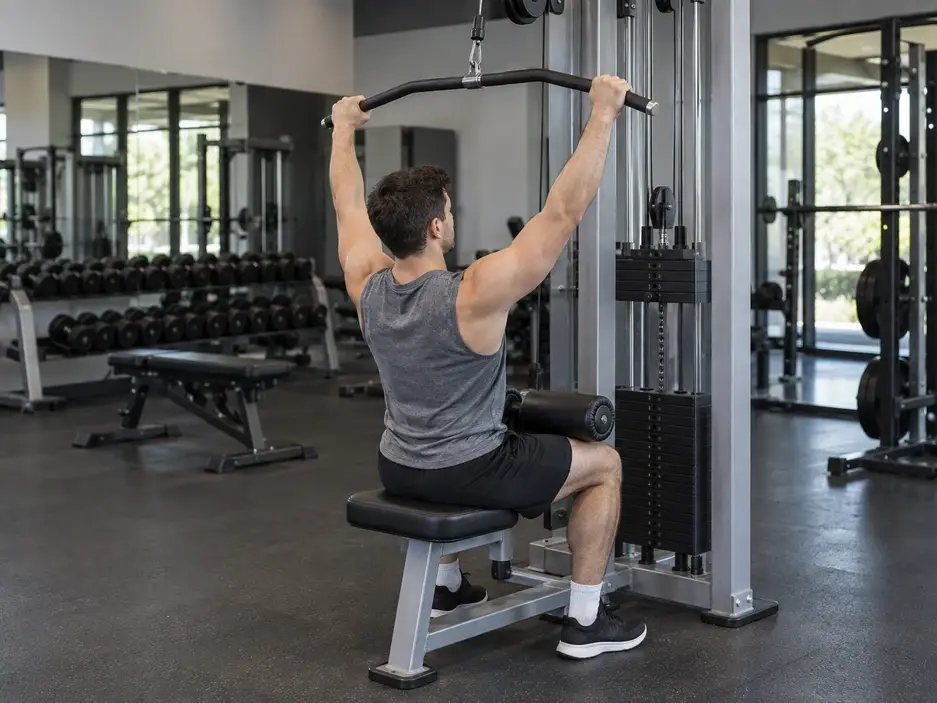
- Check the station and attachment. Look for visible cable damage, worn grips, loose or damaged connections, and an unstable seat or restraint. Use only an attachment and connector compatible with the station and secured as its manufacturer directs. Do not use damaged equipment or remove guards to investigate; report concerns to staff.
- Make adjustments with the load at rest. Find the weight selector and the permitted seat and thigh-pad adjustments. Let the stack settle completely before changing the selector or attachment, and check that the approved selector pin and adjustment locks are fully engaged. Never change the pin under a suspended load or substitute improvised pins, anchors or added weights.
- Fit the seat, thighs and feet. Use the available adjustments so the pad holds your upper thighs securely without painful compression and your feet have stable contact with the floor or the station's provided supports. Keep your hips settled on the seat. The restraint should help prevent you from lifting out of position, not require you to wedge yourself into a setup that does not fit.
- Check grip and access. Choose hand positions that permit a firm grip and a comfortable overhead reach. Follow the station's sequence for taking hold and getting seated. If the attachment is unreachable or entry or exit is unclear, ask staff for help rather than jumping for it or improvising a platform. Once seated, brace and establish the small backward lean you can keep steady.
- Rehearse with a manageable load. During your normal exercise-specific preparation, check that you can pull and return smoothly without sliding, lifting off the seat or being jerked upward. Allow the shoulder blades to move with the overhead return. This rehearsal checks fit and control; it is not a test of the heaviest setting you can move.
If the pad slips, your feet cannot stay supported or the torso position keeps changing, stop and reassess the permitted adjustments and load. Do not force a painful reach. If the station still cannot fit you, use another suitable option within your plan rather than work around its geometry. Sitting and thigh restraint do not provide full external trunk support; you still have to control your torso. Before starting, know how you will finish. Guide the attachment back under control and follow the station's directions to return the load to rest and leave safely. Do not let go while the cable is pulling the attachment away or change the selector before the weights have settled. Have staff explain an unfamiliar finish instead of assuming one exit maneuver works for every pulldown machine.
Lat Pulldown Form: Pull, Pause, and Return
Once the station fits, keep your hips seated, feet supported and thighs secured. Maintain the small backward lean established during setup rather than changing your torso angle to move the attachment. Keep your head aligned with your trunk. Your upper arms, elbows and shoulder blades move while that base stays steady.
Follow one controlled repetition
Think of the repetition as a smooth pull, a controlled pause and a guided return, not simply moving the attachment between two points. Use a comfortable path you can repeat with a secure grip and without borrowing movement from your torso.
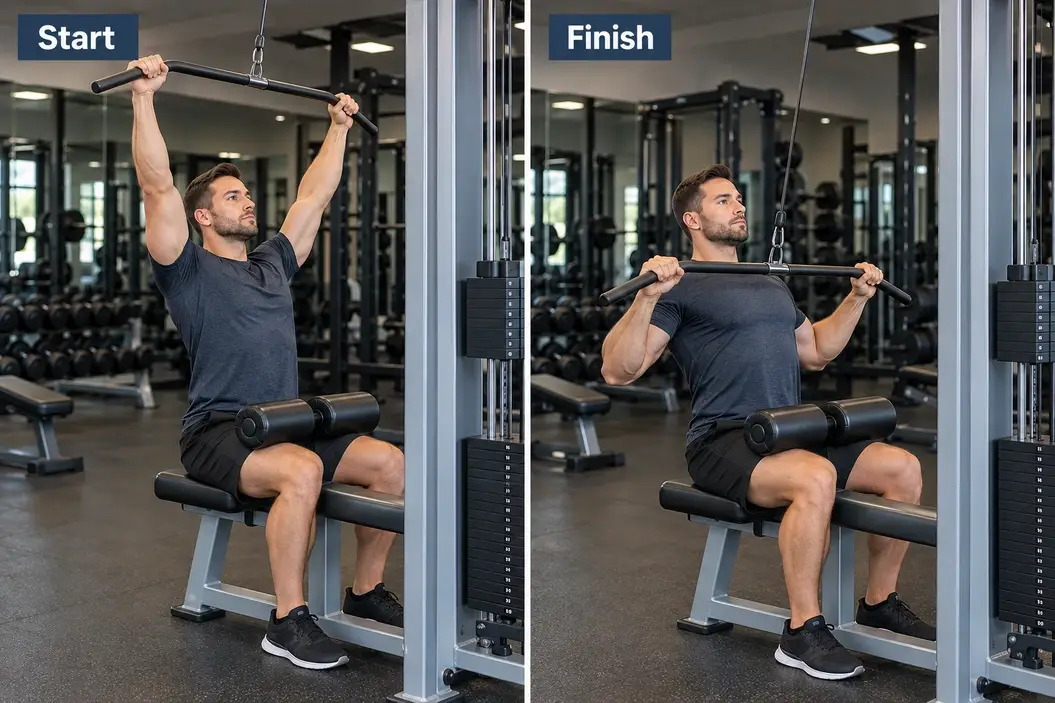
- Establish the starting reach. Begin with your arms comfortably extended overhead and your hands secure on the attachment. Allow your shoulder blades to follow that overhead reach rather than forcing them back and down. Keep your trunk braced and hips on the seat; do not let the load drag you into a loose hang or a painful stretch.
- Pull in front of your head. Bring your upper arms down toward the sides of your torso as your elbows bend, guiding the attachment toward the upper-chest area. Let your shoulder blades move with your arms. Keep the pull smooth rather than starting with a shoulder jerk, throwing your torso backward or moving your head forward to clear the bar. The attachment travels in front, not behind your neck.
- Pause at a comfortable finish. Stop where you can briefly hold the attachment without adding backward lean, reaching with your neck or driving your elbows farther behind you just to gain extra travel. Chest contact is not required, and there is no single elbow angle everyone must reach. Settle the movement before reversing it instead of forcing a harder squeeze or a lower touch point.
- Control the overhead return. Let your elbows straighten as your upper arms rise, resisting the cable so the attachment does not accelerate away from you. Allow your shoulder blades to rotate upward with the arms; trunk stability does not mean holding the shoulder blades still. Recover the same comfortable starting reach without lifting from the seat, tipping forward, snapping your elbows straight or forcing a deeper stretch. Begin the next pull without bouncing out of the top.
- End the set safely. After the final pull, guide the attachment back and follow the station's instructions for returning the load to rest and leaving the seat. Keep a secure grip while the cable is still pulling on the attachment. Do not let go and allow the weights to crash down; an unfamiliar exit sequence needs staff guidance before the set begins.
End the set when another repetition would require a bigger backward lean, a neck reach, a shorter intended range or an overhead return you cannot control. A repetition feeling harder does not, by itself, mean technique has failed; check whether you can still maintain the intended movement rather than complete it by changing the task. Stop for pain instead of forcing the endpoint. Before the next set, reassess the load and the permitted setup adjustments. A heavier setting is not useful for this version of the exercise if it repeatedly takes away the path or control you are trying to practice.
Coordinate breathing with the movement
Breathe in a controlled rhythm while keeping your trunk steady. Exhaling during the downward pull and inhaling during the upward return is a practical starting cue. Do not turn the pause into prolonged maximal breath-holding or hold one breath across repeated efforts. Keep any individual medical restrictions on breathing or effort; do not override them to match this cue.
Check the movement between the endpoints
Start and finish still images can illustrate positions, but they do not establish movement speed, the duration of a pause or control throughout the repetition. Check the movement between those positions as well: a smooth initiation, a comfortable stop and an overhead return that remains under your control.
Which Muscles Does the Lat Pulldown Work?
The lat pulldown works the latissimus dorsi, or lats, together with other shoulder movers, elbow flexors, grip muscles, and muscles that control the shoulder blades. Your trunk muscles help keep the seated position steady. Each group contributes a different part of the movement rather than doing the same job.
Upper arms, elbows, and grip
- Lats: bring the upper arms down toward the trunk at the shoulder joints. Depending on the arm path, this combines shoulder adduction, bringing the arms closer to the sides, and shoulder extension, bringing them down from a forward-raised position.
- Teres major: assists the lats with shoulder adduction and extension. It is a separate muscle near the back of the shoulder, not another name for the upper part of the lat.
- Elbow flexors: the biceps brachii, brachialis, and brachioradialis help bend the elbows during the pull. Elbow bending works alongside upper-arm movement; normal arm involvement is part of the exercise.
- Forearm and grip muscles: finger flexors help maintain your hold on the attachment, while muscles around the wrist help keep it steady. Holding the handle is a different task from moving the upper arm at the shoulder.
- Rear deltoids: can assist shoulder extension, with their contribution depending on the upper-arm path and torso position. They belong to the shoulder musculature and are not part of the lats.
During the overhead return, the lats and elbow flexors help resist the cable as the upper arms rise and the elbows straighten. They do not stop working simply because the attachment is moving upward.
Shoulder-blade movement and trunk support
The upper-arm bone moves relative to the shoulder blade at the shoulder joint; the shoulder blade also moves over the rib cage. The middle trapezius and rhomboids help retract the blade, bringing it toward the spine. Their roles are not identical: the rhomboids also assist downward rotation, while the lower trapezius works with the serratus anterior and upper trapezius to coordinate upward rotation as the arm returns overhead. Scapular stability means controlling that movement, not permanently squeezing the blades back and down. Abdominal and spinal muscles help brace the trunk against unwanted movement. Keeping the torso steady supports the pull, but it is not the same action as drawing the upper arm down. Being seated does not eliminate the need for trunk control.
Judge execution, not just sensation
Feeling effort in your biceps or forearms does not prove that your back is inactive. Neither a pump nor later soreness is required for a productive workout, and sensation alone cannot establish how much work each muscle performed. Check the intended arm path, controlled return, and your workout plan's performance criteria instead. For a slipping grip, changing torso position, or an unexpected limitation, use the later Common Lat Pulldown Mistakes and What to Check section.
Choose a Lat Pulldown Grip and Attachment
Choose a machine-compatible attachment and hand position that let you pull in front of your head, keep your wrists comfortable, and return overhead without changing your torso position. Check palm orientation, hand spacing, handle shape, and the station's available range separately. Keep the combination consistent once it suits your intended repetition.
Compare hand orientation separately from width
Overhand, or pronated, means your palms face away from you; neutral means they face each other; underhand, or supinated, means they face toward you. Width describes the distance between your hands, not their orientation. A neutral grip is not automatically narrow, and an overhand grip is not automatically wide. Use the table to compare choices, not to assemble four compulsory exercises.
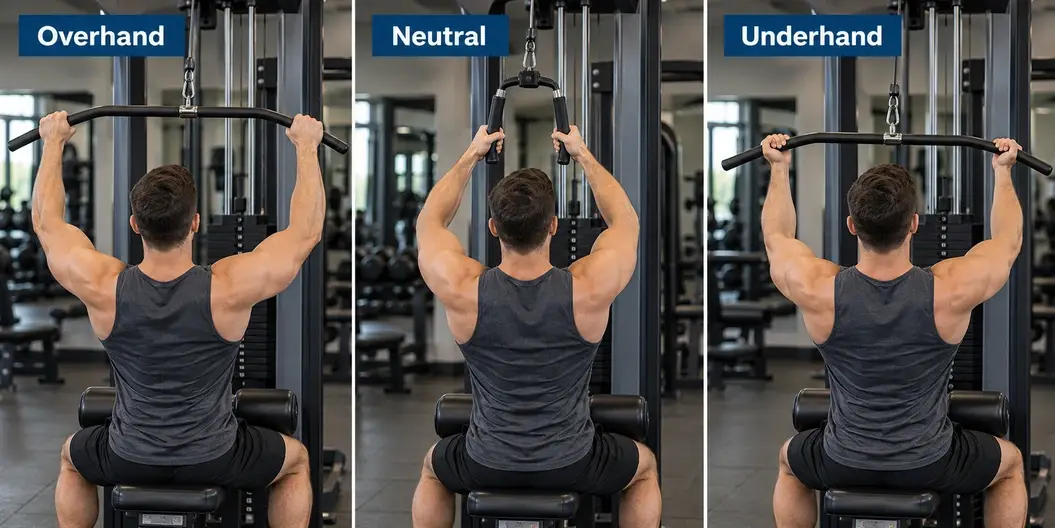
| Grip or change | What changes | Practical check |
|---|---|---|
| Moderate-width overhand | Palms face away from you, with moderate hand spacing on a suitable bar. Moderate is a descriptive label, not one required measurement. | Choose spacing that lets you hold the bar comfortably while your upper arms descend and your elbows bend without being forced into position. |
| Wider overhand | Palms still face away, but the hands move farther apart. This can change the upper-arm path and usable range without changing orientation. | Check for a comfortable overhead return and finish without extra torso lean. Do not force a lower touch point to match a narrower grip. |
| Neutral | Palms face each other on parallel handles. The attachment can place the hands close together or farther apart; neutral does not specify width. | Assess both spacing and clearance. The handles should allow a secure grip and an elbow path that does not force your wrists or shoulders. |
| Underhand | Palms face toward you. Changing from overhand to underhand reverses orientation; it does not specify how far apart your hands should be. | Check that the bar shape and chosen spacing permit comfortable wrists and an unforced elbow path through the pull and return. Use another suitable option if they do not. |
All of these pulldown options still use the back and elbow flexors. Underhand does not remove the back from the movement, and neutral does not eliminate the biceps. A different orientation is not the same as isolating one muscle. Surface electromyography (EMG) records muscle electrical activity during a test, not muscle growth over time. Different grip-testing protocols have produced different muscle-specific findings, so it is inaccurate to say all grips always activate every muscle identically. Those acute results also do not establish a universal hypertrophy ranking or prove that a wider grip will build a wider back. Choose for a usable, repeatable movement rather than a supposed muscle-growth score.
Check the attachment through the full movement
A straight bar, angled bar, and parallel-grip handle offer different combinations of hand position, spacing, and clearance. Check the actual gripping surfaces rather than assuming a handle's name guarantees comfortable wrists or shoulders. Use only attachments and connections permitted for that station. With a manageable rehearsal load, check the seated overhead start, front pull, comfortable finish, and return. The attachment needs to clear the station and your body, and the cable needs enough travel for your intended range. Keep your wrists comfortable, let your elbows follow an unforced path, and retain the torso position established during setup. If the geometry prevents this, use permitted adjustments or another suitable attachment instead of forcing the range or improvising a connection.
Keep grip changes separate from progress
Record the station, attachment, palm orientation, hand spacing, and relevant seat and thigh-pad settings so you can repeat the setup. Use the same identifiable grip positions rather than moving your hands between repetitions. More repetitions or a heavier stack setting immediately after a handle or width change does not, by itself, establish strength gained on the previous version. The task has changed. Reassess a manageable load and establish a new comparison point for that setup; judge later progress with the same intended range and execution, using your workout plan's progression criteria.
Torso Position, Elbow Path, and Range of Motion
A small backward lean established before the pull is different from leaning farther back as the attachment descends. For this seated pulldown, choose a comfortable torso position that fits the station and keep it steady through the pull and return. Use your own repeatable position as the reference, not a universal angle or another person's posture.
Keep the torso reference consistent
Compare your torso at the overhead start, during the pull, at the finish, and on the return. These checks help distinguish the intended arm movement from extra torso movement without requiring a measured angle.
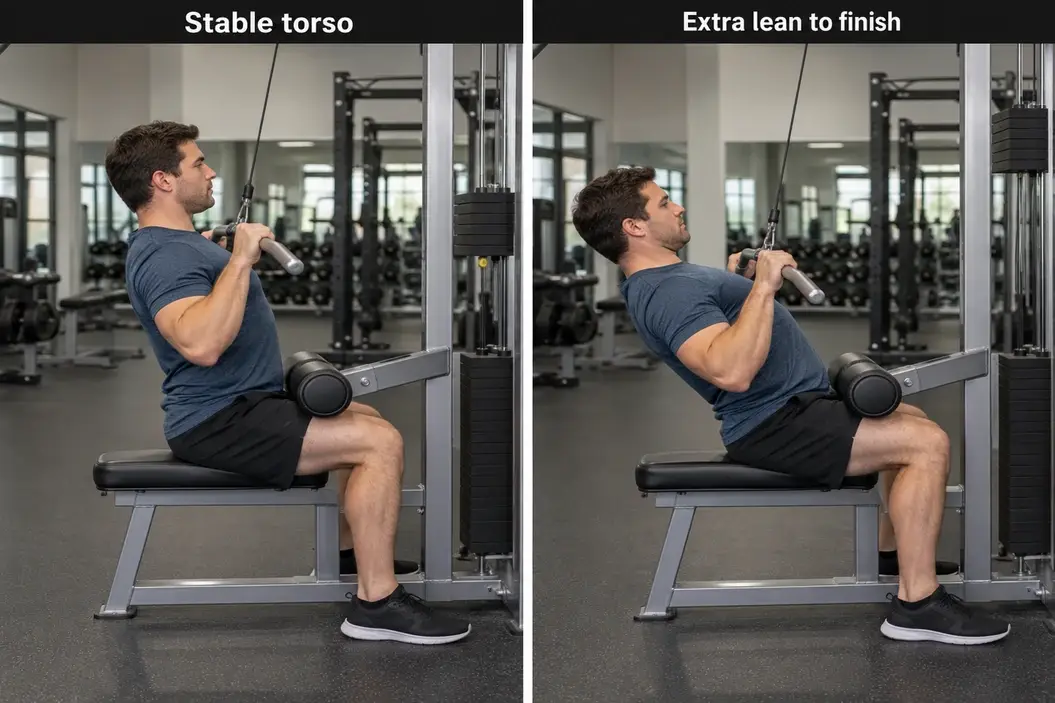
- Repeat the support points. Keep the same seat and thigh-pad settings, with your hips settled on the seat and your feet supported in a repeatable position. Sliding forward or lifting from the seat changes that base.
- Keep the selected lean steady. Maintain your trunk position while your upper arms descend and your elbows bend. Check the movement through the selected range, not just whether the start and finish look similar.
- Finish without adding lean. Do not swing backward or increase the arch of your back to complete the last part of the pull. The finish should not require moving your torso to bring the attachment closer.
- Do not chase bar contact. Use a finish that does not require forcing your wrists or elbows, reaching with your neck, or bringing your chest toward the bar. Contact is not a requirement for completing the repetition.
- Check the return as well. Guide the attachment overhead without the load lifting your hips, pulling your torso forward, or jerking your shoulders. Your arms and shoulder blades can move while the seated base stays controlled.
As a hypothetical comparison, imagine a pull that starts with a small lean but finishes with the torso much farther back. The body-to-cable relationship has changed; that is not simply more arm movement through the original path. A substantial lean can make the pull more row-like relative to the torso, changing the task used as the reference. This describes a changed repetition, not a variation to copy or proof that tissue damage occurred. The new position does not, by itself, establish a stronger lat stimulus. Neither a still picture nor the stack's pin number is enough to calculate joint torque or diagnose an injury.
Let the elbow path fit the attachment
The attachment's shape and your hand spacing help determine how your upper arms and elbows can travel. Bring the upper arms down with the attachment in front of your head; do not force every grip to produce the same elbow position. A wider bar and a closer handle need not finish with identical upper-arm spacing or attachment height. Choose the finish by the comfortable movement you can control with your torso unchanged. Stop before extra travel requires driving the elbows farther behind you, bending the wrists to reach a target, or changing your lean. Neither a particular chest touch point nor one elbow angle defines everyone's endpoint.
Allow shoulder-blade movement during the return
As the attachment rises, let your elbows straighten and your upper arms reach overhead while your shoulder blades rotate upward with them. That shoulder-blade movement is part of the return, not automatically a loss of stability. Do not hold the blades permanently back and down or let the load force a maximal stretch. Return to the comfortable overhead reach established during your rehearsal, keeping your hips seated and your chosen torso position steady. Keep that intended range repeatable rather than shortening it as the load becomes difficult. If you cannot maintain it, end the set and reassess the load, attachment, or permitted machine adjustments before continuing. Stop for pain rather than using extra lean or a smaller movement to work around it.
Common Lat Pulldown Mistakes and What to Check
Identify what changed before adjusting the next set: your seated support, torso position, arm path, grip or control of the return. Compare against the repeatable movement established during setup, not another person's bar height. These checks use the seated front pulldown as the reference; behind-neck pulling is not required. Use the table for non-painful technique issues on equipment that operates normally. If you lose control, end the set and follow the station's directions to return the load to rest before changing settings. Symptoms and suspected equipment defects need the separate response below.
Match the visible change to the relevant check
| What you notice | What to check | What to change |
|---|---|---|
| Hips lift off the seat against the pad | Check that the pad holds your upper thighs, the seat and pad locks are engaged, and your feet remain supported. Notice whether the load pulls you out of position. | Use permitted seat and pad adjustments with the load at rest. If support is sound but the load still lifts you, reduce it; do not clamp the pad painfully or use improvised supports. |
| Torso rocks backward during the pull | Check whether your lean increases to start or finish the pull instead of staying at the position established during setup. Note whether this begins immediately or only as effort builds. | Reduce an excessive load before another set. If you rushed the rest interval, restore your workout plan's intended rest instead of using momentum to complete the pull. |
| The overhead return gets shorter | Check whether you stop below your established comfortable overhead reach to keep completing reps. Also check whether the attachment or station limits the available travel. | End the set rather than keep shortening it. Reduce an excessive load or use permitted adjustments if fit limits travel; let the shoulder blades move with the arms without forcing a deeper stretch. |
| Neck reaches forward or chest moves to meet the bar | Check whether you are chasing contact after your comfortable upper-arm movement has ended. A finish without chest contact is not, by itself, a shortened or failed repetition. | Retain your head and torso position and use an unforced endpoint. Do not drive the elbows farther behind you or bend the wrists to manufacture a touch point. |
| Grip slips or needs repositioning during reps | Check hand security, handle fit and the gripping surface. Distinguish grip fatigue that prevents a secure hold from a loose or damaged grip on the equipment. | Finish safely before regripping. With the load at rest, dry your hands and check a comfortable hand position. Reduce an excessive load or choose a compatible handle you can hold securely; report damaged grips instead of using them. |
| Attachment changes but the log treats the task as unchanged | Check whether the handle, palm orientation, hand spacing or intended range differs from the reference set. The same stack setting does not make those different setups identical. | Record the change and establish a manageable load for that setup. Compare subsequent performance under the same conditions rather than calling the immediate rep difference strength gained or lost. |
| The cable jerks the arms upward or the stack drops abruptly | Check whether you are letting the attachment accelerate away during the return, or whether the equipment catches or moves unpredictably. | On a normally operating station, reduce an excessive load before the next set and guide the return rather than release it. Suspected sticking or other faults require stopping and reporting the equipment, not trying to free the stack. |
Separate symptoms and equipment faults from technique
Stop for pain, numbness or unusual weakness rather than testing another load or grip to discover the cause. Persistent or concerning symptoms warrant assessment by a qualified healthcare professional. These technique checks are not treatment. A frayed cable, loose connection, slipping adjustment lock or sticking stack is an equipment concern, not something to correct by pulling harder. Stop using the station and tell staff. Do not remove guards, substitute pins, or reach into moving parts or beneath suspended weights.
Separate fewer reps from loss of control
Fewer controlled reps in a later set at the same station, attachment, load and intended range raise a different question from rocking or being pulled upward within a set. The first concerns how much comparable work you can repeat after resting; the second means the repetition no longer meets the intended movement standard. For otherwise comparable sets, see why reps drop between sets for the relevant rest, effort and load checks. A decline does not automatically require a different grip or a deload. Keep the actual reps and stopping reason in your log, and judge them against your current workout plan rather than forcing equal counts.
Lat Pulldown Sets, Reps, and Progression
For the pulldown option in Workout B of the Full Body Workout Plan, use 3 sets of 6–12 reps, 2–3 minutes of rest between working sets, and the 2-1-1-1 tempo below. This is the third exercise row, after the selected deadlift and overhead press. Choose the pulldown instead of the pull-up option in that row, not in addition to it. This is one source-plan choice, not a complete workout, a universal pulldown dose, or a weekly back-set total. The full plan's warm-up and preparation, exercise order, other exercises, effort limits, and progression rules remain in effect.
| Exercise | Sets & Reps | Rest | Tempo | Target Muscles | Notes |
|---|---|---|---|---|---|
| Lat Pulldown (selected from Pull-Up or Lat Pulldown) | 3 sets of 6–12 reps | 2–3 min | 2-1-1-1 | Lats, upper back, biceps, forearms | Choose the pulldown loading that permits controlled repetitions within the stated range. |
Read all four tempo positions
Each position in 2-1-1-1 describes a duration in seconds. For the seated pulldown, read it as follows:
- First position: 2 seconds for the upward return, the eccentric phase. Guide the attachment overhead as your elbows straighten and your upper arms rise, rather than letting the cable jerk you upward.
- Second position: 1 second paused at the comfortable overhead start. Keep control while allowing your shoulder blades to move with your arms; the pause does not require a forced stretch or a loose hang.
- Third position: 1 second for the downward pull, the concentric phase. Bring your upper arms down and bend your elbows without adding torso momentum.
- Fourth position: 1 second paused at the comfortable finish. Hold the position without forcing chest contact, then begin the controlled return.
You start with the attachment overhead, so your first actual moving phase is the downward pull, followed by the finish pause, upward return, and overhead pause. The notation lists the return first; it does not ask you to return before your first pull. This is the source plan's cadence, not a claim that these timings uniquely maximize muscle growth.
Choose a starting load and keep an honest record
After the plan's preparation, select a load that lets you complete the lower end of the prescribed range with approximately three estimated reps in reserve on the first working set. That means you judge that about three more repetitions would be possible with the same range and control. It is an effort estimate, not a fixed stack-weight recommendation or a reason to test your one-repetition maximum. Use the same working load across the prescribed sets while it remains appropriate. Stop rather than force another repetition when you cannot maintain the intended movement. A safety or setup problem calls for stopping and reassessment; record any resulting adjustment instead of labeling changed-load work as unchanged. Record the station, attachment, palm orientation and hand spacing, seat and thigh-pad settings, load and its displayed units, intended range and tempo, actual reps in each set, actual rest intervals, and effort or stopping notes. Keep changes in preceding work visible. Record what happened, not the repetitions or rest you intended to achieve.
Compare the set records, not just the total
A, B, and C are three independent fictional records, not consecutive workouts, real training logs, or promised progress. Assume the same seated machine, named Station P for this example, with the same attachment, grip, working load, rest, tempo, intended range, and controlled technique. No recommended stack weight is implied.
| Record | Set 1 | Set 2 | Set 3 | Total reps | Repetition condition for increasing load |
|---|---|---|---|---|---|
| A | 12 | 12 | 6 | 30 | Not met: the third set has not reached 12. |
| B | 10 | 10 | 10 | 30 | Not met: none of the sets has reached 12. |
| C | 12 | 12 | 12 | 36 | Rep component met; execution, effort, comfort, and recovery must still qualify. |
A gives 12 + 12 + 6 = 30 reps, B gives 10 + 10 + 10 = 30 reps, and C gives 12 + 12 + 12 = 36 reps. A and B both stay within the prescribed range, but their set-by-set patterns differ. Equal totals do not establish equal fatigue, stimulus, or readiness to increase load, and they do not predict which record will produce more growth. The drop in A alone is not proof of overtraining. Across three sets, the numerical range boundaries are 3 × 6 = 18 reps and 3 × 12 = 36 reps. These totals describe this row only. Eighteen is not a minimum training dose for everyone, and reaching a total does not replace checking the reps and standard of each individual set.
Increase load only when the full standard qualifies
Build repetitions within the prescribed range before increasing the load. C meets the repetition criterion, not every progression condition. Check that all prescribed sets reach 12 with the same setup, intended range, tempo, and controlled execution, without extending rest to make the numbers fit. The source plan's effort limits still apply, joint comfort must remain acceptable, and unresolved fatigue must not compromise the next full-body session. A calendar date alone does not require an increase. A total of 36 obtained by shortening the return, adding backward lean, or changing the attachment is not the stipulated C record. Keep the change visible in the log rather than treating it as confirmation that the original version is ready for more weight. When all criteria are met, use the smallest practical load increase and rebuild within the same rep range. If the next machine increment prevents an appropriate effort or controlled execution within that range, retain the current workable load or use only a manufacturer-permitted fine adjustment. Do not bridge an unsuitable jump with momentum, forced repetitions, or improvised weights.
Lat Pulldown Variations and Alternatives
Choose a lat pulldown variation or alternative by the role it needs to fill in your workout plan. A better-fitting attachment, another supported pulldown machine, and a pull-up solve different problems. Match the required pulling task to equipment, support, and a range you can control rather than treating every back exercise as interchangeable.
Match the option to the task
| What you need | Possible option | What changes or needs checking |
|---|---|---|
| Keep the seated cable pull with a more comfortable grip | A different permitted attachment on the same station | Choose a compatible handle that permits comfortable wrists, an unforced elbow path, and a controlled overhead return. Record the attachment, palm orientation, and hand spacing as a changed variation, not an unchanged set. |
| Retain a vertical-pulling role on a different machine | Another appropriately supported pulldown machine | Check the intended seat, pads, and usable handle path. The machine may preserve overhead pulling with elbow bending, but its support and resistance mechanics differ from the original station. Do not assume an equal displayed weight reproduces the previous task. |
| Practice pulling your body toward fixed hand support | Assisted or unassisted pull-ups | Use a secure, rated station with safe access and exit. Choose designed assistance or an unassisted version only when it fits your current ability and the plan's intended range, effort, and control. Swinging or incomplete repetitions do not make an unsuitable choice fit. |
| Consider a one-arm pulling variation with different support | A single-arm cable pulldown | Consider this only with suitable equipment, support, and exercise-specific setup instruction. Support and trunk-control demands can differ from the two-arm seated version. Do not improvise kneeling or standing anchors; this selection comparison is not a complete technique tutorial. |
Keep assistance settings separate from body weight
An assisted pull-up machine's selected number describes that station's assistance setting. It is not automatically an exact amount to subtract from body weight or a load you can copy to a pulldown. Follow the machine's operating directions and record its identity, assistance setting, grip, and relevant body weight separately. A suitable pulldown can remain your chosen vertical pull. There is no compulsory progression from a machine to an unassisted pull-up; practice bodyweight pulling when that task serves your plan and you can perform the selected version with control.
Recognize when the pulling role changes
A row can train the lats and upper back, but it is not automatically an equivalent replacement for bringing the upper arms down from overhead. It may fill a rowing role without supplying the overhead-pulling task your routine calls for. A straight-arm cable pulldown moves the upper arms at the shoulders while the elbow bend stays fairly constant. It changes the elbow's role rather than providing another repeated elbow-flexion pull, so it does not replace every compound-pull function. Choose it for an appropriate shoulder-extension role, not simply because it shares the pulldown name. For broader equipment and support decisions, plus the existing instructions for pulldowns, pull-ups, rows, and straight-arm cable work, use the back exercise selection guide.
Keep substitutions within the original routine
The original workout plan determines whether a substitution is valid and which placement, workload, effort, and progression rules apply. These are choices for an existing exercise slot, not a list to add to the session or a new weekly workout plan. When the exercise or a meaningful setup changes, establish a fresh, manageable load or assistance baseline after learning the appropriate setup. Record the change and keep later conditions repeatable. Compare progress within that variation rather than treating a different machine number or rep count as strength gained or lost on the previous task.
Lat Pulldown FAQs
Do I have to touch my chest?
No. Use a comfortable finish without moving your neck or torso toward the bar. Your attachment and upper-arm path affect where the pull ends. Not touching your chest does not, by itself, mean a repetition is incomplete; progressively shortening your intended range is a separate issue.
How far should I lean back?
Use a small, comfortable backward lean that you establish before pulling and maintain through the pull and return. There is no universal angle to copy. If finishing requires more lean, end the set and reassess the load or permitted setup rather than counting the changed movement as the same repetition.
Which grip is best?
Choose a permitted attachment, palm orientation, and hand spacing that allow a secure hold, comfortable wrists and shoulders, and a controlled pull and return. Orientation and width are separate: neutral does not mean narrow, and overhand does not mean wide. There is no established universal muscle-growth winner; keep a suitable grip repeatable rather than assuming wider is better.
Why do I feel my biceps?
Your biceps help bend your elbows while the lats help move your upper arms at the shoulders. Feeling muscular effort in your arms is normal and does not prove that your back is inactive. Check grip security, the intended arm path, and return control rather than trying to eliminate all arm involvement.
Is a pulldown worse than a pull-up?
No. A pulldown offers adjustable external loading, while a pull-up practices moving your body toward fixed hand support. Choose the option that fits your current ability, safe equipment, and workout plan. A pulldown can remain your chosen vertical pull; you do not have to graduate to an unassisted pull-up.
What should I record when I change machines?
Record the station's identity, attachment, palm orientation, hand spacing, and relevant seat and thigh-pad settings. Log the displayed load and units, intended range and tempo, actual reps and rest, and effort or stopping notes. Keep the previous machine's history and establish a fresh, manageable load baseline on the new one. Matching stack numbers do not establish matching resistance or strength progress. For your next session, check the station, use a manageable load and one repeatable setup, then follow your chosen workout plan's actual prescription.