
Choose Ab Exercises That Work Together
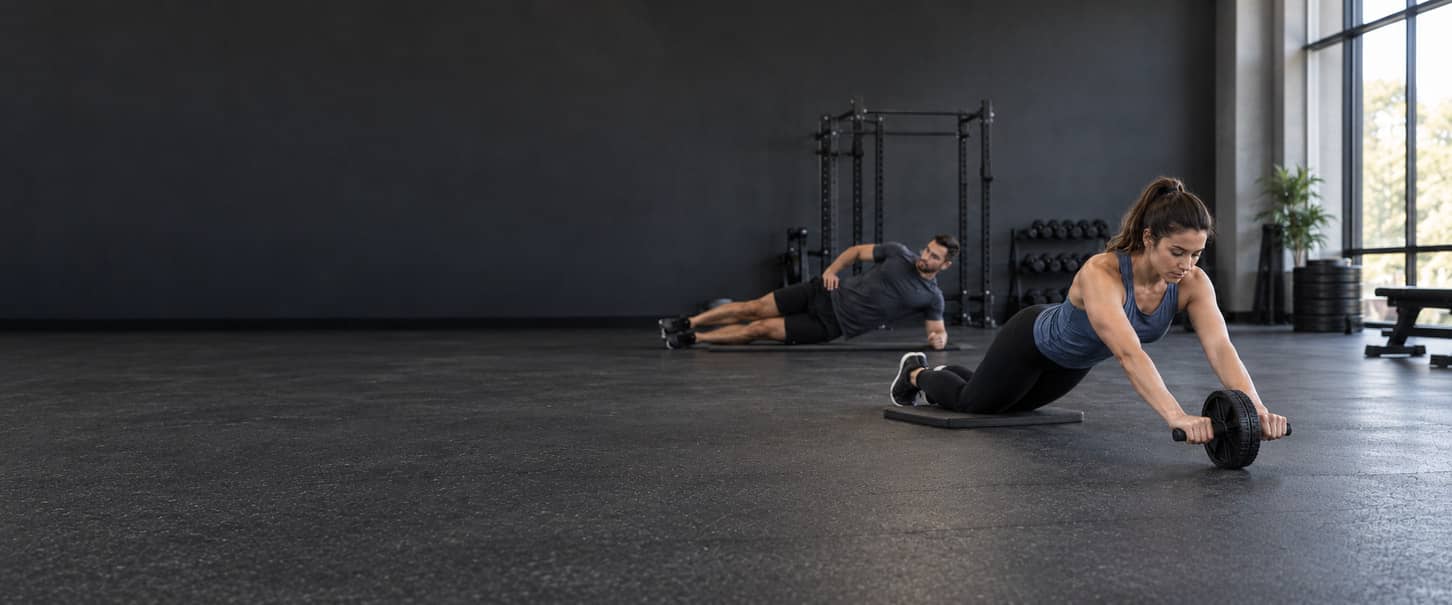
A practical starting mix usually pairs one controllable trunk-flexion exercise, such as a cable crunch or reverse crunch, with one exercise that challenges the trunk to resist extension, rotation, or side bending. That second choice might be a dead bug, ab wheel rollout, Pallof press, side plank, or suitcase carry. A hanging knee raise can also be useful when secure overhead support, grip, and controlled pelvic motion fit the task. These are selection options, not a rule that every person must train every category in one session. The “abs” are part of a wider trunk system. Choose exercises by the function your current workout plan needs, the equipment you can use securely, the range and body position you can control, the available ways to progress, and the direct or indirect trunk work already scheduled. Compound lifts require bracing, but that contribution does not automatically replace every controlled flexion, anti-extension, anti-rotation, lateral-control, or pelvic-control task. No single exercise is universally best. A useful choice is one you can perform through a repeatable standard and progress without replacing the intended task with momentum, unstable positioning, or a different movement. Do not select a starting load from a generic chart, expect one exercise to guarantee visible abs, or treat an acute muscle-activation result as a long-term growth ranking. The sections ahead explain the abdominal-wall anatomy and trunk functions, organize the main movement and control categories, and compare eight exercises by equipment, position, and progression. They then provide detailed technique, honest home options, three optional partial training blocks, progression examples, limits on upper-versus-lower-ab claims, and the relationship between direct ab training, body fat, and visible definition. Use those parts to fill an allocated need inside a complete workout plan rather than turning this guide into a complete weekly routine.
Understand the Abdominal Muscles and Trunk Functions
The abdominal wall includes several muscles that work together with the rest of the trunk. The rectus abdominis is one paired muscle running vertically on the front of the abdomen, interrupted by tendinous inscriptions that create its visible segmented appearance. Those visible regions are not separate upper- and lower-ab muscles. The external and internal obliques form layered side walls with fiber directions that help produce and resist rotation and side bending. The deeper transversus abdominis wraps around the abdomen and contributes to abdominal compression and trunk control. These muscles also coordinate with breathing, pressure regulation, and the changing relationship between the rib cage and pelvis rather than performing one isolated action in every exercise.
Identify the abdominal wall and its main functions
Use these roles to understand why different exercises can complement one another. The descriptions are practical functions, not exact percentages of work or proof that a single cue isolates one layer of the abdominal wall.
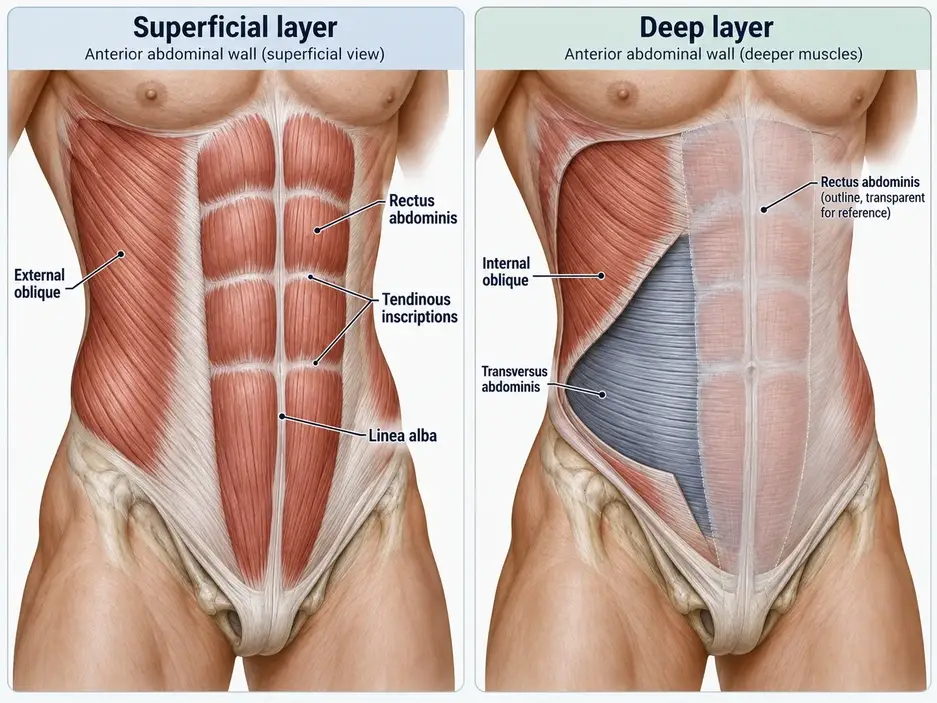
- Rectus abdominis: helps flex the trunk and control the distance and orientation between the rib cage and pelvis. It can also resist unwanted trunk extension during exercises that challenge the body to maintain that relationship.
- External oblique: assists trunk flexion, rotation, and lateral flexion, and helps resist rotation or side bending when the task tries to move the torso out of position.
- Internal oblique: contributes to trunk flexion, rotation, lateral flexion, and control of the abdominal wall. It works with other trunk muscles rather than acting as an isolated “side-ab” muscle.
- Transversus abdominis: contributes to abdominal compression and coordinated trunk support during breathing and force production. It is not a separate “deep core” switch that one universal cue can isolate from the rest of the system.
The word “core” is most useful as a label for the task being controlled, not as the name of one muscle. Trunk flexion, rotation, lateral flexion, abdominal compression, breathing and pressure coordination, and control of the rib cage and pelvis can involve different combinations of the abdominal wall and surrounding muscles. Spinal erectors, the diaphragm, pelvic floor, hip flexors, lats, shoulders, and grip can contribute according to the exercise and body position. Their involvement does not prove that the abdominals are inactive; it shows that trunk exercises are coordinated whole-body tasks. A hanging knee raise can be limited by grip or hip flexors, an ab wheel rollout can involve the lats and shoulders, and a carry can be limited by grip before trunk control fails. The movement categories in the next section therefore organize exercises by the main movement or control demand being trained. They do not assign exclusive muscles to each category, require one identical bracing sensation, or prescribe one universal way that the abdomen must look or feel during every exercise.
Match Ab Exercises to Trunk Movement and Control
Organize ab exercises by the main movement or control demand they present, then choose the category that fills a useful gap in the current workout plan. The word “anti” means resisting an external force or body-position demand; it does not mean the muscles are inactive or that no movement occurs anywhere in the body. These categories describe the primary task rather than exclusive muscle use. One exercise can involve several trunk muscles and overlap more than one category, while equipment, body position, range, and progression method can change how demanding the task becomes.
Controlled trunk flexion
Cable crunches train controlled trunk flexion by bringing the rib cage and pelvis closer through a repeatable range while the attachment supplies external resistance. Reverse crunches emphasize a controlled pelvic curl and lower-trunk roll from a supported position. Both exercises involve the abdominal wall, but the reverse crunch is not simply a “lower-ab” isolation movement. Hip position, leg mass, range, and momentum affect the task, and the rectus abdominis remains one continuous paired muscle rather than separate upper and lower muscles.
Anti-extension: resist unwanted arching or extension
Kneeling ab wheel rollouts and dead bugs both challenge the trunk to resist unwanted extension as the arms, legs, or whole body move away from a more compact position. The rollout uses a moving wheel, longer lever, and substantially greater loading potential, while the dead bug uses floor support and adjustable contralateral limb reaches. They share an anti-extension objective but are not interchangeable stages that everyone must complete. A person can progress either exercise through a longer controlled reach, a harder lever, a pause, or suitable resistance without changing to the other movement.
Anti-rotation: resist being turned
The Pallof press challenges the trunk to remain controlled while a cable or anchored band pulls from the side. Pressing the hands farther from the torso increases the rotational demand without requiring the body to twist through a large range. The exercise can also involve the hips, legs, shoulders, and arms according to the stance and equipment. Its purpose here is controlled resistance to rotation, not isolation of one abdominal layer or proof that one stance is universally superior.
Resist lateral flexion and side bending
Side planks and suitcase carries challenge the trunk to resist unwanted side bending. In the side plank taught later, the body holds a supported alignment rather than repeatedly bending the spine sideways. A bent-knee or straight-leg lever changes the demand without changing that basic objective. A suitcase carry adds walking, grip, gait, turns, and control of a weight held on one side. Grip or walking quality can end the set before the trunk is the only limiting factor, so the exercise should be recorded and progressed as a complete task rather than reduced to an oblique-isolation claim.
Hip flexion with pelvic and trunk control
A hanging knee raise combines hip flexion with the need to control the pelvis, trunk, and return while hanging from secure overhead support. The hip flexors necessarily contribute, and grip or shoulder position can limit the set before the abdominal task fails. Raising the thighs with increasing swing is different from a controlled repetition that includes deliberate pelvic motion. Choose among these categories by identifying the missing task in the current plan, removing options that lack secure equipment or tolerable positioning, and selecting an exercise with a progression method you can standardize. Not everyone needs all five categories every week, and there is no exact flexion-to-anti-movement ratio that applies to every plan. Use a comfortable, repeatable trunk position for the selected exercise rather than treating “neutral spine” as one fixed angle for every body and task.
Compare Ab Exercises by Equipment, Difficulty, and Progression
Use this matrix to compare the main trunk task, required equipment, body position and loading method, practical progression, and the principal setup or execution limit. It is a selection tool, not a universal ranking of which exercise builds the most muscle or suits every person.
| Exercise | Primary trunk task | Equipment | Position and loading | Practical progression | Main check |
|---|---|---|---|---|---|
| Cable Crunch | Controlled trunk flexion with external resistance | High cable stack, secure compatible rope or handle, and enough kneeling or permitted standing clearance | Usually kneeling or standing while cable resistance loads the trunk-flexion task; the arms hold the attachment without repeatedly pulling it through shoulder extension | Add controlled repetitions or the smallest suitable cable increment while keeping the same stance, range, tempo, and ribcage-to-pelvis movement | Do not replace trunk flexion with a large hip hinge, arm pull, forced endpoint, or return that lets the stack jerk the body upward |
| Reverse Crunch | Controlled pelvic curl and trunk flexion | Stable floor or bench surface, with a mat where needed | Supine bodyweight exercise using bent legs and a deliberate pelvic curl; leg mass and lever position influence the demand | Improve control, pause quality, pelvic-curl range, or lever length, and add suitable resistance only when the same movement remains repeatable | Lift the pelvis through a small controlled range without throwing the legs, using a long swing, or transferring body weight unsafely toward the head or neck |
| Ab Wheel Rollout | Anti-extension while the arms and body move away from the knees | Intact ab wheel, padded knees, nonslip surface, secure grip, and clear forward path | Kneeling bodyweight-and-lever exercise; demand rises as the wheel travels farther and the body forms a longer lever | Extend the controlled range gradually, refine the lever, or pause at a repeatable reach rather than treating a standing rollout as compulsory | Reverse the rollout before lumbar sag, rib flare, shoulder collapse, pain, or loss of wheel control changes the task |
| Dead Bug | Anti-extension and rotation control during contralateral limb movement | Stable floor and mat | Supine exercise using opposite arm-and-leg reaches while maintaining a repeatable ribcage and pelvic reference | Use longer controlled reaches, straighter limbs, pauses, or suitable external resistance while preserving breathing and trunk position | Limit the reach before the lower back arches beyond the chosen standard, the pelvis rotates, breathing is lost, or the limbs move faster than the trunk can control |
| Pallof Press | Anti-rotation against a side-directed resistance | Cable station or intact resistance band with a compatible purpose-designed anchor | Standing or kneeling side-on to the resistance; cable load or band stretch challenges the torso as the hands press away | Increase press distance, repetitions, controlled pause, or suitable resistance while keeping stance, anchor height, and torso orientation consistent | Do not rotate toward the resistance, lose the selected stance, let the cable or band pull the body sideways, or use an improvised anchor |
| Side Plank | Resisting lateral flexion and unwanted rotation | Stable nonslip floor or mat | Side-supported isometric using a bent-knee or straight-leg lever, with bodyweight acting through the support points | Improve hold quality, extend the lever, increase duration modestly, or add compatible load while preserving the same alignment and breathing | End the hold before sagging, rolling, shrugging, breath-holding, or a changed elbow, knee, or foot position replaces the intended standard |
| Suitcase Carry | Resisting side bending and rotation while walking | One securely held dumbbell or kettlebell and a clear, level walking path | Standing and walking with an offset external load held on one side; grip, gait, turns, and trunk control are part of the task | Increase distance, time, or load in small steps while keeping the same route, pace, turns, posture, and safe pickup and set-down | Do not lean away from the weight, rush, drag the implement, lose the walking line, or continue after grip or gait no longer permits control |
| Hanging Knee Raise | Hip flexion with deliberate pelvic and trunk control | Secure rated hanging station with safe access and exit | Hanging bodyweight exercise using a firm grip, bent-knee raise, controlled pelvic motion, and steady lowering | Improve pelvic control, range, repetition quality, or pause duration before using a harder leg position; hanging work is not a compulsory progression destination | Stop when grip, shoulder comfort, swing control, deliberate pelvic motion, or the controlled return no longer meets the chosen standard |
Choose the next exercise deliberately
- Identify the trunk movement or control task that is missing or needs a different option in the current workout plan.
- Remove exercises whose equipment, anchor, hanging support, floor space, walking path, or setup cannot be used securely.
- Choose one candidate, or two complementary candidates when the plan allocates room for different tasks, rather than collecting every option.
- Read the detailed technique entry for the selected exercise before treating the comparison row as complete instruction.
- Rehearse a manageable version and establish the range, lever, setup, load, hold, or distance that can be repeated with control.
- Let the complete workout plan determine sets, repetitions, duration, rest, scheduling, recovery, and progression.
The most useful choice is the one that fits the required task, available equipment, and current control while leaving a clear way to progress under the plan. A harder-looking exercise, larger load, longer hold, or stronger abdominal sensation does not by itself make the selection better.
Cable Crunches and Reverse Crunches
Cable crunches and reverse crunches both train controlled flexion, but they load and organize the task differently. The cable crunch adds external resistance to a trunk-flexion pattern, while the reverse crunch uses body position and a deliberate pelvic curl. Treat each as its own exercise with a repeatable setup rather than copying one load or range between them.
Cable Crunch
Use a high cable station with a secure compatible rope or handle and enough clearance for the chosen kneeling or permitted standing setup. Select the load while the stack is resting, then arrange the attachment and stance so the rib cage and pelvis can move toward one another without the arms turning the repetition into a repeated shoulder-extension pull.
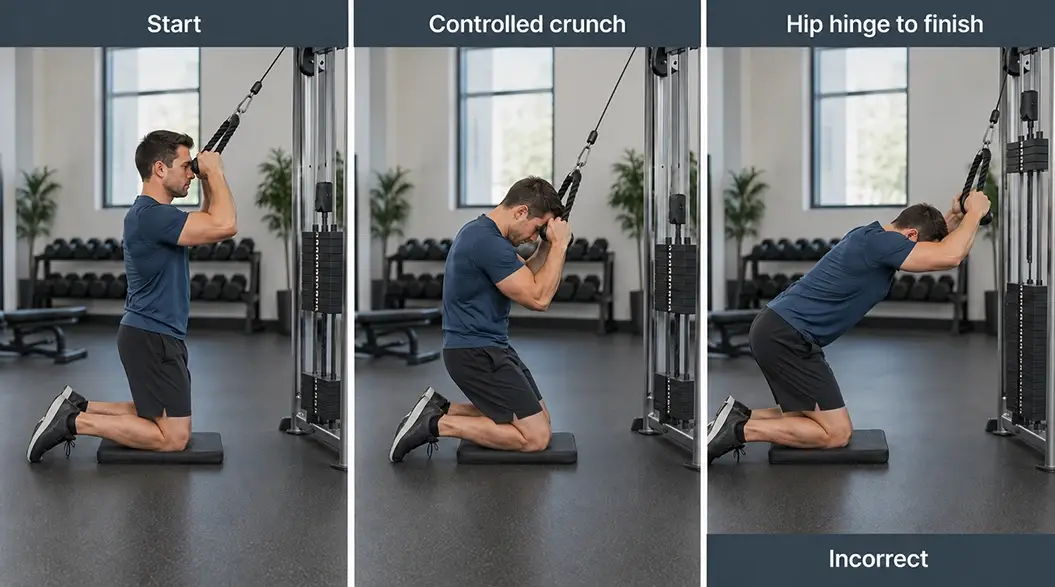
- Set up the station while the resistance is at rest. Confirm that the attachment is fully connected, choose a manageable load, and establish enough space to kneel or stand without contacting the stack, frame, or surrounding equipment.
- Hold the rope or handle securely near the head or upper torso as the attachment permits. Set a stable kneeling base or permitted stance, organize the rib cage over the pelvis, and keep the arms in a repeatable position rather than using them to pull the attachment down.
- Begin the repetition by flexing the trunk under control, bringing the rib cage and pelvis closer through the range you can reproduce. A small amount of hip movement may occur in the selected version, but do not use a large hip hinge to move the stack.
- Finish at a comfortable controlled point without forcing the forehead toward the floor, chasing maximal spinal rounding, or changing the arm position to create extra travel.
- Return steadily to the chosen starting position, allowing the trunk to lengthen without losing the stance or letting the stack jerk the body upward. Bring the load fully to rest before changing the pin, attachment, or position.
Regress the cable crunch by reducing the load, shortening the controlled range, or using the more stable permitted stance that preserves the same trunk-flexion task. Progress by adding technically acceptable repetitions, a small practical load increase, or a modestly longer repeatable range while the attachment, stance, arm position, tempo, and stopping standard remain consistent. Record the station, attachment, pulley position where relevant, kneeling or standing setup, displayed load and unit, range, actual repetitions, tempo, rest, and why the set ended. Cable resistance can remain present through much of the movement, but that does not mean joint torque or abdominal muscle force stays constant at every point.
Reverse Crunch
Use a stable mat or bench surface that supports the trunk without sliding. Begin with the knees bent in a position you can control, then use deliberate posterior pelvic motion to lift the pelvis through a small range rather than throwing the legs or building momentum from a long swing.
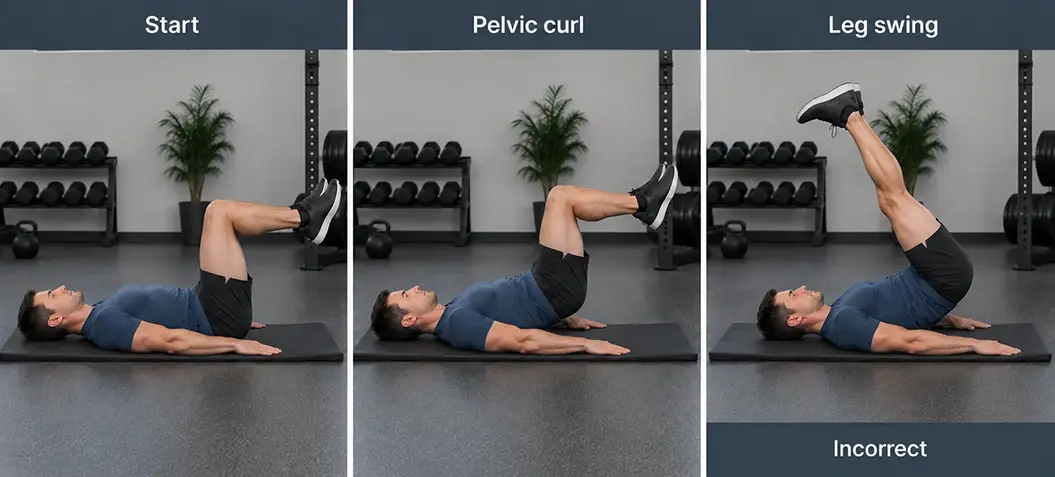
- Lie on the stable surface with the head and trunk supported. Choose a comfortable bent-knee and hip position, place the arms where they can provide only the intended support, and keep the neck relaxed rather than pulling on it.
- Settle the legs and pelvis before starting. Remove any rocking from the previous repetition and establish a range that does not require swinging the thighs toward the torso.
- Curl the pelvis posteriorly and lift it through a small controlled range, allowing the lower trunk to roll from the surface. Keep the movement deliberate instead of kicking the legs or using a rapid hip-flexion swing to create lift.
- Stop before the roll transfers body weight unsafely toward the head or neck, changes the hand support, or turns into an uncontrolled backward somersault motion. A higher pelvis is not automatically a better repetition.
- Lower the pelvis and trunk steadily to the same starting position, keeping the bent-knee arrangement controlled and preventing the legs from dropping or swinging into the next repetition.
Regress the reverse crunch by reducing the pelvic-curl range, using a shorter leg lever, or pausing between repetitions until momentum is removed. Progress through improved control, a slightly longer repeatable curl, a longer lever, a deliberate pause, or appropriate resistance only when the pelvis and trunk still move as intended. Record the surface, knee and hip position, hand support if used, pelvic-curl range, actual repetitions, tempo, rest, and any swing or position change. Hip flexors and the mass and position of the legs affect the task. The exercise can emphasize pelvic motion, but it does not prove that a separate lower-ab muscle has been isolated.
Ab Wheel Rollouts and Dead Bugs
Kneeling ab wheel rollouts and dead bugs both challenge the trunk to resist unwanted extension, but they differ substantially in loading, leverage, equipment, and skill. In both exercises, choose the range you can control and reverse without changing the intended ribcage, pelvic, or trunk relationship merely to travel farther.
Kneeling Ab Wheel Rollout
Use an intact ab wheel on a nonslip surface with padded knees, a clear forward path, and a secure grip. Start with a reach you can reverse while maintaining trunk control; distance is useful only when the same standard remains available.
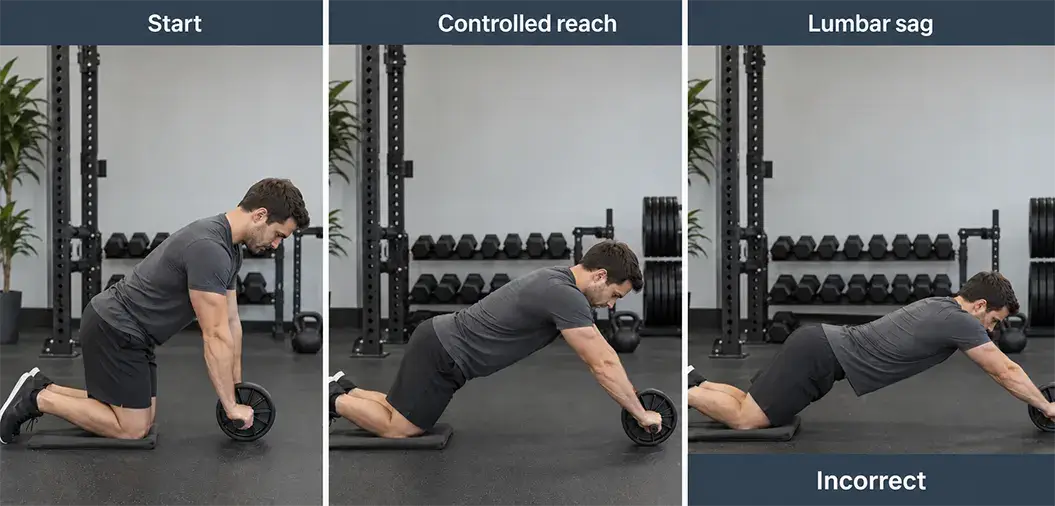
- Inspect the wheel and floor before starting. Confirm that the handles, axle, and wheel move as intended, place the knees on stable padding, clear the rollout path, and keep the wheel away from steps, furniture, loose mats, or other obstructions.
- Begin from a stable kneeling position with both hands secure on the handles. Set the wheel beneath or slightly ahead of the shoulders as the design permits, organize the rib cage and pelvis, and choose a starting range that does not already require lumbar sag or shoulder collapse.
- Roll forward under control by allowing the shoulders and hips to open while the trunk resists unwanted extension. Keep the wheel tracking steadily and stop the reach before rib flare, lumbar sag, loss of grip, shoulder collapse, or a change in knee support replaces the intended position.
- Pause only if the reached position remains controlled. Do not force your chest toward the floor, roll from a bench or household furniture, or treat a standing rollout as a required destination.
- Pull the wheel back along the same path before the trunk position changes. Return to stable kneeling control without jerking the wheel, shifting the knees, or letting the hips move independently to escape the hardest part of the return.
Regress the rollout by shortening the reach, using a closer visual marker, or selecting a lever that can be reversed cleanly. Progress through a modestly longer controlled range, a more demanding lever, or a deliberate pause only when the wheel path, ribcage and pelvic control, shoulder support, and return remain repeatable. There is no mandatory distance and no requirement to progress to a standing rollout. Record the wheel and surface, knee position, reach marker, actual repetitions, tempo, rest, and the reason the set ended. End the set when another repetition would require lumbar sag, rib flare, shoulder collapse, pain, or loss of wheel control rather than using extra distance as proof of progress.
Dead Bug
Use a stable floor or mat and begin supine with a comfortable hip and knee bend. Establish a repeatable ribcage and pelvic position, then choose a contralateral arm-and-leg reach that can be completed without forcing the lower back to arch or the pelvis to rotate.
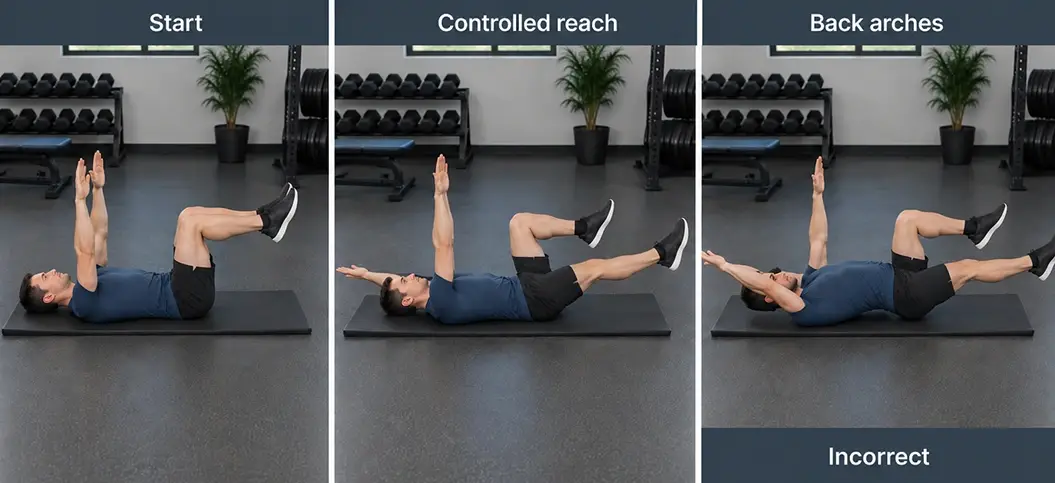
- Lie on the stable surface with the head, trunk, and pelvis supported. Bring the hips and knees to a comfortable bent position, raise the arms as appropriate, and settle into a starting position that allows normal breathing without forcing one universal amount of lower-back contact.
- Brace only enough to maintain the chosen ribcage and pelvic relationship. Keep breathing normally and confirm that the pelvis is not already rotating or tipping as the limbs prepare to move.
- Reach one arm and the opposite leg away from the body under control. Stop the reach before the lower back arches beyond the chosen standard, the ribs flare, the pelvis rotates, or normal breathing is lost.
- Return the arm and leg steadily to the starting position without letting the limbs drop or using momentum. Reestablish the same trunk reference before alternating sides.
- Repeat with the opposite arm and leg through the same controlled range. End the set when the reach shortens unpredictably, the pelvis or rib cage changes materially, the sides no longer match the intended standard, or breathing can no longer remain controlled.
Regress the dead bug by shortening the reach, moving one limb at a time, or keeping a more manageable bend at the knees and elbows. Progress through a longer controlled reach, straighter limbs, a deliberate pause, or appropriate external resistance only when the base contralateral pattern, breathing, ribcage position, and pelvic control stay repeatable. Record the limb pattern, reach, knee and elbow position, repetitions per side, tempo, rest, and any pelvic or ribcage change. Dead bugs and kneeling rollouts share an anti-extension objective, but the rollout generally creates a much larger lever and equipment-control demand. They are not compulsory stages that everyone must complete in sequence, and either exercise can be progressed without changing its name.
Pallof Presses, Side Planks, and Suitcase Carries
Pallof presses challenge the trunk to resist rotation, while side planks and suitcase carries challenge control against side bending and unwanted rotation. Each exercise uses a different support and loading method, so choose the one that fits the intended task and equipment rather than treating all three as interchangeable “oblique” exercises.
Pallof Press
Use a cable station or an intact resistance band with a compatible purpose-designed anchor installed for the intended pulling direction. Set the cable or anchor around torso height as the equipment permits, then choose a stable standing or kneeling position side-on to the resistance.
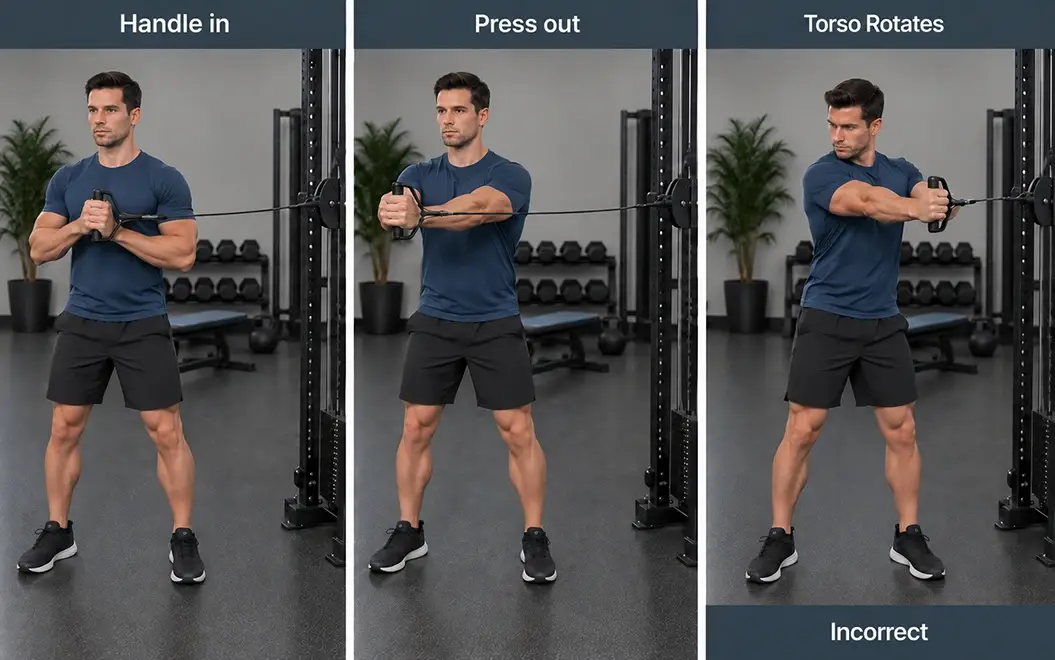
- Inspect the station, attachment, band, connectors, and anchor before loading the exercise. Select or adjust resistance while the cable stack is resting, or position the intact band within its permitted stretch range. Do not use furniture, a household improvisation, or an anchor whose mounting direction is uncertain.
- Stand or kneel side-on to the resistance in a stance you can reproduce. Hold the handle close to the torso with both hands, organize the rib cage and pelvis, and move far enough from the anchor to create manageable resistance without being pulled off balance.
- Press the hands away from the torso under control while keeping the chest and pelvis facing the same direction. Resist being turned toward the cable or band rather than compensating with a wider stance, a sudden lean, or a twist in the opposite direction.
- Pause only at a press distance that allows normal breathing and a stable body position. Do not lock the elbows forcefully or extend farther merely to create more shaking or difficulty.
- Return the handle steadily to the torso without allowing the resistance to jerk the arms or rotate the body. Ease the cable or band tension under control before changing sides or releasing the attachment.
Regress the Pallof press by reducing the load or band stretch, shortening the press distance, or using a more stable permitted stance. Progress through a longer controlled press, a deliberate pause, additional technically sound repetitions, or a small resistance increase while anchor height, stance, torso direction, and press path remain comparable. Record the side facing the resistance, cable station or band identity, anchor height, stance, load or working length, press distance, actual repetitions, rest, and stopping reason. Switching sides creates another side-specific record; it does not prove full recovery. The exercise trains anti-rotation control, but it is not a guaranteed back-pain treatment or evidence that anti-rotation work is superior to every other trunk task.
Side Plank
Use a stable nonslip floor or mat and choose a bent-knee or straight-leg lever that can be held with control. Place the supporting elbow under or near the shoulder as comfort permits, with the forearm positioned securely and the body arranged so the support points will not slide.
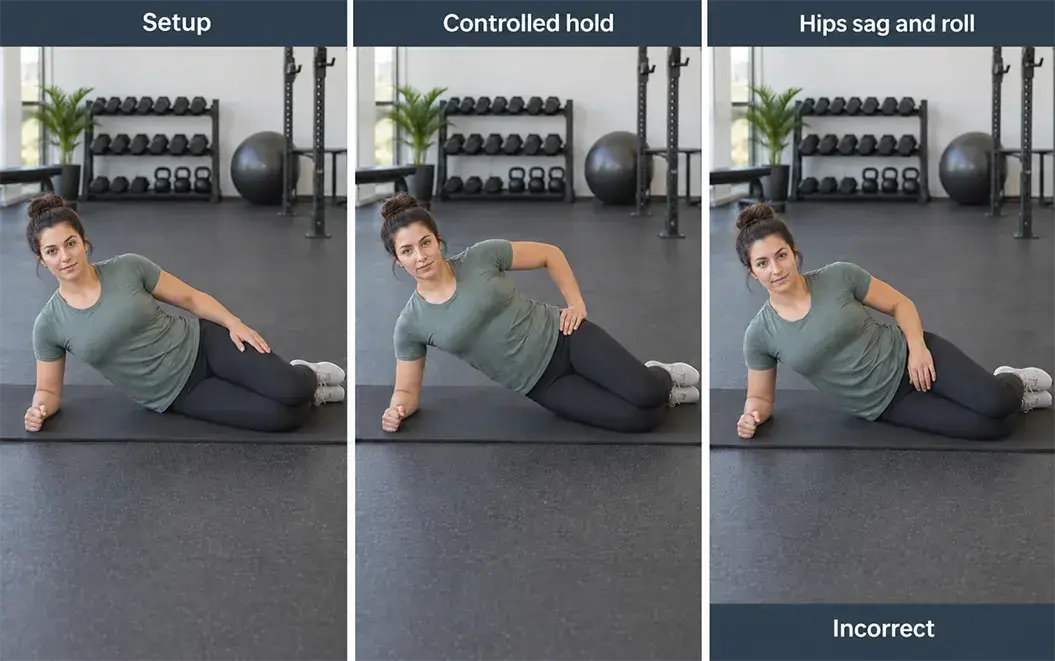
- Lie on one side and establish the selected support. Set the elbow and forearm securely, arrange the knees or feet for the chosen lever, and align the head comfortably with the trunk without forcing one exact elbow or shoulder angle.
- Organize the shoulders, rib cage, pelvis, and support points before lifting. Use the free arm in a position that does not pull the torso into rotation or interfere with breathing.
- Lift into a manageable line through the shoulders, trunk, pelvis, and lower-body support. Resist sagging toward the floor or rolling forward or backward rather than trying to raise the hips as high as possible.
- Maintain normal breathing and the same support pressure. End the hold before shrugging, shaking that changes the position, altered knee or foot placement, breath-holding, or loss of the selected body line replaces the intended standard.
- Lower under control and return to supported rest before changing sides. Reproduce the lever, elbow position, and body line on the other side instead of rushing immediately into a different setup.
Regress the side plank with a bent-knee lever, a shorter hold, or another supported version that preserves the lateral-control task. Progress through improved hold quality, a longer lever, a modest duration increase, or compatible external loading only while breathing and alignment remain repeatable. Stop the set when position deteriorates rather than turning the hold into a pain- or time-tolerance test. Record the side, elbow and forearm support, knee or foot lever, hold duration, rest, breathing or position change, and reason the set ended. A side plank challenges lateral control and can involve the obliques, but the hold does not prove isolated oblique work or require direct spinal side bending.
Suitcase Carry
Use one dumbbell or kettlebell that can be picked up and held securely, plus a clear, level walking lane with enough room for the planned route and turns. The task is to walk with a repeatable gait while resisting unwanted side bending and rotation, not to display the heaviest weight that can be moved briefly.
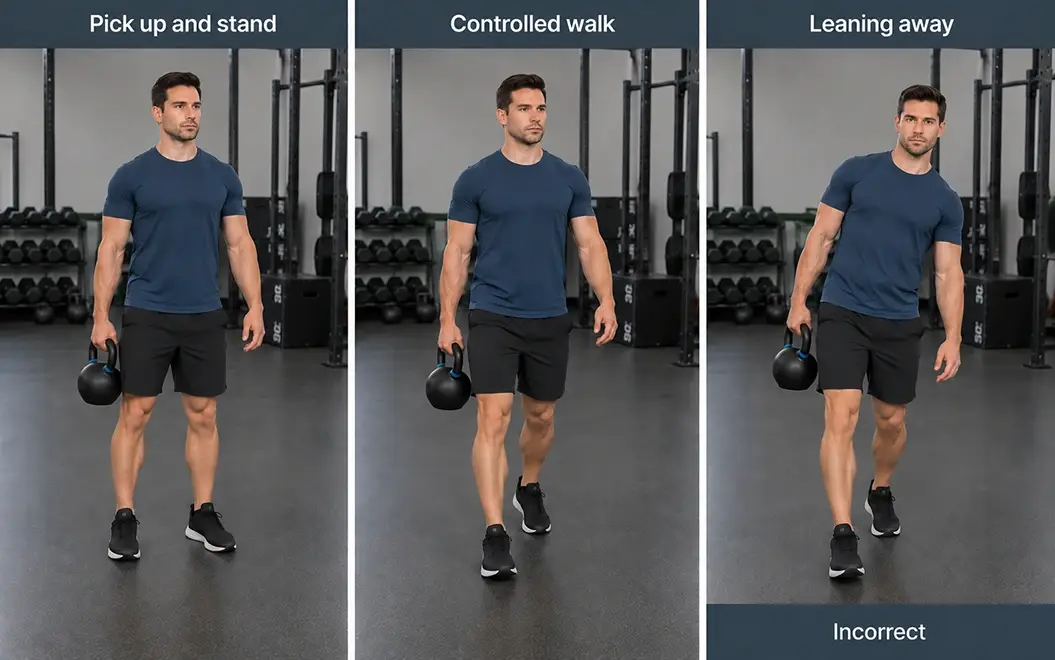
- Inspect the implement and walking route. Remove obstacles, confirm that turns and the set-down area are clear, and position the weight where it can be lifted without twisting around other equipment or people.
- Use a safe pickup that fits the implement and available space. Stand upright with the weight held securely at one side, the free arm relaxed or positioned consistently, and the shoulders and pelvis organized without leaning away from the load.
- Walk at a controlled, repeatable pace while keeping the torso from drifting toward or away from the weight. Let normal gait occur without exaggerating stiffness, shortening every step, or using the free arm to create a large counterbalance.
- Approach each turn with enough space to slow and change direction under control. Do not rush, drag the implement, cut across an obstructed area, or turn while the route is blocked.
- Finish in the planned clear area and set the weight down safely before releasing the grip. Recover as required before repeating on the other side, and do not let a failing grip or changing gait turn the final distance into an uncontrolled test.
Regress the suitcase carry by reducing the load, shortening the route or time, simplifying the turns, or using a pace that preserves gait and trunk control. Progress through a small load increase, additional distance or time, or a more demanding but still clear route only when pickup, posture, pace, turns, grip, and set-down remain comparable. Record the side, implement, load and unit, distance or time, route, number and direction of turns, pace where relevant, actual rest, grip limitation, and stopping reason. Complete and record both sides according to the workout plan rather than combining them into an unlabeled total. The carry challenges lateral and rotational control, but it does not isolate the obliques or prove that a heavier carry is automatically a better trunk exercise.
Hanging Knee Raises and Hip-Flexion Control
A hanging knee raise combines hip flexion with grip, shoulder support, pelvic motion, and trunk control. Use it only when a secure hanging station and a controlled entry, repetition, and exit are available; hanging difficulty alone does not make it a required or superior ab exercise.
Hanging Knee Raise
Use a secure rated hanging station with a safe way to reach and leave the handles or bar. Establish a firm grip and a controlled hanging start before moving the knees, then use a range that permits deliberate pelvic contribution and a steady return without swinging.
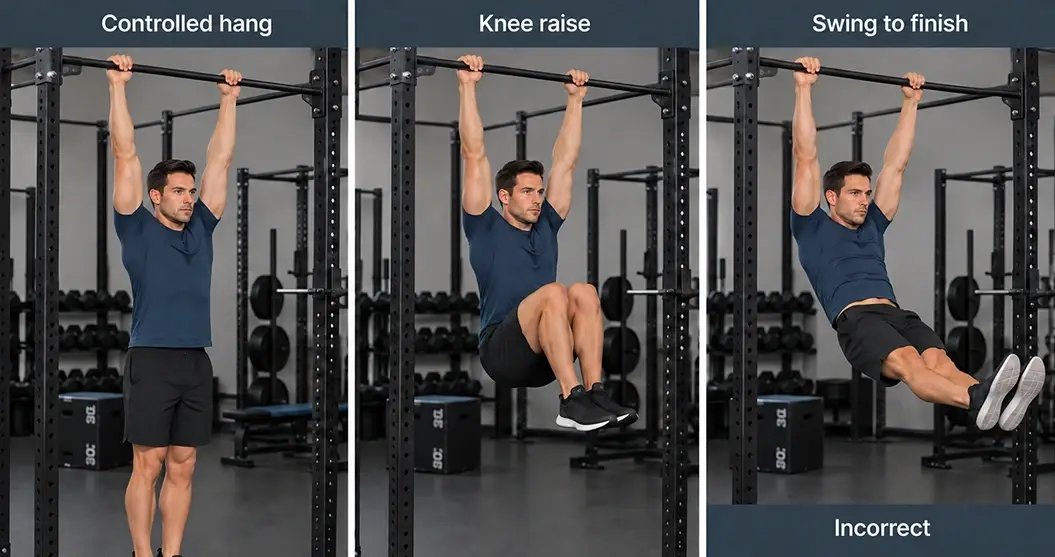
- Check the station and access route before starting. Use the intended steps, platform, or other designed access method, confirm that the bar or handles are secure, and make sure the exit area is clear. Do not jump for an unreachable bar or use loose household supports.
- Take a firm, comfortable grip and settle into a controlled hang. Organize the shoulders, rib cage, and pelvis without forcing one universal shoulder position, and let any initial movement stop before beginning the first repetition.
- Raise the bent knees under control as the hips flex, then add deliberate pelvic motion so the pelvis and lower trunk contribute to the finish. Keep the movement smooth rather than kipping, throwing the legs, or building momentum from a changing swing.
- Finish at the highest controlled position available without demanding knees-to-chest contact, reaching with the neck, or changing the grip and shoulder position to gain extra height.
- Lower the knees and pelvis steadily to the same controlled starting range. Stop the set when grip, shoulder comfort, pelvic control, or the return no longer meets the chosen standard, then use the station's safe exit instead of dropping from the support.
The hip flexors necessarily contribute because the thighs move toward the torso. Raising only the thighs while the swing changes is a different task from a controlled knee raise that includes deliberate pelvic and trunk motion. Grip or shoulder position may limit the set before the abdominal task does, so record the actual reason the repetition standard ended rather than assuming every stop reflects abdominal fatigue. Regress the exercise with a supported captain's-chair station when suitable equipment and a secure entry and exit are available, or use a floor reverse crunch when that better fits the current control and equipment. Hanging work is not a compulsory progression destination, and a floor or supported option can remain the selected exercise while it continues to meet the plan's purpose. Record the station, grip, safe-access method where relevant, controlled starting range, knee position, pelvic motion, actual repetitions, rest, estimated effort, and stopping reason. Keep the same identifiable setup when comparing later performance; do not treat a higher knee position, additional swing, or changed grip as unchanged progress, and do not describe the movement as universal lower-ab isolation.
Upper Abs, Lower Abs, and Regional Emphasis
The rectus abdominis is one continuous paired muscle running down the front of the abdomen, not two separate upper- and lower-ab muscles. Tendinous inscriptions create the visible segmented appearance, but exercise names do not divide those regions into independently isolated muscles. You can still choose movements with different trunk and pelvic actions. That is a practical way to vary the task, not proof that one exercise trains only the upper portion while another trains only the lower portion.
Interpret regional activation cautiously
Acute studies comparing activity in upper and lower regions of the rectus abdominis have produced mixed results. Some controlled protocols report no meaningful regional difference across the tested tasks, while others find task-dependent differences. These findings show that exercise setup and movement can matter, but they do not establish a universal isolation rule. Surface electromyography measures electrical activity during a test. It is not a direct measurement of long-term regional muscle growth, and a higher acute reading does not prove that an exercise will build only that region over time. Exact electrode-derived percentages should not be turned into personal growth predictions.
Use movement differences without promising isolation
Cable crunches emphasize controlled trunk flexion by bringing the rib cage and pelvis closer through a repeatable range. Reverse crunches and well-controlled hanging knee raises emphasize pelvic motion and can feel different because the legs, hips, grip, and support change the task. Hip flexors necessarily contribute to leg-raise movements. Their involvement does not make the abdominal contribution disappear, but a swinging thigh raise is not the same task as a controlled repetition with deliberate pelvic motion. Range, tempo, support, and technique determine what is actually being performed.
Choose by task, control, and progression
Do not label leg raises as “lower abs only,” claim crunches cannot train the lower region, or treat where you feel a burn as anatomical proof. Sensation can be influenced by fatigue, leverage, breathing, position, and other participating muscles. Use the comparison section to select exercises with different trunk or pelvic demands, then use the progression section to keep the setup, range, lever, load, and execution standard repeatable. The goal is a complementary exercise choice that can be progressed honestly, not a promise to isolate one visible row of the abdominal wall.
Ab Exercises at Home With Little or No Equipment
Choose home ab exercises by the equipment and secure space you actually have, not by calling every bodyweight movement equipment-free. Floor exercises, an ab wheel, an offset carry, and an anchored band press use different loading methods and setup requirements. Select the option that fills a useful task in the complete workout plan and can be repeated under the same standard.
No external equipment
Dead bugs, reverse crunches, front-plank variations, and side planks can be performed without an external load, but they still require enough clear floor space and a stable nonslip surface or mat. Bodyweight is a loading method, not an absence of resistance. Progress only when the exercise remains comparable. A longer dead-bug reach, a more demanding plank lever, a longer hold, or a larger controlled reverse-crunch range can increase the task, but extra time or range is not progress when the rib cage, pelvis, breathing, support points, or movement standard changes.
An ab wheel
A kneeling rollout requires an intact wheel, padded knees, a clear forward path, a nonslip floor, and enough control to reverse the selected range. Check the handles, axle, wheel, and surface before starting, and keep the route clear of steps, furniture, loose mats, and other obstructions. Use only the distance that permits a steady wheel path and controlled return without lumbar sag, rib flare, shoulder collapse, or loss of grip. A farther rollout is useful only when the same trunk and equipment-control standard remains available; reaching the floor or progressing to a standing rollout is not compulsory.
A dumbbell or kettlebell
A suitcase carry needs one weight that can be picked up, held, and set down securely, plus a clear level walking lane with room for the planned route and turns. Walk with a repeatable gait while resisting unwanted side bending and rotation. Do not lean away from the weight, rush, drag it, or turn through an obstructed area. Record the side, implement, load and unit, distance or time, route, turns, rest, grip limitation, and stopping reason. A household object with an uncertain handle, shifting contents, or unsafe shape is not a substitute for a securely held training implement.
A band with a compatible anchor
A band Pallof press requires an intact band, compatible connectors, and a purpose-designed anchor installed and used as its manufacturer directs on a support approved for the pulling direction. Set the anchor around torso height as the equipment permits, stand or kneel side-on, and press away without allowing the band to rotate or pull the body out of position. Do not use a towel-over-door arrangement, furniture, railings, exposed hooks, sharp edges, or an improvised household anchor. Record the band identity, working length, anchor height, starting distance, stance, press distance, repetitions, rest, and stopping reason. Band color is not a universal load unit.
Choose the option that fits the plan
- Check the space first: floor exercises need a stable nonslip area, rollouts need a clear forward path, and carries need an unobstructed walking route.
- Use only equipment that is intact, secure, and suitable for the direction of force. Remove an option when the wheel, weight, band, anchor, or support cannot be used as intended.
- Match the exercise to current control. Choose a manageable reach, lever, hold, range, load, distance, or band setup that can be repeated without changing the task.
- Let the complete workout plan determine the allocated exercise slot, sets or duration, rest, scheduling, recovery, and progression rather than building a separate home routine from every available option.
Hanging knee raises require a secure rated hanging station with safe access and exit, so they are not a no-equipment home option. When that station is unavailable, choose a floor, wheel, carry, or properly anchored band exercise that serves the needed task instead of improvising overhead support or adding another exercise simply to copy a gym setup.
Three Ab Workout Blocks and How to Use Them
These three constructed blocks are alternative ways to fill an appropriately allocated trunk-training slot. They are not three stages to complete in sequence, complete weekly workout plans, or finishers to append automatically after direct trunk work already prescribed elsewhere. Prepare the required floor space, cable station, wheel, anchor, or hanging support before starting. Rehearse unfamiliar setups and select manageable variations that allow the intended range, pelvic and ribcage control, normal breathing, secure equipment, and a controlled return. Warm-up or rehearsal sets are not counted as the working sets shown below. End a working set when the listed range, lever, support, breathing, equipment control, or movement standard can no longer be maintained. The complete workout plan controls weekly placement, recovery, and whether one of these partial blocks belongs in the schedule. The time labels are estimates because setup, transitions, side changes, actual rest, and individual pace can shorten or lengthen completion.
Read the tempo, counting, and progression instructions
Each tempo number gives seconds for one phase. For cable crunches, reverse crunches, and hanging knee raises, the order is lower or return, pause at the start, curl or raise, and pause at the finish. Begin the first repetition with the curl or raise even though the code lists the return first. The other exercises use the movement phases below; these are pacing conventions, not claims that every participating muscle shortens or lengthens together.
- Ab wheel rollout: roll outward, pause at the farthest controlled reach, return, and pause back at the start. The 3-1-1-1 code means three seconds outward and one second for each remaining phase.
- Dead bug: reach the opposite arm and leg away, pause, return, and pause at the start. The 2-1-2-1 code means two seconds for each moving phase and one second for each pause.
- Pallof press: return the handle to the torso, pause there, press away, and pause with the arms extended. The 2-1-1-1 code gives two seconds to the return and one second to each remaining phase; the first repetition starts with the press.
For dead bugs, count one reach and return as one repetition on the moving-leg side. Alternate sides until the prescribed repetitions are completed for each side, then take the listed rest before the next set. For Pallof presses, complete and record each orientation separately, allow necessary recovery when switching, and take the listed between-round rest after both sides. Other rest ranges apply between that exercise's working sets; allow setup and recovery between exercises rather than treating the blocks as no-rest circuits. For these constructed blocks, begin near the lower end of each repetition range with a load or variation that leaves a few more controlled repetitions available. Add repetitions while preserving the same range, tempo, rest, and stopping standard. Once every prescribed set reaches the upper end, increase one suitable difficulty variable by the smallest practical step and return toward the lower end. For per-side work, meet the standard on both sides. Keep or reduce the difficulty when the lower end cannot be completed with control; do not add sets or another block just to progress.
About 10 Minutes: Entry-Level Floor Block
| Exercise | Sets & Reps | Rest | Tempo | Target Muscles | Notes |
|---|---|---|---|---|---|
| Dead Bug | 2 sets of 6–10 reps per side | 45–75 seconds | 2-1-2-1 | Rectus abdominis, obliques, trunk stabilizers | Use a reach that preserves pelvic and ribcage control. |
| Reverse Crunch | 2 sets of 8–12 reps | 60–90 seconds | 2-1-2-1 | Rectus abdominis, obliques | Curl the pelvis through a small controlled range without swinging the legs. |
This floor block pairs a contralateral anti-extension task with a controlled pelvic-curl exercise. Use the manageable limb reach and pelvic range rehearsed before the working sets rather than increasing difficulty during the block.
About 20 Minutes: Balanced Gym Block
| Exercise | Sets & Reps | Rest | Tempo | Target Muscles | Notes |
|---|---|---|---|---|---|
| Cable Crunch | 3 sets of 8–15 reps | 60–120 seconds | 2-1-2-1 | Rectus abdominis, obliques | Keep the cable setup and trunk-flexion range repeatable. |
| Kneeling Ab Wheel Rollout | 2 sets of 6–12 reps | 90–150 seconds | 3-1-1-1 | Abdominals, obliques, lats, trunk stabilizers | Stop the reach before lumbar sag or loss of wheel control. |
| Pallof Press | 2 sets of 10–15 reps per side | 60–90 seconds after both sides; allow necessary recovery between sides | 2-1-1-1 | Obliques, abdominals, trunk stabilizers | Keep the torso facing forward and record each side. |
This gym block uses three different tasks rather than three versions of the same movement. Keep the cable setup, rollout reach, Pallof stance, side order, and actual recovery visible in the record so later performance remains comparable.
About 30 Minutes: Expanded Multi-Pattern Block
| Exercise | Sets & Reps | Rest | Tempo | Target Muscles | Notes |
|---|---|---|---|---|---|
| Hanging Knee Raise | 3 sets of 8–15 reps | 90–120 seconds | 2-1-1-1 | Abdominals, hip flexors, grip | Control pelvic motion and the return without swinging. |
| Cable Crunch | 3 sets of 10–15 reps | 60–120 seconds | 2-1-2-1 | Rectus abdominis, obliques | Use the same kneeling/standing setup and cable attachment. |
| Kneeling Ab Wheel Rollout | 2 sets of 6–12 reps | 90–150 seconds | 3-1-1-1 | Abdominals, obliques, lats, trunk stabilizers | Progress range only while position stays controlled. |
| Pallof Press | 2 sets of 10–15 reps per side | 60–90 seconds after both sides; allow necessary recovery between sides | 2-1-1-1 | Obliques, abdominals, trunk stabilizers | Match stance, cable height, and press distance between sides. |
A shorter or longer completion time does not invalidate any block. Record the actual setup and rest rather than rushing transitions or extending rest solely to match the label. Exercise-set totals describe the listed exercise work; they do not assign identical direct-set credit to every named muscle or establish equivalent fatigue and stimulus across different tasks.
Progress Ab Training Without Losing Control
Progress can come from load, repetitions, controlled range, lever length, hold duration, carry distance, stability demands, or a more demanding exercise variation. Change one meaningful setup standard at a time so the new result can be compared with the earlier record. Novelty alone is not progress. End a set when range, pelvic or ribcage control, normal breathing, anchor or equipment security, grip, support, or the intended movement changes materially. A longer reach, heavier load, longer hold, or harder variation counts only when the exercise remains recognizable and repeatable.
Use an anti-extension progression ladder
This original example shows one possible route from a supported floor task toward a longer-lever rollout. Move forward only when the current step remains controlled; the sequence is not compulsory, and a person can progress an existing exercise without changing its name.
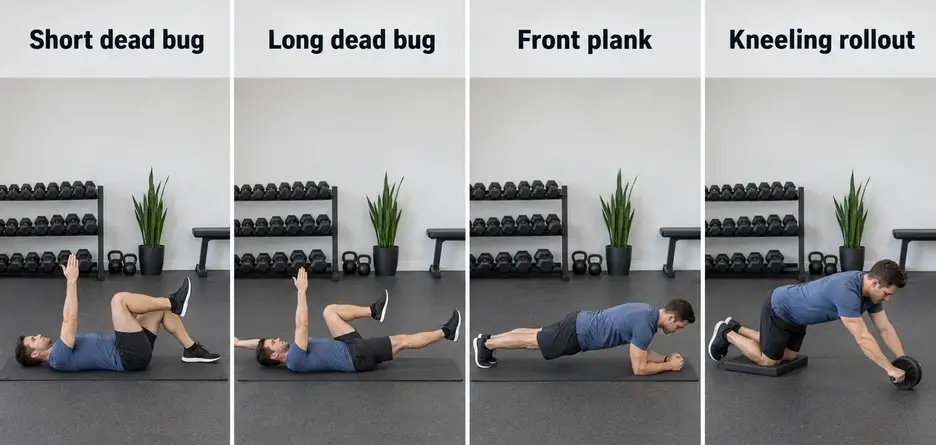
- Dead bug with short contralateral arm-and-leg reaches that preserve the selected ribcage and pelvic position.
- Dead bug with longer controlled contralateral reaches while normal breathing and side-to-side consistency remain available.
- Front plank with a manageable knee or foot lever, stable support points, and a hold that ends before sagging, breath-holding, or loss of position.
- Short-range kneeling ab wheel rollout using an intact wheel, nonslip surface, padded knees, and a reach that can be reversed without lumbar sag or loss of wheel control.
- Longer-range kneeling ab wheel rollout only when the added distance preserves the same trunk relationship, shoulder support, wheel path, and controlled return.
This is one task-specific anti-extension route, not a universal ladder that every person must complete. A dead bug can progress through reach, lever, pause, or suitable resistance; a plank can progress through lever or hold quality; and a rollout can progress through controlled range without requiring a new exercise name or a standing rollout. Keep the defining setup visible in the record. When the lever, surface, support points, wheel, or starting position changes, name the change rather than treating it as unchanged performance.
Progress the variable that matches the exercise
- Load: increase cable, machine, dumbbell, kettlebell, or compatible external resistance only after the current load can be controlled through the intended task.
- Repetitions: add technically acceptable repetitions within the plan's range while range, tempo, breathing, support, and stopping standard remain stable.
- Range: extend a dead-bug reach, pelvic curl, press distance, or rollout only to the point that can still be reversed without compensation.
- Lever length: straighten a limb, lengthen a plank, or move the wheel farther from the knees only when the longer lever preserves the same task.
- Hold duration: extend an isometric hold modestly while alignment and normal breathing remain repeatable; extra seconds after position changes are not equivalent progress.
- Carry distance: add distance or time only when pickup, gait, turns, grip, trunk control, and set-down remain comparable.
- Stability or variation: reduce permitted support or choose a harder compatible variation only when the setup remains secure and measurable. A different or less stable exercise is not automatically an improvement.
Use the smallest practical change that preserves the exercise's purpose. If several variables change together, establish a new baseline instead of attributing the result to one progression factor.
Use the Full Body source row as written
Workout A in the Full Body Workout Plan provides one direct trunk slot with two alternatives. The source permits a cable crunch or an ab wheel rollout; it does not prescribe both exercises in the same slot.
| Exercise | Sets & Reps | Rest | Tempo | Target Muscles | Notes |
|---|---|---|---|---|---|
| Cable Crunch or Ab Wheel Rollout | 2 sets of 8–15 reps | 60–120 sec | 2-1-2-1 | Rectus abdominis, obliques, trunk stabilizers | Use a range that maintains trunk and pelvic control. |
Keep the surrounding workout, preparation, recovery, and progression rules in effect. The source row is a site prescription for that plan, not proof that its two options have identical difficulty, muscle involvement, fatigue, or long-term outcomes.
Case A: replace one source option instead of appending it
This constructed example assumes no source working sets have been completed. Replacing the selected 2 cable-crunch sets with 2 ab-wheel sets gives 2 − 2 + 2 = 2 direct exercise sets. Performing both complete options would give 2 + 2 = 4 sets, which is extra work rather than the source substitution. If a switch occurs after one working set has been completed, keep that completed set in the actual record and decide what remains under the plan. Do not restart the entire two-set slot as though the completed work did not occur.
Case B: count an explicit per-side prescription
This separate constructed bookkeeping example is not wording from the Full Body source row. Assume an appropriate plan explicitly prescribes 2 sets of 10 repetitions per side for a Pallof press.
| Side | Sets | Reps per set | Repetitions for that side |
|---|---|---|---|
| Left | 2 | 10 | 20 |
| Right | 2 | 10 | 20 |
For each side, 2 × 10 = 20 repetitions. Across both sides, 2 + 2 = 4 one-side work bouts and 20 + 20 = 40 one-side repetitions. Each side receives 2 sets, not 4 sets or 1 set. The actual plan must define recovery; switching sides does not prove that the required recovery has occurred.
Keep different progression records separate
Dynamic repetitions, isometric seconds, carry distance or time, lever length, and a cable or machine load are different records. Do not convert them into one universal core score or claim that equal totals create equal stimulus. For explicit user-defined set-accounting assumptions, use the Workout Volume Calculator rather than inventing a new conversion here. Record the exercise, setup, range or lever, load or duration, side where applicable, actual repetitions, rest, effort, and stopping reason. Progress the same recorded task first; when equipment, variation, support, or movement changes materially, preserve the old history and establish a new baseline.
Ab Training, Belly Fat, and Visible Definition
Direct abdominal exercise can strengthen or build the trained muscles and improve performance in the specific trunk tasks being practiced. That does not make ordinary ab sets a reliable primary method for selectively removing fat from the belly. Muscle training and regional fat loss are related to appearance through different processes and should not be treated as the same outcome.
Interpret the spot-reduction evidence without a slogan
A six-week randomized trial of abdominal exercise alone improved muscular endurance but did not reduce the measured abdominal-fat or broader body-composition outcomes. That result argues against expecting a typical ab-only routine to selectively remove belly fat over a short intervention. A later small randomized trial in 16 overweight men reported greater trunk-fat loss when a very specific, high-volume abdominal endurance protocol was combined with treadmill exercise than with treadmill exercise alone. The narrow population, unusually demanding protocol, and combined training design matter. It does not establish that ordinary crunches selectively burn belly fat for everyone, that every abdominal exercise produces the same effect, or that direct ab work replaces an overall energy-balance plan.
Separate muscle development from visible definition
More developed abdominal muscles may be easier to see when other conditions permit, but visible definition also depends on overall and regional body fat, individual fat distribution, abdominal-wall anatomy, skin and surrounding tissue characteristics, posture, lighting, and how the body is positioned. Two people with similar estimates can therefore look different, and one person's appearance can change across photographs without a matching tissue change. There is no universal body-fat percentage at which every person will display a six-pack. A percentage estimate also does not measure abdominal muscle thickness, regional definition, lighting, posture, or the visibility of each tendinous segment.
Use the correct tool for the next decision
Use the Body Fat Calculator when a standardized circumference-based estimate and comparable tracking process are useful. Its result is an estimate of body-fat percentage, not a direct measurement of abdominal muscle development or a diagnosis of visible definition. Use the Nutrition Guide for calories, protein, and sustainable body-composition decisions that belong outside this exercise-selection guide. Keep direct ab training focused on strength, control, progression, and the allocated workout task rather than assigning it a calorie target or promising local fat loss.
Common Ab-Training Mistakes
Use the smallest correction that restores the intended trunk task, then record enough detail to show what actually changed. The goal is not to force more fatigue; it is to keep the movement, setup, progression standard, and stopping rule clear.
| Mistake | Why the task changed | Practical correction | What to record |
|---|---|---|---|
| Choosing exercises only by burn or soreness instead of the required movement or control task | Sensation can reflect fatigue, leverage, breathing, or other contributing muscles without showing whether the plan needed flexion, anti-extension, anti-rotation, lateral control, or hip-flexion control. | Identify the missing task first, then choose one controllable exercise that fits the available equipment and allocated slot. Keep the exercise when it continues to serve that task even if the sensation is less dramatic. | Selected task, exercise, setup, range or lever, actual repetitions or duration, effort, and stopping reason. |
| Performing huge unstructured repetition totals without a progression standard | Repetitions accumulated through shorter range, faster tempo, altered breathing, or momentum no longer describe the same exercise standard. | Use the workout plan's allocated dose and one repeatable standard. Progress a defined variable such as repetitions, load, range, lever, hold duration, or carry distance only while execution remains comparable. | Working sets, actual repetitions or seconds, tempo, range, lever, load or distance, rest, and the first point where the standard changed. |
| Turning cable crunches into arm pulls or large hip hinges | Repeated shoulder extension or a large hip hinge moves the cable without preserving the intended controlled trunk-flexion pattern. | Reduce the load or range, keep the attachment and arm position repeatable, and bring the rib cage and pelvis closer through controlled trunk flexion. End the set before the arms or hips must take over. | Station, attachment, stance, displayed load and unit, trunk-flexion range, actual repetitions, arm or hip change, and stopping reason. |
| Extending rollouts beyond the range that controls the rib cage, pelvis, wheel, and return | Extra distance gained through lumbar sag, rib flare, shoulder collapse, or a jerking return replaces the intended anti-extension task with loss of position or equipment control. | Shorten the reach to the farthest point that can be reversed with the same trunk relationship, shoulder support, grip, and wheel path. Progress distance only after that shorter range is repeatable. | Wheel and surface, knee position, reach marker, range, actual repetitions, tempo, position change, wheel-control loss, and stopping reason. |
| Swinging hanging raises or counting leg motion without the chosen pelvic standard | Thigh movement produced by kipping, leg throwing, or increasing swing is different from a controlled knee raise with deliberate pelvic and trunk contribution. | Let the hang settle, use a manageable knee-raise range, and include the chosen pelvic motion without forcing knees-to-chest contact. Stop when grip, shoulder comfort, swing control, or the return no longer meets the standard. | Station, grip, starting and finishing range, knee position, pelvic motion, swing, actual repetitions, rest, effort, and stopping reason. |
| Treating unstable surfaces, extreme range, or longer duration as automatic progression | A less stable setup, forced range, or extra time can increase difficulty while changing support, breathing, alignment, or the movement being measured. | Progress one relevant variable at a time and keep the setup secure. Use only the range, lever, hold, or variation that preserves the intended task and a repeatable stopping rule. | Surface and support, variation, range or lever, hold duration, breathing, repetitions, load where applicable, and any change from the previous baseline. |
| Adding a complete ab block on top of direct trunk work already allocated in the plan, or counting all compound bracing as identical direct sets | Appending another full block increases workload, while treating every compound set as equivalent direct ab work hides differences in task, intent, range, effort, and progression. | Use the plan's allocated trunk slot and replace rather than automatically append. Keep compound bracing visible as contextual work without silently converting it into identical direct-set credit. | Original plan slot, direct exercise selected, completed working sets, any substitution, compound lifts already performed, actual recovery, and whether extra work was deliberately added. |
| Using pain, numbness, a moving anchor, damaged equipment, uncontrolled breath-holding, or loss of support as a reason to force another test set | Symptoms or insecure equipment remove the conditions needed for a controlled exercise and make another harder attempt an unsafe test rather than normal progression. | Stop the set, bring the resistance safely to rest, and do not reuse damaged, moving, or improperly anchored equipment. Resume only with a secure setup and an appropriate exercise decision; obtain qualified assessment when concerning symptoms persist. | Symptom or equipment issue, exercise and setup, point where the set stopped, action taken, equipment identity, and whether the working set was ended rather than retested. |
Keep a productive exercise when it still fits
A familiar exercise that matches the required trunk task, uses secure equipment, and continues to progress under a repeatable standard does not need changing merely for variety. Change it when the plan, equipment, control, tolerance, or progression problem gives a clear reason, then preserve the previous record and establish the revised setup as a new baseline.
Ab Exercise and Core Workout FAQs
What are the best ab exercises?
The best choices are the exercises that match the trunk task your current plan needs, fit the equipment you can use securely, and allow a repeatable setup with a clear progression method. Cable crunches and reverse crunches train controlled flexion or pelvic curling; dead bugs and ab wheel rollouts challenge anti-extension; Pallof presses resist rotation; side planks and suitcase carries resist side bending; and hanging knee raises combine hip flexion with pelvic and trunk control. No single option is the universal winner.
How many ab exercises should I do in one workout?
Use only the direct trunk work allocated by the complete workout plan. One well-chosen exercise may cover a specific missing task, while two complementary exercises may be appropriate when the plan deliberately provides room for different movement or control demands. Do not automatically perform every category, combine all three partial blocks, or add a full ab block after direct trunk work has already been assigned.
Can I train upper and lower abs separately?
Not as separate muscles. The rectus abdominis is one continuous paired muscle with visible segments created by tendinous inscriptions. Different exercises can emphasize trunk flexion or pelvic motion and may produce task-dependent regional activity, but that does not guarantee isolated upper- or lower-region growth. Choose movements for their controllable action and progression rather than an isolation label.
Do ab exercises burn belly fat?
Direct ab training can strengthen or build the trained muscles and improve task performance, but ordinary ab sets are not a reliable primary method for selectively removing belly fat. Visible definition also depends on overall and regional body fat, muscle development, anatomy, skin and tissue characteristics, posture, lighting, and individual fat distribution. Do not use ab exercise as a spot-fat-loss promise or substitute for broader body-composition decisions.
Do squats and deadlifts train the core enough?
Squats, deadlifts, and other compound lifts require bracing and trunk control, so they can provide meaningful indirect trunk work. They do not automatically replace every direct function taught in this guide, such as controlled flexion, anti-extension, anti-rotation, lateral control, or deliberate pelvic motion. Whether direct work is needed depends on the plan's goals, exercise selection, existing workload, progression, and recovery; compound sets should not be counted as identical direct ab sets without an explicit accounting rule.
How often should I train abs?
There is no fixed frequency that fits everyone. Scheduling should reflect the complete workout plan, the amount and quality of direct and indirect trunk work already performed, the exercise's loading and skill demands, whether performance is progressing, and whether recovery is adequate before the next exposure. More frequent sessions are not automatically better when range, control, breathing, or progression quality is declining.
Can I train abs effectively at home?
Yes, when the exercise and equipment requirements are honest. Dead bugs, reverse crunches, front-plank variations, and side planks need clear floor space and a nonslip surface. An ab wheel needs an intact wheel and clear path; a suitcase carry needs a secure dumbbell or kettlebell and an unobstructed route; and a band Pallof press needs an intact band with a compatible purpose-designed anchor. Hanging knee raises require a secure rated station and are not equipment-free.
When should I stop an ab exercise?
Stop the set when the intended range, ribcage or pelvic control, normal breathing, grip, support, anchor security, equipment control, or movement pattern changes materially. Stop immediately for sharp, radiating, or worsening pain, numbness, unexpected weakness, dizziness, damaged equipment, a moving anchor, or loss of safe support; do not force another test repetition to diagnose or treat the problem. Next, identify one trunk task that is missing from the current plan, choose one available exercise you can control, establish its setup and recording standard, and place it in an allocated slot. Use the site's complete workout plans when you need the full weekly structure and recovery context.