
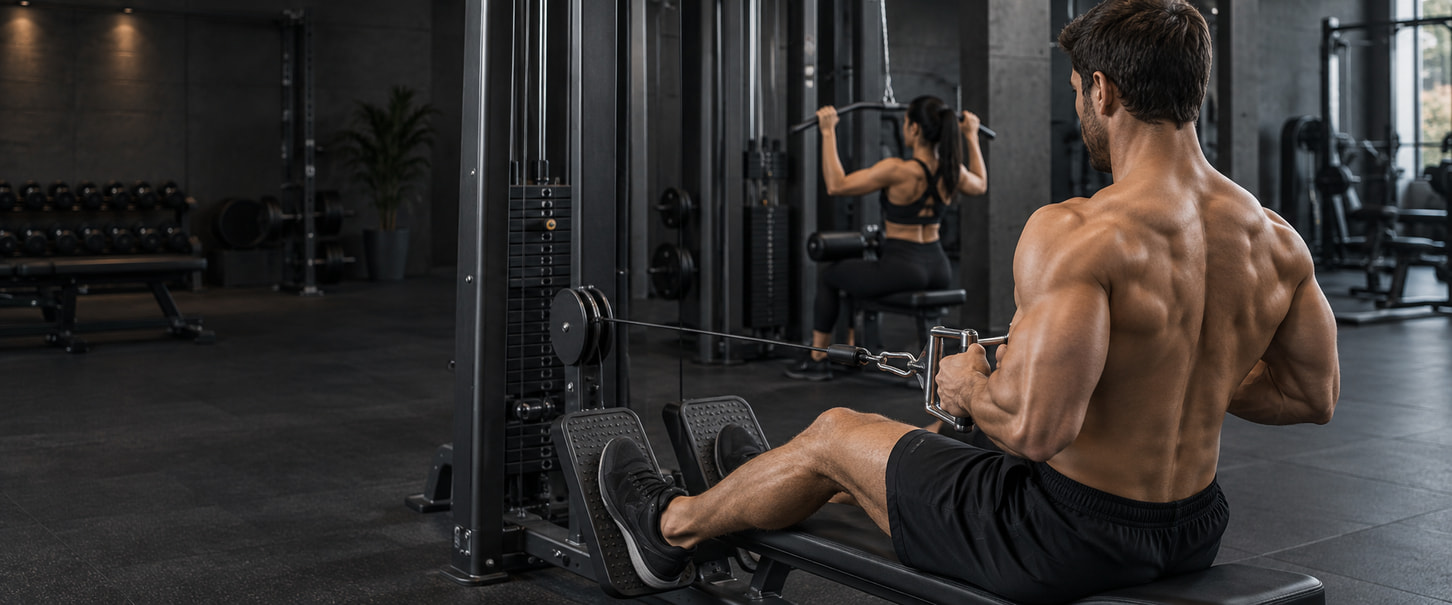
Choose Back Exercises That Work Together
Choose back exercises that serve complementary roles in your workout plan, rather than trying to fit in every variation. Across the week, a vertical pull you can control, such as a lat pulldown or pull-up, and a suitable row are useful starting points. Add rear-delt, upper-trap or other accessory work only when it fills a remaining need. This is a selection framework, not a rule that everyone needs exactly two exercises or both in every session. Your back is not one muscle doing one job. The lats help move the upper arms; upper-back muscles such as the trapezius and rhomboids help position and control the shoulder blades. The rear delts act at the shoulder, while the spinal erectors help control and extend the trunk. Exercises can involve several of these roles at once. Training for width and thickness does not mean training two separate muscle systems, and neither a wider grip nor the hardest-feeling exercise proves a better choice for growth. The comparison below organizes choices by movement, equipment and support rather than ranking them for growth. Use the movement instructions to choose between supported and unsupported rows, understand what your home equipment actually allows, and find a comfortable range you can control. Keep the setup and execution repeatable so you can judge progress through comparable repetitions and loads. You will also find three alternative back-training blocks showing how complementary exercises can fit together. They are examples of part of a workout, not complete weekly routines or extra sessions to append to your plan. If you already follow a workout plan, first review its rows, vertical pulls, rear-delt work and hip hinges. Keep the full schedule and progression with that plan's guide, then use this library to select or replace work where it actually fits.
Understand the Muscles and Movements You Are Training
Look at what an exercise asks your upper arms, shoulder blades and trunk to do. Some muscles move a body segment while others help hold your position. That distinction explains why exercises labeled as back work can serve different purposes.
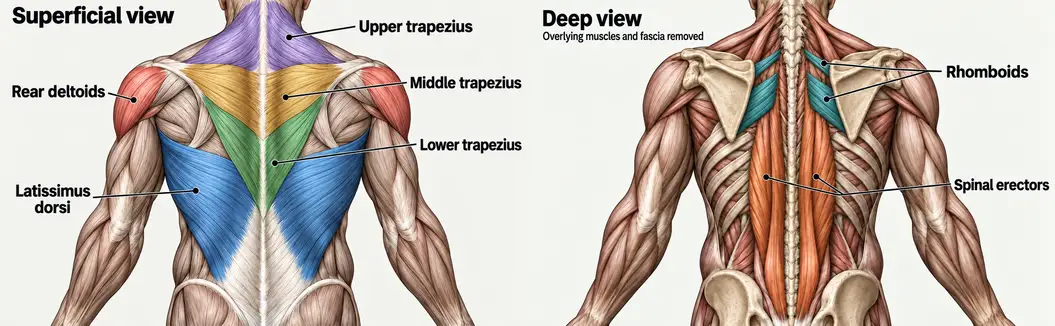
Different muscles contribute different actions
The latissimus dorsi, usually called the lats, help move the upper arm at the shoulder. Shoulder extension brings the arm back from a forward or raised position; shoulder adduction brings it toward the side of the body. These actions can contribute to both rows and vertical pulls, depending on the arm path. The scapulae are your shoulder blades. Upper trapezius fibers help elevate the shoulder girdle, while the middle trapezius and rhomboids help retract the blades toward the spine. The lower trapezius contributes to positioning and upward rotation, working with muscles such as serratus anterior as the arms rise. The rhomboids also contribute to downward rotation. Moving, rotating and stabilizing a shoulder blade are related but distinct jobs. The rear delts are the back portion of the deltoid muscles at the shoulder, not a region of the lats. They help move the upper arm backward, including the opening motion of a reverse fly. Their action at the shoulder is different from the scapular muscles moving the shoulder blade itself. The spinal erectors run along the spine and help control the trunk as well as contribute to spinal extension. They can work to maintain a steady trunk while the hips move in a hinge. That trunk-control role is different from moving the upper arm through a row or pulldown.
Recognize the role of each movement
- Vertical pulls, such as pulldowns and pull-ups, combine upper-arm movement from an overhead position with elbow bending and coordinated shoulder-blade motion.
- Rows bring the upper arm back relative to the torso while the elbow bends and the shoulder blade moves. External support changes how much unsupported trunk positioning the exercise requires.
- Relatively straight-arm shoulder extension, such as a straight-arm cable pulldown, moves the upper arm with a small, fairly stable elbow bend rather than repeating a full elbow-flexion pull.
- Posterior-shoulder accessories, such as the reverse pec deck, emphasize opening the upper arms and involve rear-delt and scapular work. They are not primary lat exercises.
- Shrugs emphasize shoulder-blade elevation, with upper-trapezius involvement. Raising the shoulders is not the same movement as a compound vertical pull.
- Hip hinges, including deadlift variations, involve hip-extensor work and trunk control, with grip demands when holding a load. They do not replace shoulder-moving rows and pulldowns.
These categories overlap. Rows can train the lats, and vertical pulls involve more than the lats. Elbow flexors help bend the elbows, and the hands and forearms maintain the grip during compound pulling. Their participation is normal, not evidence that the back has stopped working. Width and thickness describe appearance goals, not separate anatomical systems. A movement's category does not assign a fixed share of its sets to each muscle, and this list is not a requirement to include every category in every session.
Let the shoulder blades move with the arms
The shoulder socket is part of the scapula, so shoulder-blade movement helps orient it as the arm moves. During an overhead return, allow controlled upward rotation and movement around the rib cage rather than holding the blades permanently squeezed back and down. Stability means controlling the movement, not freezing the shoulder blades in place. During a row, let the blades move with the reach and pull while keeping the intended trunk position. Do not manufacture more range by heaving the torso, forcing an extreme squeeze or chasing a maximum stretch. Use a comfortable, repeatable range appropriate to the exercise rather than a universal shoulder angle. Choose the movement role your plan needs, then use its specific entry to establish the setup and execution.
Compare Back Exercises by Equipment, Support, and Training Role
Use this comparison to narrow a real choice in your workout plan. The rows compare movement roles, equipment, support and practical limitations, not which exercise produces the most growth. They are alternatives to consider, not twelve exercises to complete in one session. The support column describes the version taught in this guide. A seated position is not automatically chest support, and a machine name does not tell you whether its path will fit you. Select an exercise name to read its instructions farther down the page.
| Exercise | Training role | Equipment | Support | Useful when | Main limitation |
|---|---|---|---|---|---|
| Lat Pulldown | Vertical pull; shoulder adduction and extension with elbow flexion | High-cable pulldown station, suitable attachment, seat and thigh restraint | Seated with thigh restraint; torso still needs control | Adjustable loading is needed when bodyweight pulling is unsuitable | The stack label and available path are specific to the station |
| Pull-Up | Vertical pull; move the body toward fixed hand support | Secure, rated pull-up station; approved assisted machine when used | Hanging; body position and swinging must be controlled | Developing the specific skill of controlled bodyweight pulling | Body mass can be too demanding; assistance changes the loading record |
| Chest-Supported Dumbbell Row | Horizontal row with elbow flexion and shoulder-blade movement | Dumbbells and a stable adjustable bench | Chest on the bench; feet stable | Rowing without sustaining an unsupported bent-over torso | Bench fit, breathing space and dumbbell clearance can constrain the setup |
| Bench-Supported One-Arm Dumbbell Row | One-arm row; repeat the chosen arm path on both sides | Dumbbell and a stable exercise bench | Nonworking hand and knee on the bench; other foot on the floor | Training one side at a time with external support | Torso rotation or changing the support can alter the task |
| Seated Cable Row | Horizontal cable row with elbow flexion | Low-cable row station, handle and foot supports | Seated with foot support; no chest support in this version | Adjustable loading and a repeatable handle path are useful | Being seated does not remove the need to control the unsupported torso |
| Chest-Supported Machine Row | Row along the selected machine's path | Row machine with a chest pad and suitable adjustment range | Chest pad and stable feet | Reducing the need to hold an unsupported torso while rowing | The fixed or converging path must fit you; machine designs differ |
| Bent-Over Barbell Row | Two-arm row while maintaining a hip-hinged torso | Barbell, plates and safe loading space | Unsupported torso; substantial bracing demand | Practicing this specific row when trunk endurance is not the limiter | Hinge and grip demands can interfere with the intended pulling work |
| Inverted Row | Bodyweight horizontal pull toward a fixed support | Purpose-built or securely fixed, rated rowing bar or station | Feet on the floor; trunk held as a controlled unit | Adjusting difficulty through a repeatable body angle and leg position | An unsecured bar or household furniture is not a suitable anchor |
| Anchored Resistance-Band Row | Horizontal pull against elastic resistance | Intact band and compatible purpose-designed anchor used as directed | Stable standing stance | A compact home row is needed and a proper anchor is available | Tension changes with stretch; band color is not a universal load unit |
| Straight-Arm Cable Pulldown | Shoulder-extension accessory with a small, stable elbow bend | High cable, suitable bar or rope, and stable standing space | Standing; torso position controlled | Adding shoulder-extension work without another elbow-flexion row | Does not replace all functions of rows or compound vertical pulls |
| Reverse Pec Deck | Posterior-shoulder and scapular accessory | Rear-delt-capable machine with an adjustable seat and chest pad | Chest supported in the version described here | The wider plan needs posterior-shoulder work | Not a primary lat exercise or a substitute for a row by default |
| Dumbbell Shrug | Shoulder-blade elevation; upper-trapezius emphasis | Dumbbells and clear standing space | Standing; elbows extended without a rowing action | Optional direct upper-trap work fills a remaining gap | Not a vertical pull; extra sets may duplicate existing work |
Use the comparison to narrow your choice
- Identify the role that is missing or needs a different option in your current plan. Check the pulling and accessory work already scheduled before adding more.
- Keep only options that match equipment and secure supports you actually have. A dumbbell row does not become a vertical pull because an overhead station is unavailable.
- Compare the support you need and how you can progress the exercise. Consider whether the available load, designed assistance, body position or band setup lets you repeat and adjust the task with control.
- Read the selected movement instructions before training. Use them to check setup, execution, limitations and a suitable alternative rather than treating the table as a complete technique guide.
If the required equipment or secure support is unavailable, leave that option out rather than improvise an anchor. Choose an exercise whose setup and range you can control; the complete workout plan still determines where it fits and how much work to perform.
Lat Pulldowns and Pull-Ups: Choose Your Vertical Pull
Choose a pulldown when adjustable loading helps you perform the intended vertical pull. Choose a pull-up when practicing controlled bodyweight pulling fits your plan and current ability. Neither is automatically superior for muscle growth, and using a pulldown is not a failure to progress to pull-ups. Grip fit, a controllable range and repeatable execution matter more than choosing the widest grip or the hardest variation.
Lat Pulldown
The pulldown lets you adjust the cable load without needing to lift your body toward a bar. Use a high-cable pulldown station with a suitable attachment, a seat and a thigh restraint. Complete your normal preparation and rehearse the movement with a manageable load before working sets.
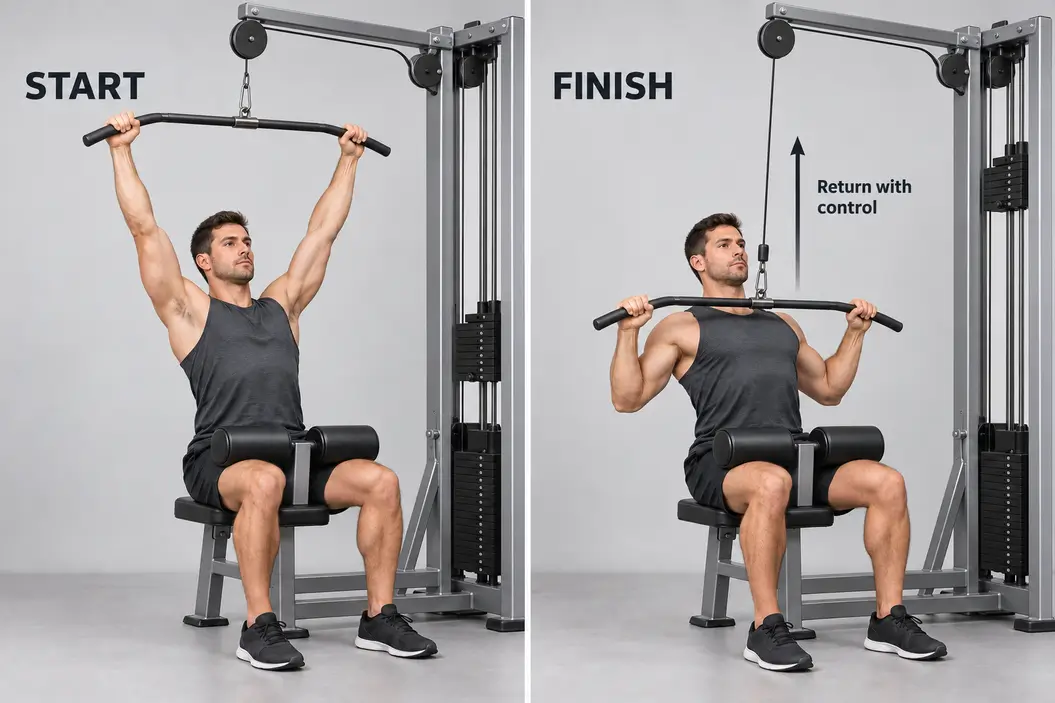
- Adjust the seat and thigh pad so you can sit securely with your feet supported and the pad holding your thighs in place. Follow the station's instructions for reaching the attachment and settling into position; ask facility staff for help if the setup is unfamiliar.
- Take a firm grip that permits a comfortable overhead reach. Brace your trunk and use a small, repeatable backward lean with your head aligned with your torso. The restraint helps hold you in place, but you still need to control your body.
- Move your upper arms down as your elbows bend, guiding the attachment in front of your head toward a comfortable upper-chest region. Keep the torso angle steady rather than rocking backward to turn the movement into a row. Bar-to-chest contact is not required; do not force the endpoint or pull behind your neck.
- Return the attachment upward under control as your elbows straighten and your arms reach overhead. Allow your shoulder blades to move and rotate with the arms instead of keeping them permanently squeezed back and down. Maintain trunk control without being jerked upward or forcing a painful stretch.
- After the last repetition, return the load gently to rest before releasing the attachment and leaving the seat, following the station's directions.
End the set when another repetition would require rocking, a shortened intended range or a return you cannot control. Stop for pain rather than pulling harder to reach a touch point. Reduce the load or adjust the permitted seat, restraint or attachment setup before another set; if the path still does not fit, choose another suitable vertical-pull option. A comfortable grip is not automatically the same width for everyone. Keep the chosen attachment and hand position consistent when comparing performance. A wider grip or a stronger sensation in the lats does not establish a better muscle-growth choice.
Pull-Up
A pull-up practices moving your body toward fixed hand support. Body mass is part of the task, so the unassisted version may be too demanding for your plan's intended repetitions even when a pulldown is manageable. Prepare for the chosen version with appropriate rehearsal or designed assistance.
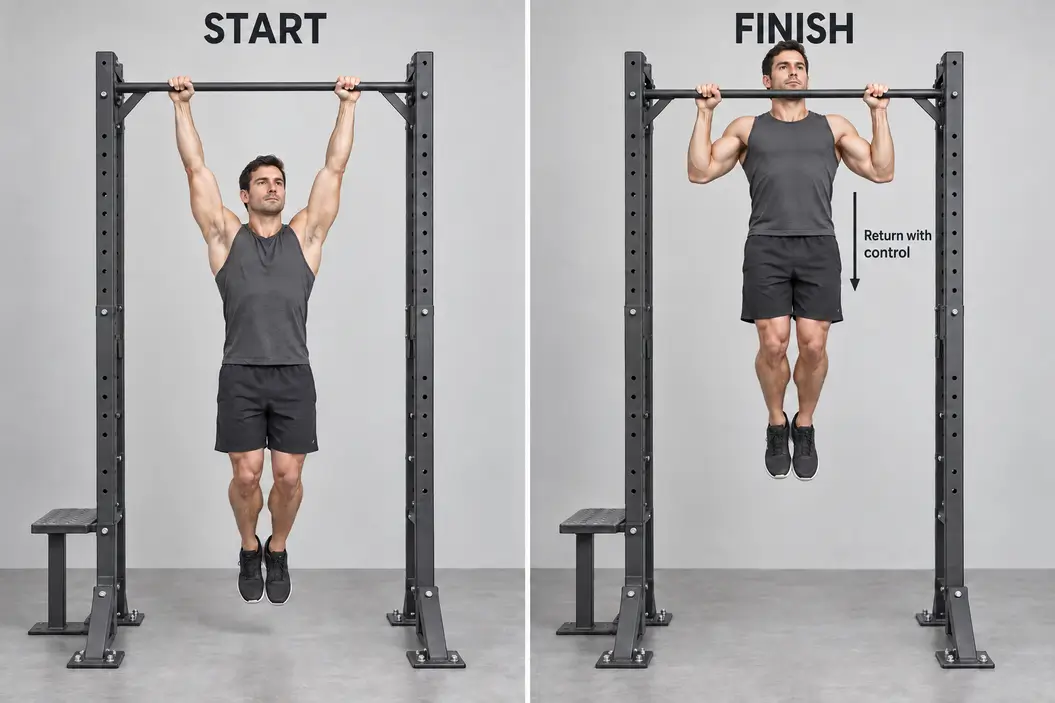
- Use a secure, rated pull-up station with a safe way to reach the handles and return to the floor. Use its intended access steps or platform where provided. For an assisted machine, follow its own entry, support and exit instructions rather than assuming every station works the same way.
- Hold the selected bar or handles firmly in a comfortable grip. Settle into a controlled overhead position, brace your trunk and keep your legs from swinging. Choose a starting range you can maintain without pain or an uncontrolled drop into a hang.
- Pull your body upward as your upper arms move down relative to your torso and your elbows bend. Bring your chin toward bar or handle height through the pulling movement, not by reaching your neck forward. Keep the body controlled rather than kicking, swinging or kipping to finish.
- Lower under control through a comfortable arm range, allowing coordinated shoulder-blade motion as the arms return overhead. Keep the same range from rep to rep. After the set, use the safe way down you established before starting.
Stop when the intended range or controlled return is no longer available, or when pain appears. If body mass prevents the prescribed repetitions and effort, use the station's designed assistance or a suitable pulldown instead of forcing incomplete repetitions. More external load belongs only after the current variation is controlled and the workout plan permits it. Record the station, grip, assistance setting and relevant body-mass context separately. An assistance pin is machine-specific information, not proof of an exact amount to subtract from body weight. Changing between assisted pull-ups, unassisted pull-ups and pulldowns changes the task; keep that change visible in the record. For either exercise, take the working sets, repetitions, rest and effort from your selected workout plan. The later workout-block and progression sections show how these entries can fit into allocated back work and how to judge a suitable progression. They do not require performing both vertical pulls or appending another back session.
Back Rows: Choose the Support and Movement You Need
Choose the row whose support and movement fit the work your plan calls for. Chest support can reduce the demand of holding an unsupported bent-over torso, but it does not make spinal loading zero or remove the need for control. A bench-supported one-arm row, an unsupported seated cable row and a bodyweight row each ask you to stabilize yourself differently. Prepare for the selected movement and rehearse its setup with a manageable load or body position before working sets. End a set when you cannot maintain its intended execution. Fatigue from holding a position is not the same as pain: stop for sharp, radiating or worsening pain, and seek appropriate assessment for persistent symptoms rather than treating a different row as a cure.
Chest-Supported Dumbbell Row
This option lets you row with both arms while the bench supports your chest. It can be useful when holding a bent-over position would limit the pulling work. The dumbbells allow an arm path you can adjust within a comfortable range, but the bench must leave room to breathe and move them.
- Use a stable adjustable exercise bench and secure its backrest. Choose an incline that supports your chest while giving the dumbbells clearance from the bench and floor; there is no single required angle.
- Settle chest-down on the pad with your feet planted. Hold the dumbbells beneath your shoulders in a comfortable grip, with your head aligned with your torso. Establish a controlled starting reach without sliding off the support.
- Bend your elbows and bring your upper arms back, moving the dumbbells toward the sides of your torso along a repeatable path. Let your shoulder blades move with the pull without forcing your elbows wide or lifting your chest to finish.
- Lower the dumbbells steadily as your elbows straighten and your arms reach again. Keep your chest and feet in place. After the set, bring the weights to rest safely before leaving the bench.
If your chest leaves the pad, the weights swing or the intended reach disappears, end the set and reassess the load. Adjust the bench when the pad restricts breathing, shoulder comfort or dumbbell clearance. If a suitable position is unavailable, use a chest-supported machine row that fits rather than forcing this setup.
Bench-Supported One-Arm Dumbbell Row
Use this version to train each side with support from your nonworking hand and knee. It is not chest-supported: your trunk still has to resist rotation while the working arm rows.
- Place your nonworking hand and knee on a stable exercise bench, with the other foot firmly on the floor. Position the dumbbell where you can pick it up without losing that support, leaving the working arm clear of the bench.
- Brace your torso and let the working arm hang beneath the shoulder. Keep your head in line with your trunk and settle into a position you can reproduce on the other side.
- Pull the dumbbell toward the side of your trunk by bending the elbow and moving the upper arm back. Keep the elbow path consistent and the trunk steady; do not twist your chest upward to lift the weight farther.
- Lower under control to the same starting reach without letting the weight pull your torso around. Set the dumbbell down safely before changing sides, then reproduce the hand, knee and foot support for the other arm.
Use a load each side can control. If rotation, jerking or a changing support position takes over, reduce the load or choose a suitable chest-supported row. Record meaningful differences between sides without assuming that the exercise diagnoses or corrects an imbalance. Complete and log both sides. When your plan specifies sets per side, the full prescribed number applies to each arm; it is not a total to divide between them. Keep the arm order and the plan's recovery between sides consistent enough to compare the work.
Seated Cable Row
A low-cable row offers adjustable loading and a repeatable handle path. This entry uses a seated station with foot support but no chest pad. Sitting down does not remove the work of holding your torso in position.
- Choose a suitable handle and set the load while the machine is at rest. Adjust your seat or foot position as the station permits so you can hold the attachment with your knees comfortably bent and feet supported.
- Establish a stable torso position and a comfortable arm reach. Brace before starting, without rounding or leaning far forward just to gain extra travel.
- Draw the handle toward your torso as your elbows bend and upper arms move back. Allow controlled shoulder-blade motion while keeping the chosen torso angle, rather than throwing your body backward or forcing the handle to touch you.
- Return the handle smoothly, straightening your arms while retaining the same trunk position. Do not let the cable jerk you forward. At the end, return the load gently to rest before releasing the handle.
Repeated rocking turns the set into a different task. Lower the load if that is how you finish the repetitions, or try a permitted handle that allows a more comfortable path. If unsupported torso fatigue still ends the set before the intended pulling work, a chest-supported dumbbell or machine row may fit better. Keep the station, handle and setup in your record rather than assuming all cable rows are interchangeable.
Chest-Supported Machine Row
This version combines a chest pad with the machine's movement path. It can reduce the need to hold an unsupported torso, but the seat, pad and handles must fit you. A fixed or converging path is not automatically appropriate for every person.
- Follow the machine's setup instructions, adjusting the seat and chest pad so you can reach the handles and move them comfortably. Place your feet firmly on the floor or provided supports, and select a manageable load.
- Rest your chest against the pad, take a comfortable grip and brace. Check that the starting position does not require you to lift away from the pad or force your shoulders forward to reach.
- Row along the machine's intended path by moving your upper arms back and bending your elbows. Keep your chest in contact and avoid leaning backward or chasing a maximal shoulder-blade squeeze.
- Guide the handles forward under control while maintaining your support. Let the arms and shoulder blades return through the available comfortable range without crashing the stack. Bring the load to rest before leaving the station.
End the set if you repeatedly lose the chest pad or cannot control the return. Recheck the adjustment and load, but do not force an uncomfortable endpoint to satisfy the machine's travel. When its path still does not fit, choose another suitable machine, a chest-supported dumbbell row or a cable row you can control. Record the exact machine and setup; the pad does not make its load equivalent to another row.
Bent-Over Barbell Row
The barbell row combines pulling with maintaining an unsupported hip hinge. That is useful when this specific task belongs in your plan and you can sustain the position, but grip or trunk fatigue can become the limiting factor before the intended pulling work is complete.
- Prepare a clear lifting area and a safe way to pick up and set down the bar. Use a comfortable overhand grip and manageable load. Ask for setup help if you cannot establish a controlled start and finish.
- With your feet stable and knees comfortably bent, hinge at the hips and brace your trunk. Choose a torso angle you can maintain, with your head aligned and arms hanging; do not force a particular back angle.
- Move the bar toward your torso by bending your elbows and drawing your upper arms back along a repeatable path. Let the shoulder blades move without lifting your chest and hips on each repetition to launch the bar.
- Lower the bar under control until your arms return to the intended starting reach, keeping the hinged position steady. After the set, use the controlled set-down you prepared rather than dropping out of the position.
If holding the hinge ends the set first, reduce the load, reassess where the exercise sits in the workout or use a chest-supported row. Repeatedly rising toward standing is not an unchanged barbell-row technique. An unsupported row is not inherently inappropriate, but continuing through pain is not a way to build the missing control.
Inverted Row
The inverted row brings your body toward a fixed hand support while your feet stay on the floor. Body angle and leg position provide ways to adjust the task, but they do not supply an exact percentage of body weight lifted.
- Use a purpose-built rowing station or a securely fixed, rated bar intended for this loading direction. Follow its locking and adjustment instructions. A loose bar across furniture or an improvised household anchor is not a substitute.
- Take a firm, comfortable grip and position your feet on a nonslip surface. Choose a manageable body angle and leg position, then straighten your arms into a controlled starting reach. Keep your trunk and hips aligned rather than hanging through the lower back.
- Bend your elbows and pull your chest toward the support, moving your body as a controlled unit. Keep the feet planted and use a repeatable arm path without thrusting your hips, reaching your neck forward or forcing chest-to-bar contact.
- Lower your body steadily as the elbows straighten and the shoulder blades move with the reach. Retain the same body position, then return safely to standing or supported rest before releasing the bar.
Stop when sagging, hip thrusting or a shortened intended pull replaces the movement. A more upright position or appropriately bent knees can make the row more manageable; use only adjustments supported by the station. If no secure setup is available, choose a suitable cable or chest-supported row instead of improvising. Record the support height, foot placement and leg position so later repetitions describe the same task. Take sets, reps, rest and effort from your workout plan. These entries explain how to perform alternatives, not six rows to add to a completed workout.
Accessory Back Exercises and the Role of Hip Hinges
Choose an accessory because it adds something your workout plan needs, not because every back session must finish with more exercises. Check the rows, vertical pulls, posterior-shoulder work, shrugs and hinges already scheduled. The options below emphasize different actions and are not three mandatory additions after compound pulling. Keep only work that serves a remaining purpose and fits your recovery. Your chosen workout plan supplies the sets, reps, rest and effort. Prepare for the selected movement and rehearse its setup with a manageable load before working sets.
Straight-Arm Cable Pulldown
This movement adds shoulder-extension work involving the lats without another repeated elbow-flexion pull. The upper arms move at the shoulders while a small elbow bend stays fairly constant; the name does not require forcefully locking the elbows straight.
- Use a high-cable station with a secure, suitable bar or rope attachment. Select the load while the machine is at rest. Stand facing the cable with stable feet and enough space for the attachment to travel in front of you.
- Take a firm, comfortable grip and begin with your arms raised within a range you can control. Keep a slight elbow bend, brace your trunk and settle into a torso position you can maintain.
- Move your upper arms down toward your sides, guiding the attachment toward the front of your thighs while keeping the elbow angle steady. Do not lean backward or arch your lower back to finish the pull.
- Return the arms upward under control, allowing your shoulder blades to move with them without forcing an overhead stretch. Retain the same trunk position. After the set, return the load gently to rest before releasing the attachment.
End the set if trunk movement takes over or you cannot control the return. Repeatedly bending and straightening the elbows into a triceps pressdown changes the intended action. Reduce the load or adjust the permitted attachment and stance before another set; stop for pain rather than forcing the endpoint. Use this accessory for a specific shoulder-extension need. It does not replace the combined shoulder, elbow and scapular actions of a row or compound vertical pull, and it does not isolate the lats from every other muscle.
Reverse Pec Deck
The reverse pec deck adds work for the rear delts and shoulder-blade muscles when that role needs attention in the wider plan. Use a rear-delt-capable machine in its chest-supported configuration.
- With the machine at rest, use its rear-delt configuration and adjust the seat and starting position as directed. Sit facing the pad with your chest supported and feet stable. The handles should be reachable without pulling you away from the pad or forcing a shoulder stretch.
- Take a comfortable grip and establish an arm position that fits the machine. Keep your chest in contact and your trunk controlled rather than leaning back to create extra travel.
- Open your upper arms outward and backward through a comfortable arc. Let the shoulder blades move with the arms, without forcing a maximal pinch, shrugging to finish or heaving your torso away from the pad.
- Guide the handles forward slowly to the same starting position. Stop the return before the machine pulls you into an uncontrolled stretch, and do not let the stack crash. Bring the load to rest before leaving the seat.
If you need to lift your chest or jerk the handles to finish, end the set and reassess the load and permitted adjustments. If the path remains uncomfortable, choose a suitable posterior-shoulder alternative within your plan rather than forcing the machine to fit. This is not a compound lat pull or an automatic replacement for a row. Rear-delt and shoulder-blade involvement does not make every set another lat-pulling set or prove complete isolation of one muscle.
Dumbbell Shrug
The dumbbell shrug emphasizes the upper trapezius through shoulder-blade elevation and a controlled lowering phase. Your hands hold the weights while the elbows stay extended; the movement comes from raising and lowering the shoulders, not rowing the dumbbells.
- Use clear standing space and a safe way to pick up and set down the weights. Stand with a dumbbell at each side, feet stable and a firm grip. Keep your head and neck comfortable and aligned with your trunk.
- Raise your shoulders smoothly through a comfortable range while keeping the elbows extended and the torso steady. Do not bend the elbows to pull the weights up as an upright row, bounce through the legs or roll the shoulders or neck in circles.
- Lower the shoulders under control toward the starting position without letting the weights yank them downward. Repeat the same manageable range, then set the dumbbells down safely at the end of the set.
End the set when you cannot maintain a secure grip, the weights swing or you need jerking body movement to continue. Reduce the load when it prevents controlled shoulder movement. Do not push through neck or shoulder pain to complete a shrug. Direct upper-trap work is optional, not a required final exercise. Consider the pulling and hinge demands already present before adding it. A shrug does not provide the upper-arm and elbow movement of a row or vertical pull.
Account for hip hinges already in your plan
Deadlifts and Romanian deadlifts involve hip extensors such as the glutes and hamstrings, spinal erectors controlling the trunk, and grip demand from holding the load. Include that work and its recovery demands when considering more unsupported rows or shrugs. Being scheduled on a lower-body day does not remove its back and grip involvement. That overlap does not make a hinge a complete substitute for shoulder-moving pulls. Holding the trunk and load is a different task from moving the upper arms through rows and pulldowns. Neither shared muscles nor a heavy weight establishes a one-for-one replacement. A heavy deadlift is not compulsory on back day, especially when your plan already places it elsewhere. Keep its exercise choice, scheduling and prescription with that plan's guide instead of adding another heavy hinge here. Before adding an accessory, identify the job it would do and check whether the existing work already covers that need.
Choose Exercises for Lat Emphasis, Upper Back, or Less Trunk Fatigue
Start with what needs attention: a movement your plan is missing, a muscle group you want to emphasize, or a limitation that ends the intended pulling work. Check the exercises already scheduled before adding anything. The useful choice is one that fits your available equipment, allows repeatable control and serves that specific purpose.
For lat emphasis, focus on upper-arm movement
Choose a controllable vertical pull or a suitable row that lets the upper arm move through shoulder adduction or extension, bringing it down from overhead or back toward the torso. A lat pulldown is useful when adjustable loading makes the intended repetitions more manageable than bodyweight pulling. A row can also train the lats; it does not become irrelevant because the goal is a wider-looking back. Choose a grip and arm path you can repeat without rocking or forcing the shoulder. The widest grip is not automatically the best choice. Consider the straight-arm cable pulldown only when additional shoulder-extension work fills a real gap in the plan, not as a compulsory finisher after adequate pulling work.
For upper-back or rear-delt emphasis, match the shoulder task
Look for a row that allows consistent upper-arm movement and controlled shoulder-blade motion while the torso stays steady. A more open upper-arm path changes the task, but it is not a reason to force extreme elbow flare, reach beyond a comfortable endpoint or pinch the shoulder blades as hard as possible. Use the actual movement and machine fit rather than a handle's name to make the choice. When posterior-shoulder work is the remaining priority, the reverse pec deck can fill that role. First account for the rows and rear-delt work already in the week. Its arm-opening action is not another compound lat pull, and overlap with rows does not make their sets identical or require adding both. Horizontal pulling is not the sole route to thickness, just as vertical pulling is not the sole route to width.
When holding the torso limits pulling, reconsider support
If maintaining an unsupported hinge repeatedly ends the set before the intended pulling work, consider a chest-supported dumbbell row or a chest-supported machine row that fits you. External chest support reduces the task of holding a bent-over torso, but it does not make spinal loading zero or guarantee comfort. Hand-and-knee bench support still requires trunk control, and sitting at a cable row without a chest pad is not chest support. Changing the exercise is not the only option. Within your plan's priorities, review its placement relative to demanding hinges, reduce excessive loading or reassess the amount of unsupported work. Replace the work that is not fitting rather than automatically adding a supported row on top. Fatigue from holding a position is different from pain: stop for sharp, radiating or worsening pain, and seek appropriate assessment for persistent symptoms instead of treating support as a cure.
When grip or elbow flexors limit the set, check the cause
Your hands hold the load and your elbow flexors help bend the elbows during compound pulls. Their participation is normal, not proof that the back is doing no useful work. Note what actually stops the set: a slipping grip, difficulty continuing the pull to its intended range, or loss of trunk control. That observation guides a check; it does not precisely measure each muscle's contribution. Review technique, load, the handle's fit, actual rest and preceding arm work before adding another exercise. A manageable load, a suitable permitted attachment or different placement within the plan may address the limitation without changing the intended role. Lifting straps are optional only when appropriate for the exercise and you understand their use. They are not required, do not remove elbow-flexor involvement and are not a treatment for hand, wrist or elbow pain.
Check what another exercise would actually add
Two rows with nearly the same arm path, support and range may add more of the same work rather than broader coverage. That repetition can be deliberate when the plan calls for it, but a different exercise name alone does not create a missing movement role. Before keeping both, identify whether the second changes a useful task, solves a limitation or simply adds workload you have already allocated elsewhere. Judge the selection by its purpose, equipment fit, controlled execution and comparable performance, not by soreness or a pump. Keep a productive selection when it already meets the need. When a change is justified, use the relevant entry's instructions, record the chosen setup and let the complete workout plan govern how much work to perform.
Back Exercises at Home: Work With the Equipment You Have
Start with the equipment and secure supports you actually have, then choose the pulling role they can provide. Dumbbells and a bench, a pull-up station and an anchored band offer different options. You do not need every exercise in this library, but a missing piece of equipment is not a reason to improvise an unsafe anchor or rename a row as a vertical pull.
Anchored Resistance-Band Row
This standing horizontal pull is an option when an intact band and a compatible, purpose-designed anchor are available. The band provides resistance while your stance and trunk control keep the row repeatable; there is no chest pad supporting you.
- Before each use, inspect the band along its length and check any handles, connectors and anchor attachments for cuts, cracks, tears or wear. Do not use a damaged band or attachment. Clear the exercise area of obstacles and sharp edges that could contact the band.
- Mount the anchor and connect the band only as their manufacturers direct, using a mounting point approved for the intended load and pulling direction. Choose a permitted anchor height that lets you row toward your torso. Follow the equipment's stretch limits; if compatibility or mounting is uncertain, do not load the setup.
- Face the anchor on a stable, nonslip surface. Hold the intended grips firmly, keep your knees comfortably bent and brace your trunk. Choose a manageable band and starting distance that allow a controlled arm reach and pull within the manufacturer's limits. Rehearse the movement at manageable tension before working sets.
- Bend your elbows and bring your upper arms back, drawing your hands toward the sides of your torso along a repeatable path. Let the shoulder blades move with the pull without forcing a maximal pinch. Keep your feet and trunk steady rather than leaning backward or jerking to finish.
- Let your arms reach forward slowly as the elbows straighten, retaining your grip and torso position. Do not let the band drag you toward the anchor or snap back. After the set, ease off the remaining tension under control before letting go.
End the set if you lose your grip, rock through the torso or cannot control the return. Use a less resistant compatible band or reduce the starting stretch within the equipment's instructions before trying again. An anchor that moves, a damaged connection or pain is a reason to stop, not pull harder. Without a safe mounting point, leave this version out and choose another actually available option. Record the band's identity, the length in use, anchor height, starting distance, grip and stance or body angle, along with your range, repetitions and effort. Tension changes as the band stretches. Color may help identify your band, but it is not a universal load unit or a direct equivalent of a cable-stack setting. Changing band length, grip, distance or body angle changes the comparison; record that change rather than treating it as the same load.
Match the exercise to your home setup
- Dumbbells and a stable exercise bench: consider the chest-supported dumbbell row when the bench is suitably adjustable, or the bench-supported one-arm dumbbell row with its hand-and-knee support. This equipment provides rowing options, not automatically an overhead pull.
- A secure, rated pull-up station: use the pull-up instructions when you can enter and leave the station safely and meet the intended range, repetitions and effort with control. Having a bar does not itself make bodyweight pulling manageable or provide designed assistance.
- An intact band and a compatible safe anchor: the standing row above can fill a horizontal-pulling role. The anchor, permitted stretch and controllable resistance determine whether this option is usable; a band alone is not the complete setup.
- No external load or secure pulling support: acknowledge the limitation. Prone arm movements or shoulder-blade squeezes may help you practice movement, but they do not automatically match progressively loaded rows or pull-ups. Loose tables or chairs, towels over doors, exposed nails and unrated bars are not substitute anchors.
The equipped-home block in the next section combines pull-ups with bench-supported one-arm dumbbell rows. It requires secure pull-up equipment, dumbbells, a stable exercise bench and the ability to meet that block's pull-up prescription with control. It is not the fallback for everyone training at home. If a requirement is missing, select an appropriate alternative within your workout plan and record the change rather than claiming the unchanged block was completed. Keep the actual exercise and setup in your log, and take the amount of work and recovery from your complete plan instead of adding extra repetitions to disguise a missing movement.
Three Back Workout Blocks and How to Fit Them Into a Plan
Use one of these back-training blocks only when it supplies or replaces an appropriately allocated part of your workout plan. They are constructed partial blocks, not complete weekly plans or three extra sessions to append to an existing routine. They are alternatives, not stages you must progress through. First check the rows, vertical pulls, posterior-shoulder work and hinges already scheduled. Choose according to the remaining need, available equipment and current capacity. A simpler portion may suit someone starting out; experience alone does not justify more work. The complete plan supplies the schedule and recovery, so the block counts below are per application, not automatically weekly totals.
Prepare each block and read the prescription
- Complete your normal preparation and exercise-specific rehearsal or ramp-up sets. Use the earlier movement instructions for safe entry, setup and finish. Warm-up sets are additional and are not included in the listed working-set counts.
- Choose a load or designed assistance that permits the prescribed repetitions with roughly 2–3 estimated technically sound reps in reserve. This means you believe you could complete that many more repetitions to the same standard. It is a starting effort convention, not a precise measurement or a universal optimum; do not force the last repetition.
- Use the rest range between that exercise's working sets, and allow setup and recovery between exercises. A range is not an instruction to start before you are ready. The one-arm row in Block C has a separate between-sides and between-rounds convention. These blocks are not no-rest circuits.
- Stop a set when the intended range, trunk control or comfort no longer permits the movement. Do not continue through sharp, radiating or worsening pain to finish a table. Persistent symptoms need appropriate assessment rather than another exercise added to work around them.
Read each four-position tempo in this order: eccentric or return phase; pause in the lengthened or starting position; concentric or pulling phase; pause in the shortened or finishing position. Each number represents seconds for that phase. A row or pull-up begins with its pull, even though the notation lists the return first. Keep pauses controlled rather than forcing a stretch or a maximal shoulder-blade squeeze. The cadence is an execution aid, not a uniquely best muscle-growth tempo. The Target Muscles column identifies involvement, not an equal share of every set for every muscle named.
Block A: Compact supported pulling block
This option pairs adjustable vertical pulling with a chest-supported row. Both exercises need their own setup and preparation; the machine row must fit your reach and comfortable movement path.
| Exercise | Sets & Reps | Rest | Tempo | Target Muscles | Notes |
|---|---|---|---|---|---|
| Lat Pulldown | 2 sets of 8–12 reps | 2–3 minutes | 2-1-1-1 | Lats, upper back, elbow flexors | Use the seated, thigh-supported setup and a consistent front-of-body path. |
| Chest-Supported Machine Row | 2 sets of 8–12 reps | 2–3 minutes | 2-1-1-1 | Lats, upper back, rear delts, elbow flexors | Choose a machine that fits and keep your chest supported throughout. |
The count is 2 + 2 = 4 raw compound-pulling sets per application. That is not four direct sets for every back muscle or proof that this block supplies enough weekly work for everyone.
Block B: Moderate gym block with posterior-shoulder work
This option adds posterior-shoulder work to a vertical pull and supported row. Choose it only when that accessory role is needed in the wider plan, not simply because the table contains more work.
| Exercise | Sets & Reps | Rest | Tempo | Target Muscles | Notes |
|---|---|---|---|---|---|
| Lat Pulldown | 3 sets of 6–10 reps | 2–3 minutes | 2-1-1-1 | Lats, upper back, elbow flexors | Choose the load from your current technique and effort, not a starting-weight chart. |
| Chest-Supported Dumbbell Row | 3 sets of 8–12 reps | 2–3 minutes | 2-1-1-1 | Lats, upper back, rear delts, elbow flexors | Keep bench support and a repeatable reach; do not lift your chest to finish. |
| Reverse Pec Deck | 2 sets of 12–20 reps | 60–90 seconds | 2-1-2-1 | Rear delts and scapular muscles | This is posterior-shoulder accessory work, not two extra lat-pulling sets. |
The count is 3 + 3 + 2 = 8 raw exercise sets per application: 6 compound-pulling sets plus 2 posterior-shoulder accessory sets. Do not relabel the total as eight direct lat sets. If you leave out the accessory because the plan already covers that need, record the changed block rather than claiming all its listed work was performed.
Block C: Equipped-home pulling block
This block requires a secure, rated pull-up station, dumbbells, a stable exercise bench and the ability to meet the listed pull-up range with controlled repetitions and the intended effort. It is not a no-equipment fallback. If a requirement is missing, choose an actually available, appropriate alternative within your plan and record the change; do not force repetitions or claim the unchanged block was completed.
| Exercise | Sets & Reps | Rest | Tempo | Target Muscles | Notes |
|---|---|---|---|---|---|
| Pull-Up | 3 sets of 6–10 reps | 2–3 minutes | 2-1-1-1 | Lats, upper back, elbow flexors | Use a secure rated bar and meet the range without swinging or forcing repetitions. |
| Bench-Supported One-Arm Dumbbell Row | 3 sets of 8–12 reps per side | 2–3 minutes after both sides; allow necessary recovery between sides | 2-1-2-1 | Lats, upper back, rear delts, elbow flexors | Complete both sides per round. Record each side separately and keep the support and arm order consistent. |
The count is 3 + 3 = 6 exercise-set rounds per application under this convention. Each of the 3 row rounds contains a set on each side: 3 sets per arm, making 6 separate arm-set executions for the row. Do not divide three sets between the arms. Allow necessary recovery before changing sides, then take the listed rest after both sides before the next round. This count combines pull-up sets and paired row rounds; it is not a count of every separate limb execution, a duration estimate or six identical direct sets for every muscle. Keep the support, arm order and actual recovery in the record so later work remains comparable.
Progress the exercise, not the block label
Progress each exercise only when all prescribed sets reach the top of its range with the same setup, range, tempo, effort and rest standard, and with acceptable recovery. For the one-arm row, this applies to the prescribed work on both sides. Then use the smallest suitable approved load increment, or appropriately reduce assistance when using an assisted variation, and re-establish repetitions within the range. No starting weight or compulsory rate of improvement is assigned here. If the next available jump prevents controlled work, retain the load or variation rather than manufacture momentum or use unsafe add-on weights. Log actual repetitions and any changed exercise or prescription instead of advancing simply because another session has passed.
Check the pulling work already in your Full Body plan
The Full Body Workout Plan already distributes pulling across its A, B and C sessions. The extract below selects existing rows from that routine; it is not another block to add. For this accounting example, assume each source session occurs once in the same week, with its base prescriptions unchanged and one listed alternative chosen per row. Full Body A, B and C here identify the source sessions, not Blocks A, B and C above. Keep the source plan's preparation, effort and progression guidance. Its rep and rest prescriptions remain its own rather than being replaced by the constructed block values.
| Source session | Selected existing row | Sets & Reps | Rest | Tempo | Role in this extract |
|---|---|---|---|---|---|
| Full Body A | Chest-Supported Row | 3 sets of 8–12 reps | 2–3 min | 2-1-1-1 | Compound horizontal pull |
| Full Body B | Lat Pulldown, choosing the listed Pull-Up or Lat Pulldown option | 3 sets of 6–12 reps | 2–3 min | 2-1-1-1 | Compound vertical pull |
| Full Body C | One-Arm Dumbbell Row, choosing the listed cable/dumbbell option | 3 sets of 8–12 reps per side | 90–150 sec | 2-1-2-1 | Unilateral compound row |
The selected count is 3 + 3 + 3 = 9 compound-pulling sets in that week. A unilateral round completed on both sides counts once in this exercise-row ledger, but Full Body C still requires 3 sets on each side, not three shared between them. These are planned counts; call them completed only when the stated work is actually performed. The source's 2 rear-delt sets and its hinge work remain relevant but sit outside these nine selected compound-pulling sets. Warm-ups, optional additions, other exercise rows and modified schedules are outside this narrow count too, not declared unnecessary. Nine is neither the complete routine's set total nor each back muscle's direct-set dose. An appropriate same-role substitution can replace an eligible 3-set row with another suitable 3-set row and keep the selected count at 9. That preserves the arithmetic, not identical muscle involvement, effort, loading or stimulus. Establish a new load baseline for the changed exercise and retain the source plan's applicable prescription. Before selecting a block, identify which allocated work it would replace or which genuine gap it would fill. If the existing routine already supplies suitable pulling, keep that work rather than automatically appending one block, let alone all three.
Progress Your Back Training Without Losing the Comparison
Progress each back exercise against its own record. Keep the movement and execution comparable, then use your workout plan's criteria to decide whether to add load or reduce designed assistance. A row can be ready for a change while a pulldown stays at its current setting; neither needs to advance simply because another week has passed.
Keep the standard before changing the load
Retain the exercise, equipment, grip, support, intended range and tempo when comparing sets. Record the actual load and units, completed repetitions, rest and effort estimate, including reps in reserve when your plan uses it. Note why the set stopped and any relevant change in preparation or preceding work. Missing details remain unknown rather than becoming the values you had planned. Under the progression rule used in these blocks, all prescribed sets must reach the top of their range with the intended setup, range, tempo, rest and effort, plus acceptable comfort and recovery. For a per-side exercise, check both sides. Then use the smallest suitable approved load increase, or appropriately reduce designed assistance, and re-establish repetitions within the range. If the next available change prevents controlled work, keep the current load or variation. There is no required weekly increase, failure test or reason to improvise unsafe add-on weights.
Check every set, not just the total
These two independent fictional records illustrate a prescription of 3 sets of 8–12 reps on the same documented machine and setup at the same working load. The repetitions are stipulated to be technically acceptable. The records are alternatives, not measured outcomes, consecutive workouts or a prediction; no starting weight or timeline is assigned.
- Record P1: 12 + 11 + 10 = 33 reps. Only the first set reaches 12, so the requirement to reach the top of the range on every set is not yet met.
- Record P2: 12 + 12 + 12 = 36 reps. Every set reaches 12, satisfying the repetition component only, not automatic approval to increase the load.
For P2, still check range, tempo, actual rest, estimated effort, setup, comfort and recovery against the chosen prescription. Shortening the reach, heaving the torso or taking materially different rest to obtain those repetitions changes the comparison. A recorded effort estimate is not an exact physiological measurement. The totals summarize repetitions, not muscle growth or readiness by themselves. P1's remaining sets still count as work performed, even though they do not meet the increase criterion. Do not force additional reps to make the log resemble P2.
Separate exercise counts from muscle accounting
Raw exercise sets describe the working sets performed under a stated counting convention. Keep planned but unperformed work and preparatory sets separately identified. For a one-arm row, the full per-side prescription applies to each arm. This guide counts a round completed on both sides once in its exercise-row tally, while the log still preserves each side's repetitions and execution. Assigning those sets to individual muscles is a separate accounting step. A compound pull can involve several muscles without becoming several performed exercise sets, and their involvement does not establish identical training stimulus. Neither the constructed blocks nor the earlier nine-set Full Body extract gives every back region the same direct-set dose. For the distinction between raw counts and muscle assignments, use the guide to counting weekly sets and direct versus indirect work. Any muscle-credit model needs explicit assumptions rather than a growth percentage inferred from an exercise name.
Start a separate baseline when the task changes
Keep the old history when you change the machine, designed assistance, grip, support or another meaningful part of execution. Label the new conditions and establish a baseline for them using the plan's normal preparation, rep range and effort rules. A planned reduction in assistance can be a progression step, but the new setting must stay visible in later comparisons. Do not rewrite earlier sets as though they used it. A higher number on a different station is not automatically more strength, and a lower one is not automatically regression. The explanation of gym-machine weight differences shows why load labels are not universal resistance or strength equivalents. Preserve the displayed setting and its units instead of inventing a conversion. A supported row and an unsupported row also remain different tasks even when their rep counts match.
Investigate a stall before adding more work
First check whether the record describes the same exercise and execution. Then examine whether the load or recent increase was too demanding, whether the actual rest matched the plan, and whether preceding arm work, pulls or hinges changed what limited the set. Review recovery and relevant changes in sleep, illness, stress or other activity before deciding that another exercise or set is missing. Use the complete plan to decide whether to retain the load, reduce an unsuitable demand, adjust exercise placement or reassess workload. One hard session is not a diagnosis or an automatic reason for a deload, and there is no fixed deload schedule prescribed here. Stop for pain or unsafe execution; persistent symptoms need appropriate assessment rather than more repetitions to confirm a number. For the next comparable session, keep the date, exercise and setup, actual sets and reps, load or assistance with units, range, tempo, rest, effort and stopping reason. Record any material change and the plan-based decision it led to. Judge the next step from that complete record, not attendance, a total-rep score or a larger stack number alone.
Common Back-Training Mistakes and Useful Substitutions
Start with what you can observe: a missing movement role, a changing repetition or a limitation that ends the intended work. Check the relevant setup and part of your workout plan before deciding what to change. A useful adjustment addresses that problem; it does not require replacing every exercise after a hard session.
Repeating similar pulls without identifying the need
If several rows use nearly the same arm path, support and range, check what each is meant to add. Deliberate repeated work can have a place, but another similar row does not automatically provide broader coverage. Compare the selected movements with the roles already present across the week. Keep purposeful repetition, and replace unnecessary duplication only when a different role is genuinely needed and the complete plan allows it.
Adding load while losing the intended repetition
Torso heaving, lifting away from a chest pad or cutting the return short can make the recorded load look better while changing the exercise. Compare the repetition with the setup, range and control described in its entry, not just whether the handle or weight reached you. End the set when that standard is no longer available. For a non-painful control problem, reassess the load, actual rest and preparation before the next appropriate set instead of counting altered repetitions as unchanged progress. If bodyweight pull-ups require swinging or incomplete repetitions to meet the prescription, use designed assistance or a suitable lat pulldown. This preserves a vertical-pulling role without pretending the new exercise or assistance setting has the same loading baseline.
Pinning the shoulder blades or forcing a fixed endpoint
If keeping the shoulders permanently back and down prevents a controlled overhead return, check whether a stability cue has become an instruction to stop normal shoulder-blade motion. Let the shoulder blades move with the arms while retaining trunk control. Similarly, bar-to-chest contact, a maximal shoulder-blade pinch or the widest available grip is not a universal requirement. Use a permitted grip, attachment and comfortable endpoint that fit the entry; do not force extra travel to copy someone else's position.
When trunk or grip fatigue ends the row
If holding the bent-over position repeatedly ends the set before the intended pulling work, check the load, rest and preceding hinges as well as the row's placement. A chest-supported dumbbell row or a chest-supported machine row that fits may serve the required rowing role without the same unsupported hold. Chest support does not make spinal loading zero or establish that an exercise is suitable for a painful back. If grip or elbow-flexor fatigue is the limitation, examine the grip, load, rest and preceding arm work rather than assuming a chest pad will solve it. Their participation in compound pulling is normal. A suitable handle, manageable load or plan-based placement change may help preserve the intended task; the alternative still needs a secure grip and controlled execution.
Replacing an exercise with a different role by accident
When equipment is unavailable, compare what the replacement actually asks you to do. A shrug moves the shoulder blades through elevation and lowering; it does not supply the shoulder and elbow movement of a vertical pull. A hip hinge loads the hips, trunk and grip but is not a complete replacement for a shoulder-moving row. Match the intended role before choosing from the available entries. At home, an anchored resistance-band row can provide a rowing option when the band is intact and its compatible anchor is installed and used as directed. It does not replace every missing pulling pattern. Without a secure setup, use another appropriate option that is actually available, such as a bench-supported dumbbell row with suitable equipment, rather than improvising a household anchor.
Optional accessories keep accumulating
If back training keeps accumulating optional accessories or another heavy deadlift, review the whole week before adding more. Include existing rows, vertical pulls, posterior-shoulder work and hinges, even when they appear on differently named workout days. Keep an addition only when it fills a real need within the plan's workload and recovery. Otherwise, leave out the unnecessary optional work or adjust its allocated place through the plan rather than automatically stacking it onto completed sessions.
Judging the choice by soreness, pump or stack size
If the reason for switching is a smaller pump, less soreness or a more impressive number on another machine, check the actual completed work first. Those sensations and labels do not establish which exercise produces better growth, and a lack of soreness does not erase the work performed. Compare repeatable execution, plan-relevant effort, progression and recovery instead of adding work to recreate a sensation or make unlike machines share one load scale.
Recognize when another trial set is not the answer
Sharp, radiating or worsening pain, numbness, tingling or unexpected weakness are reasons to stop the exercise, not try another load or grip to diagnose the cause. Seek appropriate assessment for concerning or persistent symptoms, with prompt medical attention for new or progressive weakness. These are not problems this substitution guide can diagnose or rehabilitate. Stop using damaged or unstable equipment and report it to the facility or manufacturer; a lighter trial set is not a safety check. For an ordinary selection or non-painful technique problem, record the observation, the relevant check and the bounded change you chose. Preserve the original history and establish a new baseline when the exercise or meaningful setup changes. Keeping the same set count does not prove identical stimulus. Use the complete plan's applicable prescription to evaluate the revised task, not another exercise added simply to make the session feel harder.
Back Exercise and Workout FAQs
What are the best back exercises?
Choose exercises that fill complementary roles, suit your equipment and current ability, and fit your workout plan. A controllable vertical pull and a suitable row are useful roles to consider across the week, not a compulsory pair in every session. Add posterior-shoulder, upper-trap or shoulder-extension work only when it addresses a remaining need. There is no ranked winner that overrides the task, your control or the work already scheduled.
Can rows replace pulldowns?
They overlap, but a row is not an automatic one-for-one replacement for a pulldown. Rows can train the lats as well as upper-back muscles; pulldowns involve more than the lats and bring the upper arms down from overhead. Check whether your plan needs a rowing role, an overhead pull or practice of a specific exercise, and what its other movements already provide. Match a substitution to that purpose rather than assume another row covers every missing pulling pattern.
Do I need deadlifts for a bigger back?
Not as a universal requirement for back growth. Deadlifts and Romanian deadlifts contribute hip-extensor, spinal-erector and grip work, but holding the trunk and load during a hinge differs from moving the upper arms through rows or pulldowns. They do not replace all shoulder-moving pulls. Keep any existing hinge work and its recovery demands in the complete plan; do not add another heavy deadlift simply because a session is called back day.
Does a wide grip build a wider back?
Not automatically. A wider grip does not guarantee greater lat growth or a particular back shape, and a stronger sensation is not proof of a better choice. Use a grip that allows controlled upper-arm and shoulder-blade movement through a comfortable range without forcing an endpoint. Keep the chosen grip repeatable when comparing performance, and record a meaningful change rather than treating it as identical work.
How many back exercises or sets should I do?
Use the workload in an appropriate complete workout plan, not the length of this exercise menu. The earlier blocks are alternative partial blocks: their counts describe one application, not universal weekly targets or extra sessions to add. Review the rows, vertical pulls, accessories and hinges already scheduled, then consider whether you can complete the intended work and recover for the next planned session. A raw exercise-set count does not give every back region the same direct-set dose. For a per-side row, the prescribed work applies to each side rather than being divided between the arms. More exercise names or a larger total alone does not make the plan better.
Are dumbbells or machines better?
Neither category automatically wins. Compare the actual movement, support, adjustment range, available load increments and progression you can repeat. A dumbbell setup needs stable positioning and clearance; a machine's handles and path still need to fit you. Chest support can reduce the demand of holding an unsupported torso, but not every seated row has that support, and a pad does not eliminate all trunk work. Keep a separate baseline when the equipment or meaningful setup changes instead of inventing a weight conversion.
Can I train my back with no equipment?
You can practice unloaded arm and shoulder-blade movements, but they do not automatically match progressively loaded rows or vertical pulls. A bodyweight pull still needs secure, rated support, and an anchored band row needs an intact band and a compatible, properly installed anchor. Without external resistance or secure pulling support, acknowledge the limitation rather than improvise with furniture, towels over doors or an unrated bar. For your next workout, identify the role you need, read its exercise entry, preserve a suitable setup and fit the work into your complete plan. To choose the weekly schedule, compare the complete workout plans rather than treat a back-training block as the whole routine.