
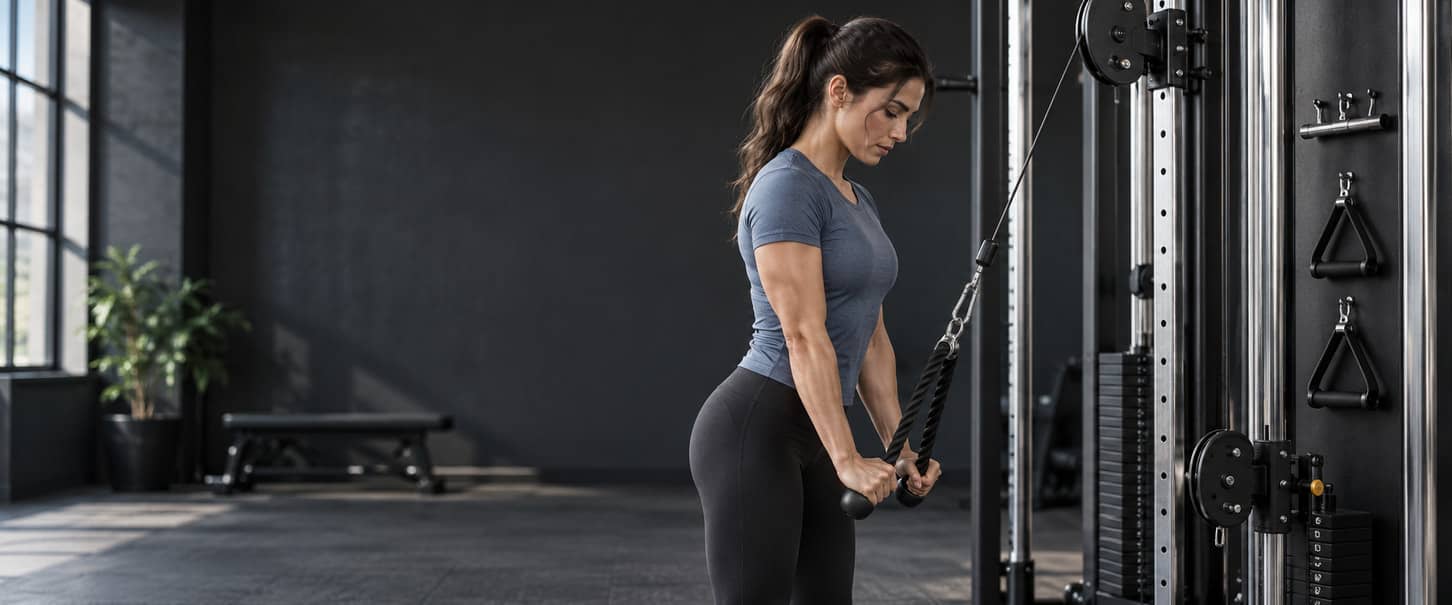
Choose Cable Exercises That Fit Your Station and Workout
Choose the cable exercise that fits both the job in your workout plan and the station in front of you. One adjustable outlet can support many curls, extensions, raises and trunk exercises; a two-handle chest press or fly needs two compatible outlets, while a seated row or lat pulldown needs its intended body supports. Start with the directory, check the attachment and cable path, and learn the selected movement before adding resistance. Moving a pulley or changing handles can change the exercise and its load record. It does not turn every option into another set to add. This library helps you choose and set up cable exercises across body regions. It includes practical instructions and routes to the dedicated technique guides, then shows how three choices fit into an existing workout plan. It is not a sixteen-exercise circuit or a complete cable-only programme.
Cable Exercise Library by Movement, Pulley and Attachment
Use the movement column to find the work you need, then remove options whose outlets, attachments or support are unavailable. Each linked name leads to an in-page technique entry or a clearly identified route to an existing detailed guide. The height descriptions are starting arrangements for these named versions, not ideal settings for every person or machine. Read the setup and movement instructions before treating a comparison row as sufficient instruction.
| Exercise | Movement or main role | Outlets and starting height | Attachment and support | Selection check |
|---|---|---|---|---|
| Standing Bilateral Cable Chest Press | Chest pressing; triceps and shoulders assist | Two outlets; around chest-to-shoulder height | Two single handles; stable standing staggered stance | Enter and return both handles securely; preserve the pressing elbow action. |
| Standing Bilateral Cable Fly | Chest fly; stable elbow bend | Two outlets; around mid-chest height | Two single handles; stable standing stance | Check open-range clearance and a controlled two-handle exit. |
| Seated Cable Row | Compound rowing; back and elbow flexors | One low rowing outlet | Compatible rowing handle; intended seat and foot supports | An ordinary column does not supply the required seat and foot bracing. |
| Lat Pulldown | Compound vertical pull | One overhead outlet at a fitted station | Permitted pulldown handle; seat and thigh restraint | Follow the dedicated guide; do not improvise missing restraint. |
| Straight-Arm Cable Pulldown | Shoulder-extension accessory | One high outlet | Compatible bar or rope; standing torso control | Keep the elbow bend broadly stable rather than pressing down at the elbows. |
| Single-Arm Cable Lateral Raise | Lateral-deltoid arm elevation | One low outlet on the nonworking side | Single handle; stable stance, optional intended fixed support | Use the farther arm and keep the cable clear of the ankles and torso. |
| Single-Arm Cable Rear-Delt Fly | Posterior-shoulder arm opening | One outlet near the selected shoulder-height arc | Single handle; side-on standing torso control | Use the far arm and the dedicated guide; do not substitute a lateral-raise path. |
| Cable Face Pull | Combined posterior-shoulder pull and rotation | One outlet fitted to an upper-face path | Two-ended rope; stable standing stance | Use the dedicated guide and maintain face and connector clearance. |
| Standing Cable Curl | Bilateral elbow flexion | One low outlet in front | Compatible two-handed curl bar; standing | Retain the upper-arm position instead of leaning backwards. |
| Rope Triceps Pressdown | Bilateral elbow extension near the torso | One high outlet in front | Two-ended rope; standing | The elbows extend; do not turn it into a shoulder-driven pulldown. |
| Overhead Rope Cable Extension | Elbow extension with raised upper arms | One low outlet behind for this selected version | Two-ended rope; staggered standing stance | Use the dedicated guide for entry and exit; overhead does not mean high pulley. |
| Front-Held Cable Squat | Knee and hip extension; lower-body work | One low outlet in front | Compatible two-handed handle; whole-foot standing base | Keep the hold steady; balance or grip may limit the exercise. |
| Cable Pull-Through | Bilateral hip hinge | One low outlet behind | Two-ended rope between the legs; clear standing area | Move at the hips and retain a clear controlled return route. |
| Supported Cable Hip Extension | Hip extension by one leg | One low outlet in front | Compatible ankle cuff and intended fixed hand support | Keep the pelvis steady and unload before changing the cuffed leg. |
| Kneeling Cable Crunch | Loaded trunk flexion | One high outlet | Compatible rope; stable kneeling surface | Keep the arm position steady instead of making a large hip hinge. |
| Standing Cable Pallof Press | Trunk anti-rotation | One outlet around torso height | Handle secured in both hands; side-on stance | Record the side facing resistance even though both hands hold the handle. |
The directory is a selection tool, not an exercise sequence. Twelve entries have complete concise tutorials here; four provide equipment-specific orientation and a route to the released detailed guide. Those routes are named so the limits of the shorter entries are clear.
Set Up the Cable Station and Choose Compatible Attachments
Before adjusting a station, return the resistance to rest. Check the actual machine instructions, selector, adjustment locks, cables and attachment. Keep the working arc and the route back to the resting position clear, including the space needed by other people. An adjustable outlet, a fixed low-row station and a lat-pulldown station do not supply the same support. Use the actual configuration rather than deciding that every exercise involving a cable is available on every cable column.
| Station configuration | Useful capability | Limit to check |
|---|---|---|
| One adjustable outlet | Several high, low and torso-height tasks, one setup at a time. | Not the two independent outlets used by the bilateral chest press and fly. |
| Two compatible independent outlets | Two-handle bilateral chest work with a separately recorded setting per outlet. | Confirm that the actual model permits independent use; two handles need not mean two stacks. |
| Low-row station with seat and foot supports | A repeatable seated rowing arrangement. | The seat is not chest support; do not invent a foot brace for a plain column. |
| Lat-pulldown station with thigh restraint | A supported compound vertical-pull setup. | Check reach, seat and restraint rather than assuming every high cable is a pulldown station. |
| A station with an intended support pad or hand support | External support for specific permitted tasks. | A cable cover, moving pulley carriage or weight stack is not a hand support. |
Choose the attachment for the movement
| Attachment | Use in this guide | Compatibility or handling check |
|---|---|---|
| Single handle | One-arm raises and reverse flyes, or one handle on each of two outlets. | Full grip, sound strap and compatible clip; never put a foot through a hand grip. |
| Two-handed straight or angled bar | Bilateral curl or an appropriately fitted straight-arm pulldown. | Use the intended grip width and clear the thighs, outlet and face. |
| Two-ended rope | Pressdown, overhead extension, pull-through or a compatible crunch. | Length and connector clearance must suit the exact exercise; one rope is not universal. |
| Rowing or pulldown handle | A handle fitted to the intended rowing or pulldown station. | Confirm reach and support; do not infer one standard stack reading from the handle. |
| Ankle cuff | The taught supported hip-extension setup. | Use its permitted attachment location and closure; unload before fitting or removing it. |
| Link bars, dual-outlet connectors and specialty accessories | Only tasks specifically permitted by their actual instructions. | No improvised clips, joined ropes, belts or two-handle conversion of a single outlet. |
Rehearse the route and record the setup
Rehearse the start, finish and exit with light resistance. Adjust height and distance so the cable remains clear and the mechanism retains usable travel at both endpoints. Do not chase constant tension by standing so far away that the stack or cable reaches its travel limit. Follow the label's stated units and basis. Two handles may be fed by separate stacks or a shared mechanism; do not assume one arrangement from its appearance. Use why gym machine weights differ for the fuller explanation, rather than halving every display or creating a stack-to-dumbbell conversion. Keep the same station, outlet, attachment, stance or support and range in the record when comparing performance. Ordinary resistance increases under the same setup remain in that exercise history. A deliberate support or geometry change needs a labelled comparison.
Standing Cable Chest Presses and Flyes
A cable press deliberately extends the elbows while the upper arms move forwards. A chest fly keeps a broadly stable elbow bend while the arms close through an arc. Both versions below use two compatible outlets and no backrest; neither is created by fastening two handles to one cable.
Standing Bilateral Cable Chest Press
Use two compatible adjustable outlets and one single handle in each hand. Stand facing away from the outlets with a stable staggered stance. Unlike a fly, this press deliberately bends and extends the elbows as the upper arms move. The standing position still requires balance and trunk control; it does not provide a bench backrest.
- With the resistance at both outlets resting, attach the handles and set both outlets around the intended chest-to-shoulder pressing height. Inspect the locks and cable routes. Choose very light resistance to rehearse how both handles will reach the start and return to rest.
- Take both handles through the rehearsed station-specific route and face away from the outlets. Use a stable staggered stance, softly bent knees and a repeatable torso position. Position the hands near the sides of the chest with a comfortable bent-elbow path and aligned wrists; do not let the cables drag the arms behind the body.
- Check that each cable clears the body and upper arms at both endpoints and that the station has enough travel. Refit the outlets, stance or range while unloaded when necessary. A large forward lean or reliance on the cable to keep you standing means this setup or resistance does not fit.
- Press the handles forwards as the elbows extend and the upper arms move towards the front of the torso. Allow normal shoulder-blade movement. Keep the feet and trunk steady rather than stepping, lunging or thrusting the body to finish.
- Return the hands towards the selected chest-level start as the elbows bend. Stop at the repeatable lower endpoint rather than seeking the deepest shoulder stretch. One coordinated press and return with both arms counts as one bilateral repetition.
- End while both handles remain controllable. Follow the rehearsed return route to settle the resistance at both outlets before releasing either handle. Use lighter resistance, demonstrated handling help or another suitable press when access or exit is not secure; do not improvise a heavy blind turn.
Progress within the same station, stance, outlet heights and range. Record each outlet setting and displayed load separately. A standing cable press cannot inherit a bench-press load or be assumed to provide the same support or strength practice. Use this press for a pressing role. Choose a cable fly only when the intended role is a fly, rather than changing elbow action during the set to move more weight.
Standing Bilateral Cable Fly
This chest fly uses two compatible outlets around mid-chest height, two single handles and a stable standing position. Bring the upper arms towards the front of the torso while retaining a small, broadly stable elbow bend. It is not a reverse fly or a press.
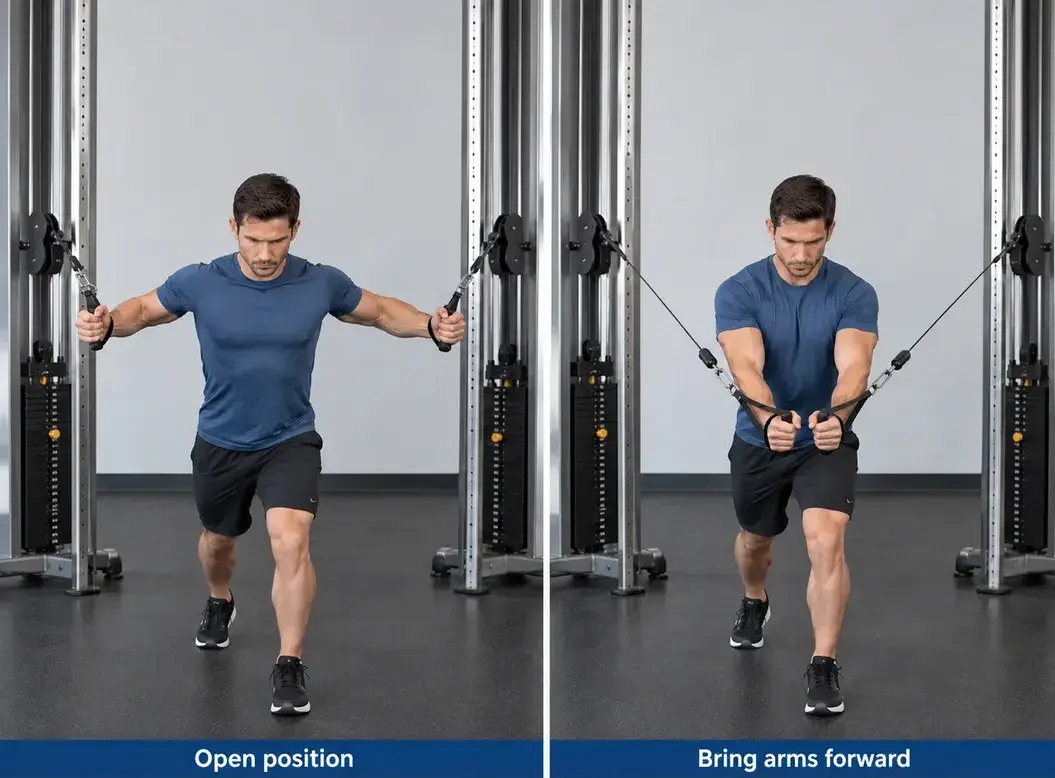
- With the resistance at both outlets at rest, set the outlets around mid-chest height, connect the handles and inspect the clips and adjustment locks. Confirm clear cable routes and a controlled two-handle pickup and return.
- Take a stable staggered stance facing away from the outlets. Establish a modest open-arm starting range with softly bent elbows, comfortable wrists and a torso position you can keep. Do not use a forced stretch or a backward pull to arrange the start.
- Bring the upper arms forwards through a broad hugging arc. Keep the elbow bend approximately unchanged and let the hands approach one another without requiring a crossover, wrist twist or maximal shoulder-blade squeeze.
- Return through the same arc under control. Stop before the shoulder position, stance or elbow angle must change. Chest movement and assistance from other muscles are compatible with the task; repeated elbow extension turns it into a different exercise.
- Keep the handles, cables and frame clear of the body throughout. Reduce the load or open range when you cannot repeat the motion without stepping or being pulled backwards. Both arms closing and returning together make one bilateral repetition.
- Use the planned route to settle the resistance at both outlets before releasing the handles. Choose a fitted pec deck or another suitable chest exercise when the two-outlet arrangement cannot be entered and exited securely.
Record both outlet heights, resistance per outlet, stance, body distance, elbow bend and controlled endpoints. Mid-, low- and high-cable paths change the setup; they do not switch exclusive parts of the chest on and off. For wider pressing and fly choices, use the chest exercise selection guide. Take the working sets, rest and progression from the workout plan you are following.
Cable Rows, Lat Pulldowns and Straight-Arm Pulldowns
Choose a row for a rowing role, a lat pulldown for a compound vertical pull, or a straight-arm pulldown for a shoulder-extension accessory. Sharing a cable does not make their support, elbow movement or place in the workout interchangeable.
Seated Cable Row
Use a low-cable rowing station with an intended seat and secure foot supports. Both hands hold a compatible rowing attachment. The seat and feet support the setup, but the torso still has to remain controlled because this version has no chest pad.
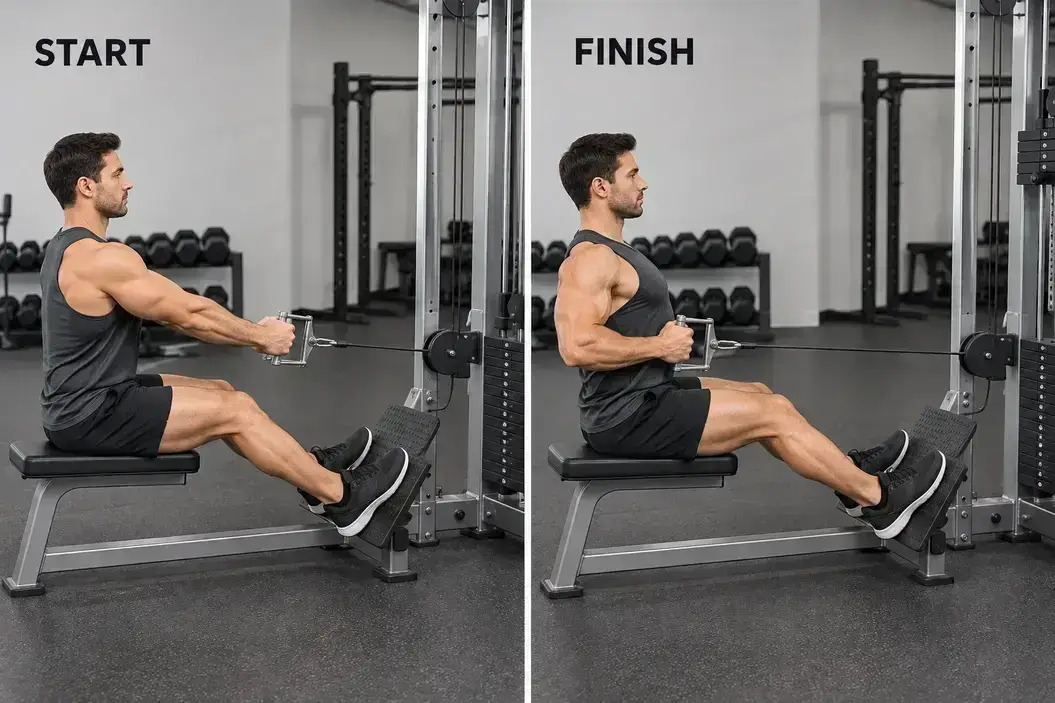
- Select the handle and load while the stack rests. Adjust the intended seat or foot position as the station permits. Confirm a reachable attachment, a clear pull path and a controlled return.
- Sit with secure foot contact and comfortably bent knees. Take a full grip and establish a repeatable starting reach without being dragged forwards or leaning far over the hips.
- Bend the elbows and move the upper arms back relative to the torso, bringing the handle towards a comfortable part of the trunk. Let the shoulder blades follow the movement while retaining the selected torso position.
- Finish before a backward rock, shrug or shortened reach replaces the pull. The handle need not strike or touch the stomach, and the elbows do not need an extreme behind-body endpoint.
- Guide the handle forwards as the elbows extend, keeping the feet and trunk in place. Retain the same controlled reach without crashing the stack. One pull and return by both arms counts as one repetition.
- Settle the resistance fully before releasing the handle or leaving the seat. Recheck the load, handle and station fit when the return is insecure. A chest-supported row is a separate supported choice, not this no-pad version under another name.
An adjustable outlet alone does not supply a seated rowing station. Without the intended foot support and a stable seat, do not brace against a weight stack, wall, loose bench or other improvised arrangement. Record the station, handle, seat and foot settings, displayed resistance, torso position and endpoints. Use the back exercise selection guide for broader rowing and vertical-pulling choices rather than adding every cable pull to the same session.
Straight-Arm Cable Pulldown
Face one high cable outlet with a compatible bar or rope held in both hands. The upper arms move down towards the sides while a slight elbow bend stays broadly steady. This is shoulder-extension work, not a lat pulldown with repeated elbow bending or a triceps pressdown.
- Attach the permitted bar or rope and choose manageable resistance while the stack rests. Clear the space in front of the thighs and the path back towards the outlet.
- Take a full grip and stable stance. Start with the arms raised only within a range you can control, a slight elbow bend and a modest torso angle you can maintain.
- Move the upper arms down towards the sides, allowing the attachment to travel towards the front of the thighs. Keep the wrists supported and avoid converting the movement into repeated elbow straightening.
- Finish without leaning backwards, arching more through the lower back or driving the hands behind the body. A smaller controlled arc can be more suitable than copying another person's endpoint.
- Return the arms through the same arc, allowing coordinated shoulder-blade motion without being pulled into an extreme overhead stretch. Both arms moving down and returning together make one repetition.
- Return the resistance to rest before releasing the attachment or changing settings. Reduce the resistance or use another suitable pulling option when trunk position, grip or return control fails.
This can fill a shoulder-extension accessory role, but it does not automatically replace a compound row or vertical pull. Those exercises include different elbow and shoulder actions. Record outlet height, attachment, torso angle, elbow bend and range. A cable pullover on a bench is another supported implementation with its own clearance and setup, not a second name for every standing straight-arm pulldown.
Lat Pulldown at a Fitted Station
A lat pulldown needs an overhead cable, reachable attachment, fitted seat and intended thigh restraint. An adjustable high outlet with no restraint is not automatically the same supported station. The elbows bend as the upper arms move down; a straight-arm pulldown keeps a different elbow relationship. Use the lat-pulldown technique guide for the complete setup, grip, pull and return. Select this exercise only when that compound vertical-pull role belongs in your workout plan. Do not turn a kneeling or freely standing improvised setup into the pictured seated version.
Cable Lateral Raises, Rear-Delt Flyes and Face Pulls
Pulley height and arm path separate these shoulder tasks. A lateral raise uses a low outlet for arm elevation, the selected rear-delt fly opens the arm across a shoulder-height cable line, and a face pull combines pulling, elbow bending and controlled rotation. Keep each setup distinct.
Single-Arm Cable Lateral Raise
Stand side-on to one low outlet with the working arm farther from the cable column. Use a compatible single handle and raise the upper arm through a controlled arc. The free hand may use an intended fixed support when the actual station provides one; it does not pull on the working arm.
- With the stack resting, connect the handle, set a permitted low outlet and inspect the cable route. Keep the cable clear of the ankles, sharp edges and possible trapping points.
- Use stable feet and a repeatable near-upright torso. For right-arm work, place the station to your left. Take the handle across the front into a modest near-side start without forcing the shoulder into a deep cross-body reach.
- Keep the wrist aligned and a small elbow bend. Raise the working upper arm away from the torso through a comfortable arc, allowing normal shoulder-blade movement without a sudden shoulder hike.
- Stop where the same stance, torso and arm path remain controlled. Around shoulder level may be a useful reference, not a compulsory endpoint or a reason to force a thumbs-down twist.
- Lower through the same arc without a body lean, swinging hand or stack impact. One raise and controlled return by the selected arm is one repetition.
- Settle the stack before changing sides, support or settings. Mirror the actual setup for the other arm and follow the explicitly assigned per-arm work and recovery, rather than assuming one set on each side is two sets for each arm.
Reduce resistance or shorten the controllable arc when trunk movement replaces arm elevation. A different outlet height, body distance or support arrangement needs a labelled baseline. For a wider choice of presses, raises and shoulder equipment, use the shoulder exercise selection guide. The lateral raise starts near the side and elevates the arm; a shoulder-height cable reverse fly opens the arm across a different path.
Single-Arm Cable Rear-Delt Fly
For the taught upright single-arm version, one outlet sits near the intended upper-arm arc on the nonworking side. The farther arm opens away from a controlled reach across the front of the torso with a broadly steady elbow bend. The cable stays clear in front of the body; this is not the low-to-high lateral-raise path. Use the rear-delt exercise guide for the complete one-outlet setup, both-side handling and per-arm application. Keep the same anatomical arm throughout each set and establish a separate baseline from a lateral raise or bilateral fly.
Cable Face Pull
A face pull uses one outlet around the selected upper-face pulling height and a rope long enough for the hands to separate beside the face. Upper-arm movement, elbow bending and a controlled external-rotation contribution occur together. It is neither a reverse fly nor isolated external rotation. Use the face-pull technique guide for the full cable-height, clearance, movement and return instructions. If the connector or rope risks striking the face, unload and correct the setup rather than leaning or jerking to create room.
Cable Curls, Pressdowns and Overhead Extensions
A curl bends the elbows; a pressdown extends them with the upper arms near the torso. An overhead extension keeps the upper arms raised and requires a different handling route. Use the exercise assigned to the arm-work slot rather than collecting every grip and angle.
Standing Cable Curl
Face one low pulley and hold a compatible two-handed straight or angled curl bar. Both arms curl together. This front-facing version is not a behind-the-body curl or a two-outlet crossover.
- Inspect the cable and clip, connect the permitted bar and select manageable resistance while the stack rests. Keep a clear route from the starting position back to a resting stack.
- Take symmetric comfortable grips with the palms facing upwards or following the bar's permitted angles. Stand where the bar clears the thighs and the cable has usable travel.
- Establish steady upper arms near the torso, aligned wrists and a stable stance. Take up the resistance without leaning backwards or changing the selector under tension.
- Bend both elbows to curl the bar while the torso remains steady. Stop before a growing shoulder swing, shrug or hip drive takes over.
- Extend the elbows under control to the same lower endpoint. Do not snap the elbows straight, bounce the bar off the thighs or let the stack jerk the hands down. One two-arm curl and return counts as one repetition.
- Settle the resistance through the prepared route before releasing the bar. Use a lighter setting or another compatible grip when the bar or range does not fit.
Record the station, low outlet setting, attachment, grip, body distance, displayed load and elbow range. Changing the attachment or shoulder position changes the comparison; it does not automatically earn another set allocation. The arm exercise selection guide compares cable, dumbbell and supported curl options. Here, the worked progression later belongs to this specific bilateral cable curl.
Rope Triceps Pressdown
Face one high outlet and hold one end of a compatible rope in each hand. The upper arms stay near the torso as both elbows extend. The rope moves down in front of the body, not behind the head.
- With the stack resting, inspect the rope, clip, selector and cable. Set the outlet high enough for the intended downward path and clear return; choose a light rehearsal load.
- Use full grips, stable feet and a modest fixed torso position. Begin with the upper arms near the sides and elbows bent, without letting the cable pull the shoulders upwards.
- Extend the elbows so the hands move towards the thighs while the upper arms remain broadly in place. Keep the wrists aligned and do not drop body weight onto the rope.
- Finish at comfortable active extension. Let the rope ends separate only as the natural hand path requires, without forcing a wrist twist or driving the upper arms behind the body.
- Allow the elbows to bend on the controlled upward return. Keep the torso and upper-arm position repeatable. One two-arm extension and return counts as one repetition.
- Return the stack fully to rest before releasing the rope. End early when grip or handling becomes uncertain; use less resistance or a compatible alternative handle when needed.
The upward, elbow-bending return is the eccentric phase of this exercise. A straight-arm pulldown instead moves the upper arms with much less change in elbow bend. An overhead extension changes the shoulder position and handling. It can be another choice when your workout plan assigns triceps work, not an automatic extra after pressdowns.
Overhead Rope Cable Triceps Extension
The existing bilateral overhead rope implementation faces away from one low outlet with the upper arms raised. It therefore uses a low outlet despite being called overhead. A high-outlet forward extension is a different setup, not the same tutorial with the pin moved. Use the long-head triceps exercise guide for the complete entry, working range and controlled removal. Rehearse the handling with light resistance, including a competent handoff when needed; do not make a heavy blind turn or allow the cable to rub the head, neck or back.
Cable Squats, Pull-Throughs and Hip Extensions
Cable lower-body options can add a squat, hinge or controlled single-leg hip-extension task when the station and workout plan permit them. Their hand holds, balance and available travel can become the limiting factors. None makes a complete leg session unnecessary.
Front-Held Cable Squat
Face one low outlet and hold a compatible two-handed handle close to the upper torso. Bend and extend the knees and hips while keeping the handle position reasonably steady. This front-held cable squat is neither a belt squat nor a squat-to-row combination.
- While the stack rests, attach the intended two-handed handle, set a permitted low outlet and select light resistance. Rehearse bringing the handle to the front-held position and returning it without pulling on a loaded adjustment.
- Face the outlet with stable feet at a comfortable width. Hold the handle near the upper chest with both hands, elbows bent and wrists supported. Stand where the cable has usable travel and does not contact the knees or body.
- Descend by bending the knees and hips together through a repeatable range. Keep whole-foot contact and allow the knees to follow the chosen foot direction. Do not hang backwards from the cable or use it as fall protection.
- Stop at a depth you can reverse with the same balance and handle position. A fixed thigh-parallel target is not required. If the cable goes slack, a travel limit is reached or the handle obstructs the path, unload and refit instead of forcing depth.
- Extend the knees and hips to return to standing without adding an arm row, calf bounce or backward lean. Keep breathing and the hands near their selected position. One descent and return by both legs is one repetition.
- Bring the attachment and stack to rest through the rehearsed route before releasing it. Use a lighter setting or another squat option when the hold, balance or return limits the movement.
The cable pulls towards its outlet, not straight down like a freely held dumbbell. The holding and balance demands can limit this exercise before the legs; more displayed resistance does not make it a barbell-squat equivalent. Keep this as its own exercise record. A bilateral squat, hip hinge and single-leg kickback serve different roles and do not make one another redundant merely because the glutes contribute.
Cable Pull-Through
Use one low cable outlet behind you and a compatible two-ended rope held between the legs. Move through a hip hinge with a modest knee bend, then return to standing. The hands hold the rope; they do not curl it or pull it up towards the chest.
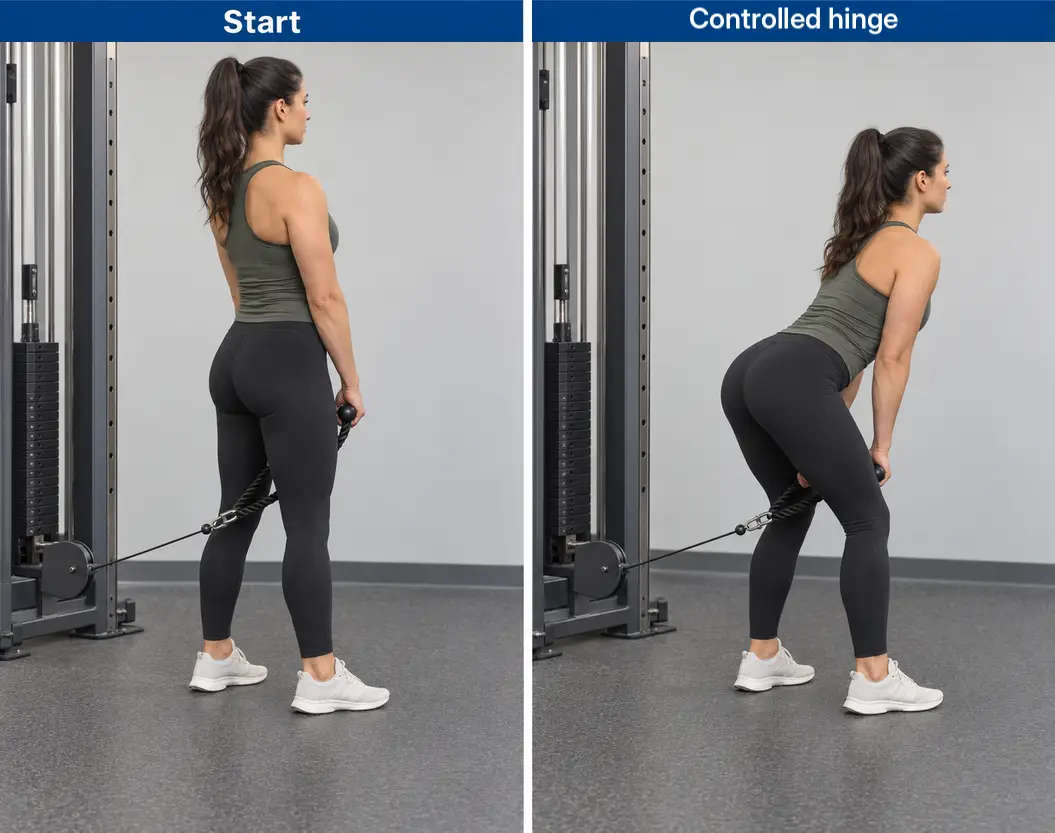
- With the stack resting, attach a rope long enough to keep the hands and connector clear of the body. Clear the floor, the cable route between the feet and the route back to the station. Select very light resistance to learn the handling.
- Face away from the outlet with one foot on either side of the cable. Take one rope end in each hand through a controlled unloaded or very lightly loaded reach. Establish a stance wide enough for cable and hand clearance without forcing the hips.
- Move forwards only far enough to establish usable cable travel while keeping balance. Stand tall with the hands low in front of the pelvis and a slight knee bend. Do not step over a tensioned cable, swing it into position or rely on it to keep you upright.
- Send the hips backwards as the torso inclines at the hip joints. Let the long arms and rope travel back between the legs. Keep the knees softly bent without turning the movement into repeated deep squatting.
- Stop the hinge while the torso, grip, balance and cable clearance remain controlled. The torso does not have to reach parallel to the floor, and extra back rounding or a forced hamstring stretch is not a depth target.
- Extend the hips to return to standing, keeping the arms long and the hands low. Finish without leaning backwards, throwing the hips past a comfortable upright position or lifting the rope with the shoulders.
- Repeat the controlled hinge and standing return. One hinge and return is one repetition; the initial handling is not another working repetition. Stop before the cable starts dragging the feet backwards or the hands lose their route.
- Keep both grips and walk back towards the outlet carefully as needed to settle the stack, keeping the cable between the feet and clear of the body. Release the rope only when the resistance rests. Reduce the load or obtain a demonstrated handling method when the route is not secure.
The cable changes the direction of resistance compared with a barbell or dumbbell hinge. This is not proof of identical hamstring loading, a universal lower-back safety advantage or a substitute for direct knee-flexion work. Use the leg exercise selection guide to choose squat, hinge, knee-flexion and calf work across the complete workout plan. Do not replace every lower-body exercise with this rope movement merely to keep the whole session at one cable column.
Supported Cable Hip Extension
Use one low outlet, a compatible ankle cuff and an intended fixed hand support. Face the station and move the cuffed leg backwards at the hip while keeping the pelvis steady. This controlled hip extension is not a swinging kick or a knee curl.
- With the stack resting, fit the cuff at the location permitted by its instructions and connect the approved attachment point. Inspect the closure and clip. Use only a cuff designed for this loading; do not place a hand grip around the ankle or improvise a strap.
- Take the intended fixed support with the hands. Stand on the nonworking leg with a soft knee and set the cuffed foot near its controlled starting position. Leave the cable clear of the supporting ankle and keep a route to unload without hopping.
- Establish a steady pelvis and a torso position you can retain. Keep a small, broadly stable bend in the working knee; this entry does not alternate knee flexion and extension to move the load.
- Move the cuffed thigh backwards relative to the pelvis. Stop before the lower back arches farther, the pelvis twists or the stance changes. The foot need not rise high, and sensation alone does not determine the endpoint.
- Return the leg forwards under control to the same start, preventing stack impact or cable contact. One backward hip movement and return by the selected leg is one repetition.
- Complete the assigned work for that leg while preserving support. Unload fully before moving the cuff to the other leg; follow the plan's explicit per-leg allocation and rest rather than assuming the changeover is recovery.
- Bring the foot to a stable position, settle the resistance, then detach the cuff and release the hand support. Stop sooner if balance, closure security or unloading becomes uncertain.
Use a lighter load and smaller arc when pelvis or back movement replaces hip motion. Without a compatible cuff and intended fixed support, choose another suitable exercise rather than inventing an attachment. Keep the working leg, supporting leg, cuff position, support, outlet and range in the record. A different knee angle or body position is a labelled variant, not an unnoticed way to increase the same result.
Cable Crunches and Pallof Presses
The cable crunch deliberately flexes the trunk; the Pallof press challenges control against rotation while the hands move. Choose the task assigned by your workout plan. Both need manageable resistance, normal breathing and a controlled way to return the attachment.
Kneeling Cable Crunch
Use one high outlet and a compatible rope while kneeling on a stable surface. Keep the attachment near the upper torso or beside the head with a repeatable arm position. Flex the trunk under control rather than repeatedly pulling with the shoulders or sitting back into a large hip hinge.
- With the stack at rest, connect the rope, select manageable resistance and clear the kneeling and return space. Rehearse reaching and returning the attachment before choosing a working load.
- Kneel on a suitable stable surface facing the outlet. Hold the rope securely beside the head or upper torso as its length permits, keeping it clear of the neck. Arrange the ribs over the pelvis and keep the knees supported.
- Flex the trunk to bring the rib cage towards the pelvis through a range you can repeat. Retain the arm position; a large backwards sit or a shoulder-driven pulldown changes the task.
- Finish at a controlled point without trying to touch the forehead to the floor or force maximum spinal rounding. Keep breathing instead of using a prolonged breath hold to sustain the position.
- Return slowly to the selected start without letting the cable jerk the trunk upwards. One controlled crunch and return is one repetition.
- Settle the resistance and release the attachment through the rehearsed route before rising or changing the selector. Reduce the load or choose another suitable trunk exercise when the support or handling is unreliable.
Record the outlet, rope, kneeling distance, arm position and trunk range. Changing to a standing crunch changes the support and geometry rather than preserving the same comparison. A cable crunch is a loaded trunk-flexion choice. A Pallof press instead asks the trunk to resist rotation; those tasks can have different places in a workout plan.
Standing Cable Pallof Press
Stand side-on to one cable outlet around torso height and hold a compatible handle with both hands. Press the hands forwards while keeping the chest and pelvis facing the same direction. Both arms hold the handle, but the side facing the resistance defines the side-specific setup.
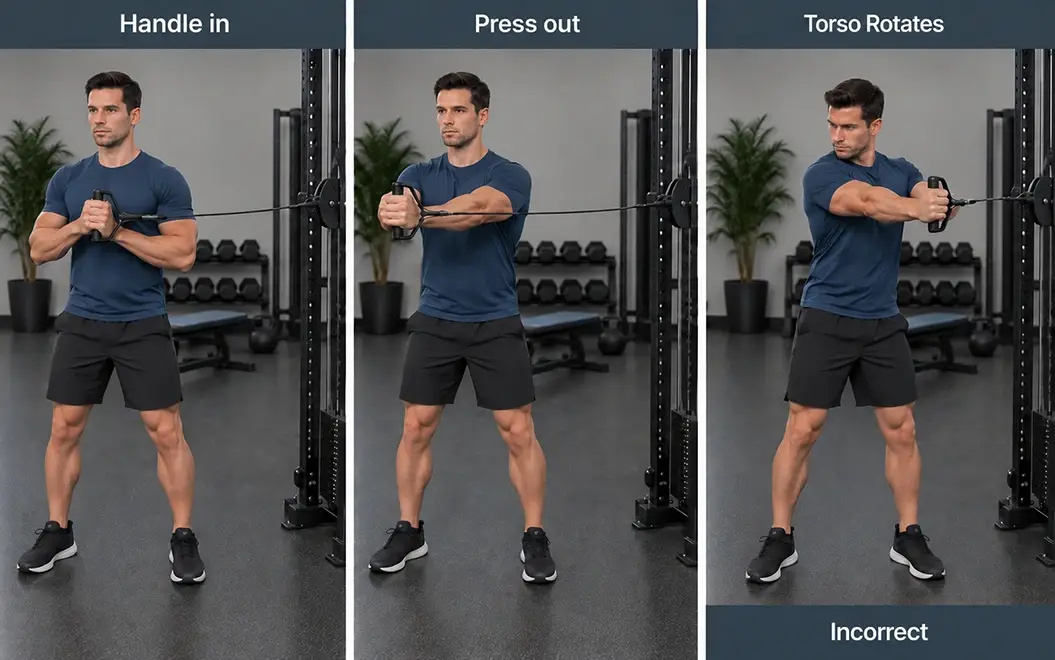
- While the stack rests, connect a handle intended to be held securely in both hands, choose light resistance and set an outlet around torso height. Clear the cable path and inspect the adjustment lock.
- Stand side-on with stable feet and the handle held near the front of the torso. Move only far enough away for usable travel without using tension to keep your balance.
- Press the hands away from the chest through a controllable distance while the pelvis and chest keep their orientation. Resist being turned towards the outlet without counter-rotating in the other direction or changing stance.
- Pause at the chosen press distance only while normal breathing and body position remain controlled. Do not force a locked-elbow reach or move farther merely to create shaking.
- Return the handle to the torso steadily. One press-out and return is one repetition. A timed hold is a different prescription and needs its own stated duration.
- Settle the stack before changing which side faces the outlet. Repeat the full setup on the other side, following the plan's prescribed side order and rest. Unload before releasing the handle or walking through the cable path.
Regress by lowering resistance or shortening the press distance while keeping a repeatable stance. Both arms pressing together do not erase the need to account for the two resistance-facing sides when the plan prescribes them. Use the ab exercise selection guide for wider flexion, anti-extension, anti-rotation and lateral-control choices. This is training instruction, not a test or treatment for back pain.
Use Cable Exercises in an Existing Workout Plan
The prescription below comes from the Upper/Lower Split Workout Plan. These are the final three rows, exercises five to seven, from one Upper A session. They follow the two presses and two pulls and retain that original order. The lateral-raise row offers cable or dumbbell work, the extension note allows a pressdown or overhead angle, and the curl offers an EZ bar or cable. Choose one implementation for each row. The quotation does not specify a rope, curl bar, cable side-count convention or outlet height.
| Exercise | Sets & Reps | Rest | Tempo | Target Muscles | Notes |
|---|---|---|---|---|---|
| Cable or Dumbbell Lateral Raise | 2 sets of 12–20 reps | 60–120 sec | 2-1-1-1 | Lateral Delts | Raise through a comfortable arc without swinging the torso. |
| Cable Triceps Extension | 2 sets of 8–12 reps | 60–120 sec | 2-1-1-1 | Triceps | Choose a pressdown or overhead angle according to elbow and shoulder comfort. |
| EZ-Bar or Cable Curl | 2 sets of 8–12 reps | 60–120 sec | 2-1-1-1 | Biceps, Brachialis | Keep the shoulder position stable and complete the chosen range consistently. |
Choose manageable starting resistance through rehearsal, not by copying a display from another machine. Keep preparatory work distinct from the assigned working sets. The source describes stable isolation work as often 0–3 reps in reserve; that is contextual guidance, not a requirement to reach failure or permission to lose handling control. Use the listed 60–120 sec between working sets of each selected bilateral extension or curl. The explicit one-arm lateral-raise application later assigns that interval after each arm. Take sufficient recovery under the complete plan's adjustment rules and record the interval actually used. For the curl, 2-1-1-1 means a two-second controlled lowering through elbow extension, a one-second lower pause, a one-second curl and a one-second controlled top pause. For the pressdown, the two-second return travels upwards as the elbows bend. For the raise, it is the arm-lowering return. The order describes phases, not a rule that every exercise starts by moving the weight down.
Progress the Standing Cable Curl Choice
The hypothetical log is for the bilateral Standing Cable Curl selected in Upper A: two sets of 8–12. Exposures A through C share the same station, low outlet, bar, grip, body position, range, load, intended effort and comparable rest. D is a possible outcome after a small permitted increase, not a timetable or client record.
| Exposure | Set 1 | Set 2 | Decision |
|---|---|---|---|
| A | 10 | 9 | Retain the load and add controlled repetitions under comparable conditions. |
| B | 12 | 11 | Retain the load; the second set has not reached 12. |
| C | 12 | 12 | Consider a small permitted increase only when technique, effort, rest and handling also qualify. |
| D | 9 | 8 | One possible result after a manageable increase, not a promised timetable. |
Reach 12 on both curl sets with the same technique, effort, rest and handling before increasing resistance. A result of 12/11 does not qualify. The lateral-raise row instead has a 20-repetition upper boundary; do not transfer the curl's target to it. A result of 9/7 after an increase misses the curl's lower boundary in the second set. Record it rather than adding assisted or altered repetitions. The source permits repeating the load after an isolated final-set shortfall while reviewing recovery; early misses, repeated decline or changed technique need reassessment. When an increment cannot support the assigned range after appropriate recovery, use a smaller permitted step or the previous manageable resistance.
Count Both Sides and Plan Your Station Changes
This worked station example selects the single-arm cable lateral raise, bilateral rope pressdown and bilateral standing cable curl for the three source rows. The lateral raise is explicitly adapted to two sets of 12–20 repetitions per arm, with 60–120 seconds after each arm and a 2-1-1-1 tempo. The source does not state that side convention. Keep the source order: complete the lateral raises, then the extension, then the curl. Finish each exercise's assigned work and settle the stack before changing the outlet or attachment. Do not move the curl before the extension merely to avoid moving the pulley twice.
| Selected application | Work received | Actual work bouts | Interpretation |
|---|---|---|---|
| Adapt the lateral-raise choice to the taught single-arm cable raise | 2 sets per arm | 4 single-arm bouts | Per-arm allocation and rest after each arm are explicit adaptations, not quoted source details. |
| Choose the bilateral rope pressdown for the triceps row | 2 extension sets received by each arm | 2 bilateral bouts | One implementation of the source-permitted pressdown angle, not an extra extension allocation. |
| Choose the bilateral standing cable curl for the curl row | 2 curl sets received by each arm | 2 bilateral bouts | One implementation of the cable choice; the source does not specify this bar or grip. |
| Perform all three selected rows in their original order | 2 lateral-raise sets, 2 extension sets and 2 curl sets per arm, in different roles | 8 bouts: 4 single-arm plus 2 bilateral plus 2 bilateral | Six grouped exercise-set allocations under the stated per-arm-round convention; not eight sets per muscle. |
One lateral-raise order is left set 1, rest, right set 1, rest, left set 2, rest, then right set 2 and the final rest before the extension. At 15 repetitions in each bout, each arm completes 30 repetitions and the four bouts contain 60 single-arm repetitions overall. Then unload, fit the high outlet and rope, and perform the two bilateral pressdown sets with their own 60–120 sec rest. Unload again, fit the low outlet and curl bar, and perform the two bilateral curl sets. Setup changes are not a reason to erase actual rest or hurry the next working set. The three choices make six grouped exercise-set allocations under the stated per-arm-round convention, but eight actual bouts: four single-arm raises, two bilateral extensions and two bilateral curls. These train different roles, not eight identical direct sets for each muscle. The guide to counting workout sets explains why the unit must remain visible. Performing the full pressdown allocation and then the full overhead-extension allocation would add two extension sets and two bilateral bouts, making ten bouts across this modified tail. It would not preserve the original triceps choice. Already-completed sets remain recorded if equipment changes partway through. Keep the first four Upper A rows, all other sessions, schedule, recovery and progression unchanged. Do not convert this cable-station example into a second arm workout, a weekly multiplier or a reason to reserve the machine beyond normal gym rules.
What to Do With One Pulley, Limited Attachments or a Busy Station
Choose the solution that preserves the role your workout plan needs. A missing support, an incompatible cuff or a busy station is not solved by assembling a new exercise from spare clips and furniture. An available source-listed alternative is often the simplest choice. Otherwise make an explicit adjustment to the complete workout plan, accounting for the changed support, movement, load, rest and work already performed.
| Constraint | Practical decision | What remains different |
|---|---|---|
| Only one outlet is available | Choose the taught one-outlet exercise for the role or a suitable non-cable alternative. | The bilateral two-outlet chest press and fly are not recreated by adding another handle. |
| No intended row seat or pulldown restraint | Use another fitted station or an exercise with complete instructions and suitable support. | Sitting on the floor or a loose bench is not the same supported implementation. |
| No compatible rope, handle or cuff | Use another permitted attachment with its own defined setup, or choose another exercise. | Do not improvise retention, connect ropes together or wear a hand grip. |
| The cable station is occupied or unsuitable | Wait, use an available source-listed alternative, or make an explicit workout-plan adjustment. | Changing order, support, exercise or rest is not an unchanged performance comparison. |
For changes that go beyond a listed alternative, use when to change your workout plan. A cable press is not automatically the same strength task as a bench press, a cable pull-through is not a knee curl, and a hand-supported hip extension is not a complete replacement for squat, hinge and calf work. Start a suitable new resistance baseline for the replacement and preserve the work already completed. Waiting, using an allowed alternative or deliberately changing the plan are different choices; record the one you actually made.
Cable Training Mistakes and Recovery Checks
Most useful corrections begin with the actual mismatch: an unsuitable attachment, obstructed cable, loss of balance or a changed joint action. Bring the resistance to rest before changing the setup. A larger displayed number does not make a different movement the same repetition.
| Observed problem | Practical response |
|---|---|
| A selector, carriage or attachment is adjusted while loaded | Settle the resistance completely and follow the actual equipment instructions. |
| The cable rubs, catches, loses usable travel or pulls you off balance | Unload and refit height, distance, range or equipment before continuing. |
| A fly turns into a press or row, or a hinge turns into an arm pull | Restore the selected joint action with manageable resistance; record a deliberate variation separately. |
| A matching display on another outlet or machine is treated as an equivalent load | Establish and record a new station-specific starting resistance. |
| One side is omitted or both sides are counted twice | Keep the plan's per-side convention and actual completed work visible. |
| Extra exercises are added or rest is shortened simply to keep a station | Preserve the complete plan or record the deliberate adjustment rather than disguising more work. |
One poor exposure is not automatically a plateau. Compare actual rest, previous exercises, load, support and range, then review recovery before adding more work. Use why reps drop between sets for the broader performance checks. Stop and settle the load when grip, balance, attachment security or equipment control becomes uncertain. Persistent, worsening or otherwise concerning pain, radiating symptoms, numbness or unexpected weakness needs appropriate assessment rather than repeated exercise testing. This library does not prescribe rehabilitation.
Cable Exercise FAQs
What are the best cable machine exercises?
Choose by the role in your workout plan and the station you can use: a supported row for rowing, a fitted press for pressing, a curl or extension for arm work, and an appropriate squat, hinge or trunk exercise when those tasks are assigned. No single exercise list is a mandatory full-body session.
Can I use this library with only one cable pulley?
Many entries use one outlet, including the curl, pressdown, lateral raise, pull-through, crunch and Pallof press. The bilateral chest press and fly taught here require two compatible outlets. The seated row and lat pulldown also need their specific supports.
What height should I set the cable pulley?
Use the starting height for the named implementation, then check both endpoints, cable clearance and available travel with manageable resistance. A low pulley can serve a curl, lateral raise or the selected overhead extension; the exercise name alone does not determine the outlet height.
Does a 2:1 pulley mean I should halve the displayed weight?
Not without the actual label basis and manufacturer documentation. A display may already express effective user resistance, and cable routing differs between stations. Keep the station and stated units in the record rather than applying a universal conversion.
Is constant cable tension better for muscle growth?
A cable can provide a useful adjustable line of resistance, but tension, joint torque and muscle force are different quantities. This guide does not establish a universal growth advantage over free weights or other machines. Choose a repeatable setup and progression that fits the task.
Can cable exercises replace my whole workout?
Only an appropriately designed complete workout plan can establish that. One station may lack the support, travel, available load or compatible attachments for every required movement. The worked example here applies three existing Upper A choices, not a cable-only weekly routine.
How many sets and reps should I do?
Use the selected workout plan. The quoted Upper A lateral-raise row uses 2 sets of 12–20, while its extension and curl rows each use 2 sets of 8–12; all three list 60–120 sec and 2-1-1-1. These are specific source rows, not universal prescriptions for the library.
Do two sets of a single-arm exercise mean one on each side?
An explicit two-sets-per-arm prescription gives each arm two sets, creating four single-arm bouts. The worked lateral-raise adaptation uses that convention with rest after each arm. Do not silently transfer it to an unrelated exercise whose prescription is unclear.
Can I train legs and glutes on a cable machine?
The front-held squat, pull-through and supported cuff hip extension provide different lower-body tasks. Grip, balance, support and cable travel can limit them. They do not automatically replace heavy squat practice, knee-flexion work or calf training.
Should I group exercises by pulley height or do them as a circuit?
Not at the expense of the selected workout plan's order, rest and priorities. Finish the assigned work and unload before changing the station. A circuit or reordered session is a deliberate programming choice, not a hidden benefit of sharing one cable column.
Can I use resistance bands or ordinary handles as ankle straps?
No improvised ankle retention is taught here. Use a compatible purpose-designed cuff for the hip extension. A band needs its own manufacturer-permitted setup, attachment and exercise instructions; it is not automatically a substitute for every cable entry.
What should I do if the cable path or movement hurts?
Stop and bring the resistance to rest safely. Recheck fit and handling without forcing the same movement through symptoms. Persistent, worsening or otherwise concerning symptoms need appropriate assessment rather than an improvised test or a new attachment presented as a cure.