
No-Equipment Home Workout Plan
Train at home with two alternating workouts that use your body weight, a clear floor and a solid wall. Start with a version of each exercise you can control, take the listed rests and build repetitions before making the movement harder. No weights, bands, bench or pull-up bar are needed. The plan trains the legs, pressing muscles, calves and trunk, with light upper-back work. It does not provide the same pulling resistance as rows or pull-ups. It suits starting out, returning gradually or training when equipment is unavailable; it is not a complete replacement for well-loaded back and biceps training. Use three non-consecutive training days when they fit your recovery, or the two-day option below. There are no jumps, timed circuits or compulsory finishers. Read the setup and exercise instructions before your first session.
Your Weekly Home Workout Schedule
Alternate Workout A and Workout B. With three training days, use A/B/A in the first week and B/A/B in the next, then continue the sequence. Leave at least one full non-training day between these sessions.
| Week | Monday | Wednesday | Friday |
|---|---|---|---|
| 1 | Workout A | Workout B | Workout A |
| 2 | Workout B | Workout A | Workout B |
For two days a week, use A then B on non-consecutive days, such as Monday and Thursday. Do not squeeze the missing third session into either workout. Two and three days provide different amounts of practice and training; choose the schedule you can recover from and repeat. The first time you perform each workout, do one set of every exercise, including one set per side where stated. Move to the listed two sets once you can complete that version comfortably and recover for the next session. Repeat the reduced session when needed rather than advancing because a date has passed. Complete an exercise's sets before moving to the next row. For separate-side exercises, perform one side, rest, perform the other side and rest; repeat that sequence for the second set. This is a rested strength routine, not a race through six exercises.
Workout A
Use the versions you selected during rehearsal. The table lists the normal two-set session; use one set per exercise for your introductory session. Rest after each set and allow time to change position before the next exercise.
| Exercise | Sets & Reps | Rest | Tempo | Target Muscles | Notes |
|---|---|---|---|---|---|
| Bodyweight Squat | 2 sets of 8–15 reps | 90 sec | 3-1-1-0 | Quadriceps, glutes, adductors | Use a comfortable, repeatable depth. |
| Push-Up: chosen version | 2 sets of 6–12 reps | 90 sec | 2-1-1-0 | Chest, triceps, anterior delts | Choose wall, knees-down or regular floor push-ups; perform one version. |
| Floor Glute Bridge | 2 sets of 10–20 reps | 90 sec | 2-1-1-1 | Glutes; hamstrings assist | Keep both feet planted and stop before the lower back arches farther. |
| Prone W Raise | 2 sets of 8–12 reps | 60 sec | 2 sec lift, 1 sec hold, 2 sec lower | Upper-back and rear-shoulder muscles | Light shoulder-control work, not a replacement for rows. |
| Standing Calf Raise | 2 sets of 10–20 reps | 60 sec | 2-1-1-1 | Calf muscles | Use light hand contact with a solid wall; both feet stay on level floor. |
| Dead Bug | 2 sets of 4–8 reps per side | 60 sec after each complete set | 2 sec reach, 1 sec pause, 2 sec return | Abdominals and other trunk-control muscles | Alternate sides within each set; finish the target on both sides before resting. |
For a dead bug, alternate left and right inside one set. At six repetitions per side, each set contains twelve reach-and-return movements. Two sets give twelve repetitions per side and twenty-four movements altogether. This session contains twelve sets when performed as written. The light W raises and trunk-control work have different purposes from the squats and push-ups, so the total is not twelve equivalent sets for every muscle.
Workout B
Keep the split squat stationary: one leg stays in front for the whole set. The hamstring walkout adds small heel steps to a raised bridge; read its instructions before trying the prescribed cycles.
| Exercise | Sets & Reps | Rest | Tempo | Target Muscles | Notes |
|---|---|---|---|---|---|
| Bodyweight Split Squat | 2 sets of 6–12 reps per leg | 90 sec after each leg | 3-1-1-0 | Quadriceps, glutes, adductors | Keep the same leg in front for the set; use light wall contact if needed. |
| Push-Up: chosen version | 2 sets of 6–12 reps | 90 sec | 2-1-1-0 | Chest, triceps, anterior delts | Use the same chosen version unless you deliberately change it. |
| Short Hamstring Walkout | 2 sets of 4–8 reps | 90 sec | About 1 sec per heel step | Hamstrings and glutes | One repetition is the whole outward-and-return cycle, followed by a brief reset. |
| Prone W Raise | 2 sets of 8–12 reps | 60 sec | 2 sec lift, 1 sec hold, 2 sec lower | Upper-back and rear-shoulder muscles | Keep the lift small and the neck comfortable. |
| Standing Calf Raise | 2 sets of 10–20 reps | 60 sec | 2-1-1-1 | Calf muscles | Rise and lower without bouncing or pulling with the hands. |
| Side Plank | 2 sets of 15–30 sec per side | 60 sec after each side | Steady hold; breathe normally | Obliques and other trunk-control muscles | Begin with bent knees; complete and rest each side separately. |
Two split-squat sets per leg means four separate sets: left, right, left, right, with the listed rest after each. At eight repetitions per set, that is sixteen repetitions with each leg leading. The rear leg still helps support the movement. The side plank also has four separate holds. Four holds of twenty seconds give forty seconds per side, not eighty seconds on each side. As written, Workout B has sixteen separate work periods, so it can take longer than Workout A.
Before You Start: Space, Warm-Up and Effort
Check the space
Use a level, nonslip floor with enough room to lie down, reach your limbs and step into a split stance. Use only a solid wall for pushing or light balance support, not glass, a loose panel, a door or furniture. A mat or folded towel can cushion contact, but it must not slide; neither is an anchor or slider. You need to get down to and up from the floor safely and tolerate the chosen hand, knee, shoulder and foot support. When that is not possible, seek an adapted plan instead of forcing these positions. Ask a qualified healthcare professional about activity that fits any relevant condition, injury or long period of inactivity. Stop for pain, dizziness, chest discomfort or unusual breathlessness; seek urgent medical help for severe or persistent symptoms.
Warm up without tiring yourself out
Walk or march gently for about three to five minutes, then rehearse a few easy repetitions of the first exercises. Start with a shallow squat and an easy push-up version. Before a new floor movement, practise its setup and return. Rehearsal prepares you for the session; it is not another full circuit.
Choose a useful difficulty
For the squats, push-ups, bridges, walkouts and calf raises, choose a version that lets you reach the bottom of the range with roughly two or three good repetitions still possible. During the introductory sessions, leave a larger margin. The estimate is approximate: stable movement and a controlled finish matter more than assigning a perfect number. The reps-in-reserve guide explains this effort scale. Stop W raises and dead bugs when you can no longer repeat the intended position. End side planks before the hips sag, the body rolls or breathing becomes strained. Do not test failure to discover how long you can last.
Read rest and tempo
Rest is recovery between sets, not the time spent doing the movement. Take the table's interval after each set; take extra time when needed and note it. Shortening rest is not the progression method for this plan. The four numbers describe lowering, the lower pause, lifting and the top pause. For 3-1-1-0, lower for three seconds, pause for one, rise for one and use no timed top pause. Push-ups use 2-1-1-0; bridges and calf raises use 2-1-1-1. A bridge begins with the lift even though the notation lists lowering first. The other exercises use the plain-language timing shown in their rows.
Squats, Split Squats and Calf Raises
Use a comfortable stance and a range you can repeat. A wall can help with balance, but it should not carry your body weight during a squat or calf raise.
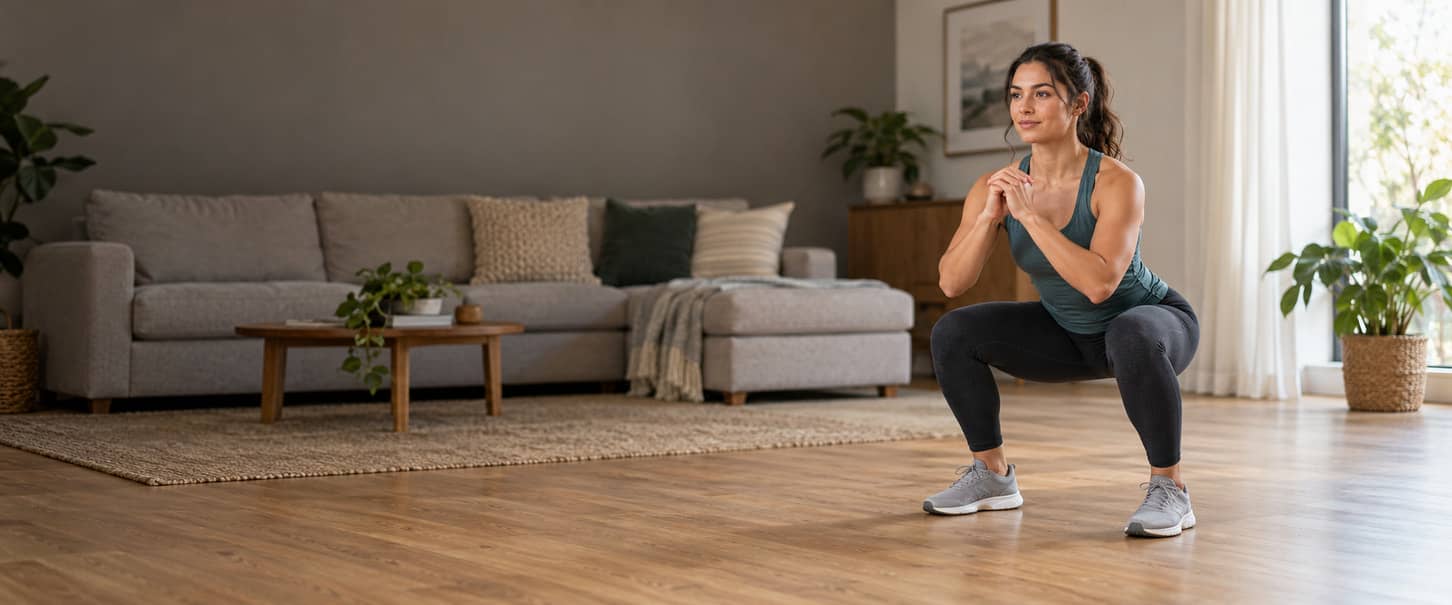
Bodyweight Squat
Stand on a level floor with the feet around hip-to-shoulder width. Turn the toes out slightly if that is more comfortable.
- Stand tall with your weight spread across both feet. Hold the arms in front for balance or use light fingertip contact with a solid wall beside you.
- Bend the hips and knees together, lowering between your feet. Let the knees follow the direction of the toes.
- Stop at a depth you can control without the heels lifting or balance shifting unexpectedly. There is no requirement to reach a particular height.
- Press through both feet to stand. Keep the same stance and avoid bouncing out of the bottom.
- Finish standing steadily. Use a shallower squat or light wall contact if balance limits the set.
Build a comfortable, repeatable depth before adding repetitions. When the two-leg squat becomes easy at the upper target, the split squat below is one possible replacement with its own per-leg prescription.
Bodyweight Split Squat
Take a staggered stance with both feet on the floor and enough side-to-side width for balance. The front leg does most of the work, while the rear leg helps.
- Place one foot ahead of the other with the rear heel raised. Use light hand contact with a solid wall beside you if needed.
- Keep both feet in place and bend both knees, lowering between them. A slight forward torso lean is acceptable when controlled.
- Stop before the rear knee hits the floor or the front heel lifts. Let the front knee move naturally with the toes.
- Push through the front foot, with assistance from the rear leg, to return to the same stance. Do not step or jump between repetitions.
- Complete the set with the same leg forward, stand securely and rest for 90 seconds before changing the lead leg.
Start with a shorter comfortable range. Progress the depth gradually, then the repetitions. A rear-foot-elevated version is not required. The leg exercise guide covers wider choices when your equipment changes.
Standing Calf Raise
Use both feet on a level floor and light hand contact with a solid wall. Keep the knees comfortably near straight.
- Stand with the feet at a comfortable width and the whole forefoot supported.
- Raise both heels, keeping pressure spread across the balls of the feet rather than rolling outwards.
- Pause briefly at the top without pulling yourself upwards with the hands.
- Lower both heels to the floor under control. Do not bounce or bend the knees to restart the movement.
- Finish with both heels down. Keep wall contact when it helps balance.
Use the same foot position and range each time. There is no need to balance on a step or remove support to make the exercise harder.
Single-Leg Calf Raise
This optional progression replaces the two-leg calf raise. Keep wall support and work on the level floor.
- Stand beside the wall and transfer weight onto one foot. Lift the other foot clear without twisting the pelvis.
- Rise onto the ball of the working foot as far as you can control without pulling with the arm.
- Pause briefly, then lower the heel to the floor without dropping.
- Complete the assigned repetitions, put both feet down and rest before switching legs.
- Return to the two-leg version when the single-leg movement cannot reach its target with control.
Use two sets of 8–15 repetitions per leg, 60 seconds of rest after each leg and 2-1-1-1 tempo. This creates four separate sets instead of the baseline two. Do not perform both calf versions for their full allocation.
Choose Your Push-Up Level
Choose one push-up version that lets you complete 6–12 controlled repetitions per set. Wall, knees-down and regular floor push-ups are options, not three exercises to perform together. All use two sets, 90 seconds rest and 2-1-1-0 tempo.
Wall Push-Up
Face a solid wall on a nonslip floor. Start close enough that the movement is comfortable.
- Place both hands on the wall around chest height, slightly wider than the shoulders if comfortable. Keep the feet stable.
- Bend the elbows and bring the chest towards the wall while the body stays in one line.
- Stop before the face touches the wall or the hips fold forwards. Keep a comfortable elbow path.
- Press away to the starting position without shrugging or arching the lower back.
- Finish upright. Moving the feet a little farther from the wall can increase the challenge, provided the feet remain secure.
Record the approximate foot distance so later sessions are comparable. Stop moving farther away once slipping, wrist position or body control becomes the limit.
Knees-Down Push-Up
Use a comfortable floor or nonslip mat. The support points are the hands and knees, not the hips.
- Kneel and walk the hands forward until the shoulders, hips and knees form a roughly straight line.
- Keep the abdomen gently braced and lower the chest and hips together by bending the elbows.
- Stop at a depth you can control without the hips sagging or the head reaching forwards.
- Press through the hands and let the shoulder blades move naturally as you return.
- Bring the hips back towards the knees to rest. Return to the wall version if floor support or the movement is unsuitable.
Do not leave the hips directly above the knees and lower only the face. Keep the chosen depth consistent before testing a toes-supported version.
Regular Floor Push-Up
Support the body on the hands and toes. Leave enough clear space to lower and place the knees down safely.
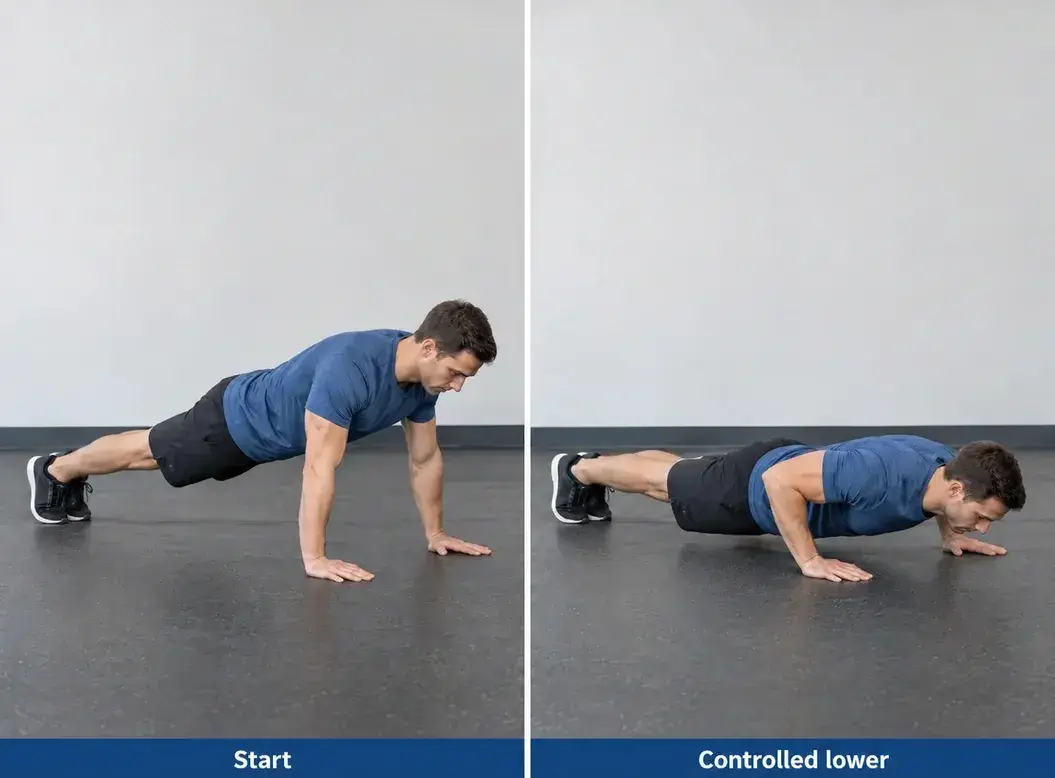
- Set the hands at a comfortable width and extend the legs. Hold the head, trunk and hips in a controlled line.
- Bend the elbows to lower the chest and hips together. Keep the elbows at a comfortable angle rather than forcing them against the ribs.
- Pause briefly at the lowest controlled position without resting on the head or letting the hips drop.
- Press back up as one unit, allowing the shoulder blades to move with the arms.
- Place the knees down to finish. End the set before the body line or chosen depth changes.
The chest exercise guide explains other pressing options. Here, use the simplest version that provides a useful challenge. Handstands, one-arm push-ups and furniture-supported progressions are not required.
Glute Bridges and Hamstring Walkouts
Bridges and walkouts start with the head and upper back on the floor. Keep the neck relaxed and lower the pelvis to finish; neither exercise requires a bench.
Floor Glute Bridge
Lie on your back with the knees bent, feet flat and arms at your sides.
- Choose a comfortable foot width and distance. Keep the head and upper back supported.
- Press through the feet and lift the pelvis by straightening the hips.
- Stop when the shoulders, hips and knees form a comfortable line, before extra height comes from arching the lower back.
- Pause for one second, then lower the pelvis steadily to the floor.
- Reset and repeat without bouncing. Settle fully on the floor before changing position.
Use a smaller lift when needed. The hip thrust and glute bridge guide explains the difference between floor support and a bench-supported thrust.
Single-Leg Floor Glute Bridge
Use this optional replacement only when the two-leg bridge is easy and you can keep the pelvis level.
- Begin in the two-leg bridge starting position, then lift one foot with that knee bent. Keep the working foot planted.
- Lift the pelvis through the working hip without twisting towards either side.
- Use a smaller height if necessary to keep the pelvis level and the neck relaxed.
- Lower to the floor, repeat on the same leg, then rest before changing sides.
- Return to the two-leg version when the pelvis twists or the hamstrings cramp repeatedly.
Replace Workout A’s bridge with two sets of 8–15 repetitions per leg, 90 seconds rest after each leg and 2-1-1-1 tempo. That is four separate sets, not two alternating sets.
Short Hamstring Walkout
Begin with a small bridge and bent knees. Your heels step away and back while the pelvis stays raised; the feet do not slide.
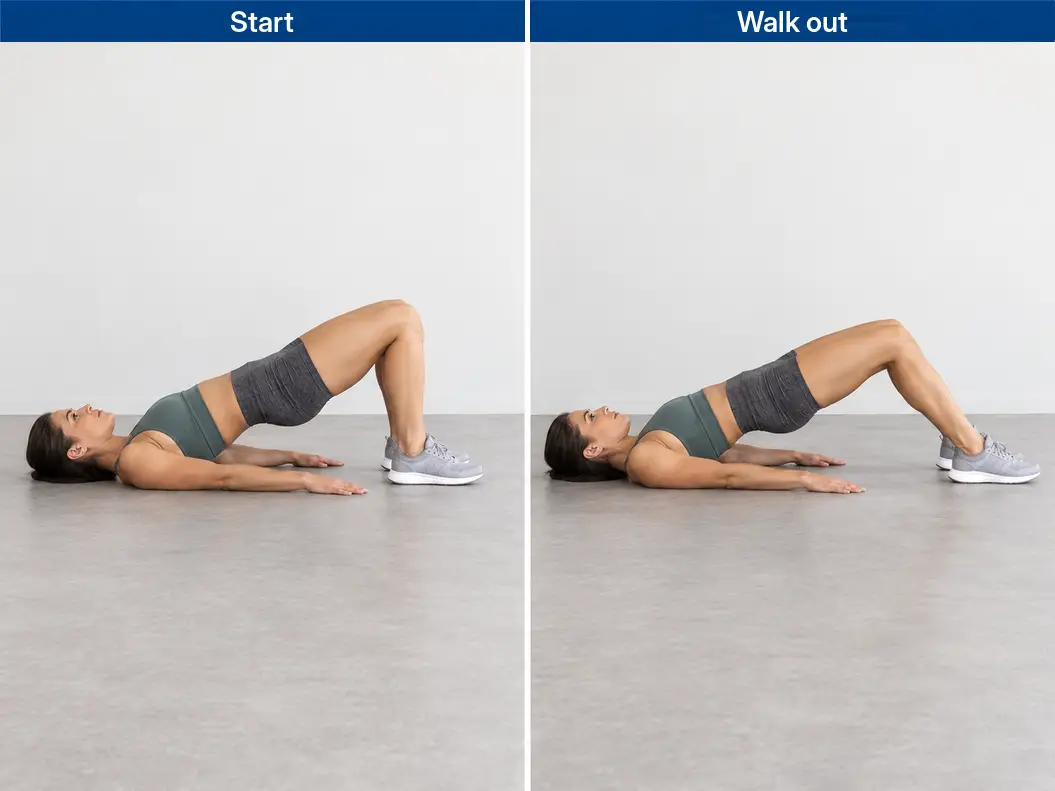
- Lie on your back with the heels planted and raise the pelvis into a modest bridge. Keep the head, upper back and arms supported.
- Take small alternating heel steps away from the hips. Start with only a short distance and keep some bend in the knees.
- Stop moving out before the hips sag, the lower back arches farther or the heels slip. Straight legs are not the goal.
- Walk the heels back to the starting position, then lower the pelvis briefly to reset. The whole outward-and-return cycle counts as one repetition.
- Use about one second per heel step. Finish the set when you cannot repeat the same distance and hip position.
Shorten the path to make the walkout easier. When even a short path is unsuitable, use two bridge holds of 15–25 seconds with 90 seconds rest: lift as in the bridge, hold while breathing, then lower. A hold is a temporary alternative, not a knee-curl equivalent. Repeated cramping or pain is a reason to stop and reassess.
Light Upper-Back Work and Core Exercises
These exercises develop controlled shoulder or trunk movement. Keep the range and breathing comfortable rather than trying to reach the highest position or longest possible hold.
Prone W Raise
Lie face down with the legs relaxed. Bend the elbows so the arms form a W, with the hands nearer the head and elbows angled down towards the waist.
- Keep the neck in line with the upper back and the face clear of the floor. A folded towel may cushion the forehead without obstructing breathing.
- Set the upper arms diagonally out from the torso and keep the elbows bent. Turn the thumbs upwards as far as comfortable.
- Lift the hands, forearms and elbows a small distance, keeping the chest and pelvis supported rather than arching the back to gain height.
- Hold for one second, then lower gently. Keep the elbow bend and head position steady.
- Stop when the lift becomes a shrug or neck extension. Leave the drill out if lying face down or lifting the arms is uncomfortable.
This is light upper-back and shoulder work. It does not replace a loaded row or pulldown. Once the controlled 8–12 repetitions are easy, extra high-repetition sets are not a solution to the missing pulling resistance.
Dead Bug
Lie on your back and raise both feet, keeping the knees bent above the hips. Point the arms towards the ceiling.
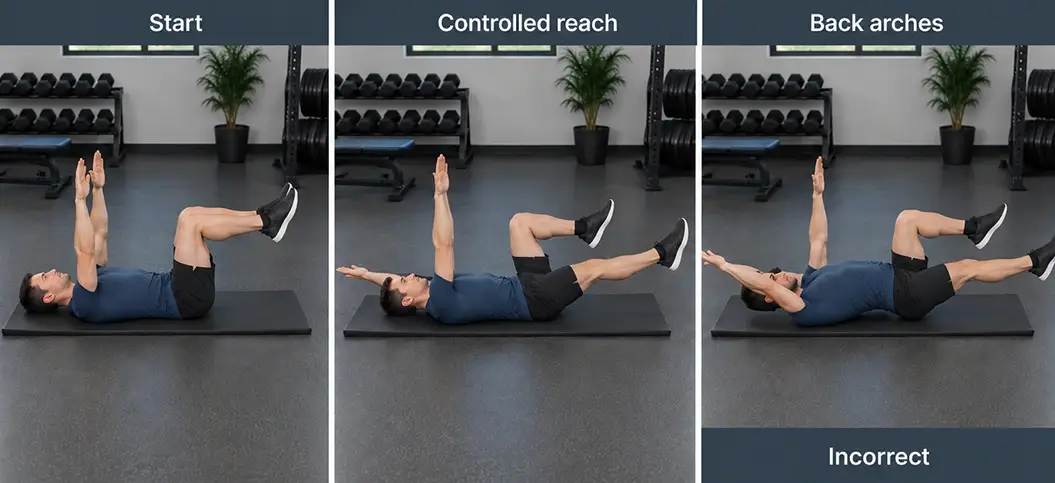
- Keep the head and trunk supported and choose a back and pelvic position that allows normal breathing.
- Reach one arm and the opposite leg away slowly. Begin with a short reach.
- Stop before the lower back arches farther, the pelvis turns or you need to hold your breath.
- Return that arm and leg, then repeat with the opposite pair. One reach and return is one repetition on that side.
- Alternate until each side reaches its target, then rest for 60 seconds. Shorten the reach when needed.
Two sets of six per side are two complete alternating sets, not four separate sets. The ab exercise guide explains other trunk exercises; they are not extra work to add to this session.
Side Plank
Begin with bent knees on a comfortable nonslip floor. The support points are the lower forearm and knees.
- Lie on one side with the elbow under or close to the shoulder and the forearm planted. Bend the knees and align the shoulders and hips.
- Lift the pelvis into a line from shoulders to hips to knees. Keep the free hand on the hip or resting comfortably.
- Breathe normally while keeping the hips raised and the chest facing forwards rather than rolling towards the floor.
- Lower fully after the chosen hold, rest for 60 seconds and repeat on the other side. Repeat both sides for the second set.
- For the harder straight-leg version, extend the legs and support the lower body through the sides of the feet, staggering them if needed. Keep the same controlled trunk line and return to 15-second holds.
Build from 15 towards 30 seconds without sagging or holding your breath. A shorter controlled hold is preferable to forcing the lower target. Note shortened holds and keep the easier version until it fits.
How to Progress Without Weights
Improve one exercise at a time. First repeat the same comfortable range, support and timing. Add repetitions or hold time within the listed range before changing the version. Keep two working sets; do not make every workout longer as the default progression. For this plan, reach the upper target on every prescribed set on two comparable appearances of that workout before making the movement harder. Keep the listed rest and follow each exercise's effort, form and breathing guidance. For separate-side work, both sets on both sides must qualify. This is a practical progression rule, not a test of muscle growth.
| Exercise | Easier starting option | First progression | Next step when ready |
|---|---|---|---|
| Squat | Use a comfortable shallower depth | Build depth, then 8–15 reps | Replace with split squats: 2 sets of 6–12 per leg; 90 sec after each leg. |
| Split squat | Light wall contact and a shorter range | Build controlled range, then 6–12 reps per leg | Keep it useful or use a plan with suitable external resistance; unstable balance is not the goal. |
| Push-up | Choose wall or knees-down | Build 6–12 reps in the same version | Try the next suitable taught version at 6 reps; return if six controlled reps are not available. |
| Glute bridge | Use a smaller comfortable lift | Build 10–20 reps without twisting or arching | Replace with single-leg bridges: 2 sets of 8–15 per leg; 90 sec after each leg. |
| Hamstring walkout | Reduce the outward distance; use the specified bridge hold if needed | Build 4–8 complete out-and-back repetitions | Increase the outward distance slightly, then restart at 4 controlled cycles. |
| Calf raise | Keep wall contact and a manageable range | Build 10–20 controlled reps | Replace with single-leg calf raises: 2 sets of 8–15 per leg; 60 sec after each leg. |
| Dead bug | Shorten the opposite-arm-and-leg reach | Build 4–8 reps per side | Lengthen the reach slightly, then return to 4 reps per side. |
| Side plank | Bent knees or a shorter controlled hold | Build 15–30 sec per side | Try straight legs at 15 sec per side; retain the easier version if it fits better. |
W raises are not on the harder-variation ladder. Keep them light and controlled; they cannot supply the missing row or pull-up. Reaching a bodyweight exercise's limit is a reason to reconsider equipment or goals, not to invent an unsafe version.
Push-Up Progression Example
The log below follows the knees-down push-up in Workout A only: two sets of 6–12, 90 seconds rest and 2-1-1-0 tempo. Keep the support and depth the same. Workout B has its own record because the work before the push-ups differs.
| Comparable Workout A | Set 1 | Set 2 | Next decision |
|---|---|---|---|
| 1 | 8 | 7 | Keep the same version and build repetitions. |
| 2 | 10 | 9 | Keep the same version. |
| 3 | 12 | 11 | The second set has not yet reached 12. |
| 4 | 12 | 12 | First qualifying exposure; repeat to confirm. |
| 5 | 12 | 12 | Second qualifying exposure; rehearse a harder version if it remains suitable. |
These are invented examples, not a promised rate of progress. After qualifying, rehearse a regular floor push-up without exhausting yourself. Use it for the next working sets only if you can complete six controlled repetitions with two or three more still possible. Otherwise, keep the knees-down version. Do not complete both full prescriptions. An 8/5 result records thirteen repetitions, but the second set missed the six-repetition minimum. Review rest and technique. An isolated late miss can justify repeating the version; an early or recurring miss calls for an easier option. More repetitions with a shorter range do not qualify as the same performance. Keep the same two-sided accounting after a change. Replacing Workout A's two bilateral bridge sets with two sets per leg creates four separate sets, making that session fourteen work periods rather than twelve. Change one exercise first and allow for the extra time and recovery.
Recovery, Missed Workouts and a Simple Training Log
Make recovery part of the schedule
Keep the non-training days between sessions. Mild soreness can follow unfamiliar work, but soreness is not the target. If soreness prevents normal movement or a comfortable warm-up, allow more recovery before repeating the workout. Persistent or worsening pain, unusual weakness or marked swelling needs assessment rather than a harder exercise. Walking or easy marching can fit between sessions. Build activity gradually instead of adding a daily jumping circuit to compensate for a rest day. Strength work and aerobic activity are different parts of general fitness. Use regular meals, hydration and sleep to support training; the nutrition guide covers food planning for your goal. This plan does not require supplements or a particular calorie intake.
Keep the sequence after a missed day
| Planned slot | Original session | What happens |
|---|---|---|
| Monday | A | A completed. |
| Wednesday | B | Missed; no session completed. |
| Friday | A | Do B when recovered. |
| Next Monday | B | Do A, then continue alternating. |
That first week contains two completed sessions, not three. Do not double the next workout or place two hard sessions on consecutive days to catch up. The missed-workout guide covers wider scheduling decisions. Record a partly completed session as partial, then continue the sequence at the next suitable session. Do not add the unfinished sets to it. After illness or a longer break, use easier variations and one set per exercise at first when appropriate. A repeatedly unmanageable three-day schedule can become the two-day A/B option.
Record what you actually did
Use an ordinary notebook or digital note. Copy these fields: date; workout A or B; exercise and version; planned sets and range; repetitions or hold time for each set; actual rest; any pain or form change; next-session decision. For separate-side work, record both sides. For example: split squat, left 8/8, right 8/7, 90 seconds after each set. That is four sets and thirty-one repetitions, not thirty-two. For dead bugs, record repetitions per side within each complete set. Mark skipped sets as not performed.
What This Plan Cannot Replace
Back and biceps training
A floor-and-wall setup offers fewer ways to load pulling than pressing. The W raise moves the arms against their own weight, but it is not a row, pulldown or curl. Push-ups do not fill that gap either. This plan therefore does not claim equal training for every muscle group or complete gym-equivalent strength and muscle development. Self-resisted pulling can create effort, but the resistance is difficult to measure and repeat. It is not included as a substitute for a reliably loaded row. Do not use doors, towels over doors, loose tables or chairs as anchors. The back exercise guide explains pulling options when purpose-designed equipment and suitable support are available.
Strength and muscle gains have limits
Bodyweight exercise can provide useful resistance when the selected version is challenging. A small push-up study found gains in chest and triceps thickness with adjusted push-ups. A small progressive bodyweight-squat study also reported strength and muscle-size improvements in sedentary young women. Neither tested this complete routine or established that easy repetitions keep working indefinitely. A split squat can make leg work harder without weights, but it is not a substitute for every heavy squat or hinge goal. When even the hardest suitable version feels easy at the top of its repetition range, choose more resistance or use the movement for practice rather than endlessly adding repetitions. There is no fixed number of weeks after which everyone needs to change.
| Your situation | Next option | What to check |
|---|---|---|
| No equipment and the exercises still challenge you | Continue this plan | The movements remain comfortable, and the pulling limit fits your present goals. |
| Dumbbells are available and five days genuinely fit | Five-Day Dumbbell Workout | Use its complete schedule and bench/no-bench branch; do not simply add it to this plan. |
| A gym is available and equipment is unfamiliar | Beginner Gym Workout Plan | Learn the equipment and adopt that plan’s own sessions and progression. |
The no-equipment plan remains usable without buying anything. Choosing equipment later is a separate decision, especially when stronger pulling, heavier leg work or a specific lift becomes the goal.
No-Equipment Home Workout FAQs
Can I build muscle without weights?
Challenging bodyweight exercises can build some strength and muscle, especially when you are starting out. The results depend on the movement and how it progresses. This floor-and-wall plan has limited pulling resistance, so it is not an equal substitute for every gym exercise.
How many days a week should I train?
Use three non-consecutive days when recovery and your schedule fit. Two days with A then B is a valid lower-frequency option. Do not compress three workouts into two or train daily simply to make the plan harder.
Do I need a mat, chair, band or pull-up bar?
No exercise equipment is required. You need a clear nonslip floor and a solid wall. A nonslip mat or towel is optional for comfort, not for anchoring or sliding. Chairs, bands and pull-up bars are not part of the baseline.
What should I do if I cannot perform a floor push-up?
Use the wall or knees-down version that allows the assigned range with control. Do not force floor repetitions by sagging or moving only the head. Each version has complete instructions above.
Does the W raise replace rows or pull-ups?
No. It is light upper-back and shoulder-control work. It does not provide the same pulling resistance or direct biceps work. The plan’s equipment limit remains even when the W raises feel tiring.
How do I make the exercises harder?
Build controlled repetitions first. After every prescribed set qualifies twice in comparable sessions, try the next suitable variation or a slightly longer controlled range. Keep the set count fixed unless the stated single-leg replacement changes the number of separate sets.
Should I shorten the rest periods?
Not as the default progression. Use the listed rest so effort and technique are comparable. Extra breathlessness is not proof of better strength training.
How do I count hamstring walkouts?
Walking the heels out and then back, followed by a brief reset, is one repetition. Individual heel steps are not separate repetitions. Keep the outward distance consistent.
Do I rest between legs?
Yes for split squats, single-leg replacements and side planks: rest after each side as prescribed. Dead bugs are different; alternate sides within one complete set and rest after both sides have reached their target.
Will this workout burn belly fat?
It cannot choose where body fat is lost. It can support an active routine, but changes in body fat depend on the wider balance of food intake and activity. No exercise here guarantees visible abs or a particular calorie burn.
Can I use this instead of my usual gym plan while travelling?
It can be a practical short-term option when the space and movements fit. Expect less pulling and a different load from your gym sessions. Resume the gym plan gradually rather than trying to make up missed heavy work.
When should I move to another plan?
Change when your goals, available equipment or recovery no longer fit, or when suitable bodyweight versions no longer provide enough challenge. Continue when the plan remains useful; a calendar deadline is not required.