
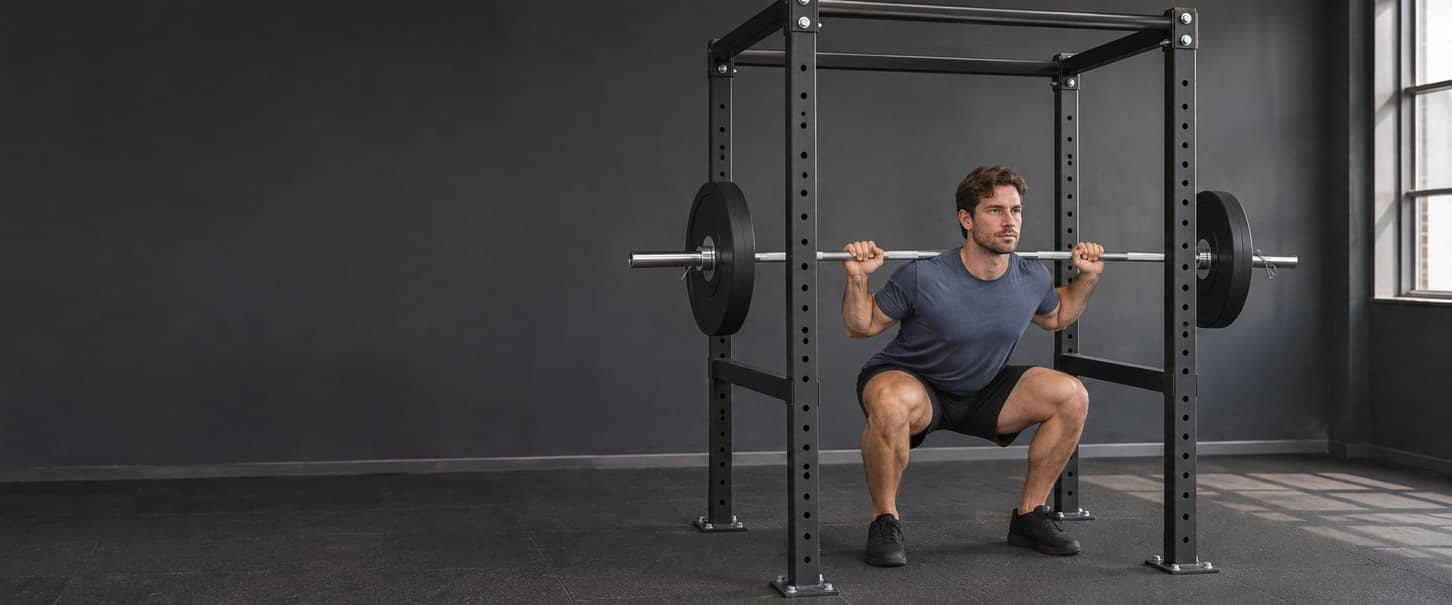
Barbell Squat: Learn a Repeatable High-Bar Technique
For a high-bar back squat, support the bar on the muscular upper back, stand clear of the rack, bend the hips and knees together, and return to standing before reracking. Keep your feet supported and use a depth you can repeat without losing balance or control. The rack, safety supports and return procedure are part of the exercise, not afterthoughts. This guide teaches that high-bar version from setup to finish. It also shows how to check stance, depth and technique changes without assuming that every lifter needs the same toe angle or upright torso. A lower bar position, different shoes or shorter squat can change the task; a heavier number alone does not show better performance. The squat trains the quadriceps, glutes and adductors while the trunk and upper back help support the load. It is one option within a complete workout plan, not a requirement for building your legs. New lifters should learn the equipment and movement with appropriate instruction before using demanding working sets.
Set the Rack, Safeties and Load Before You Start
Use a compatible power rack or squat rack with suitable safety supports. Know how its hooks and supports lock, where the bar will travel and how you will return it. A spotter is not a substitute for insecure equipment or a setup nobody has checked.
| Check | What you need | When to change the setup |
|---|---|---|
| Rack and bar compatibility | A stable rack used as intended, with the bar securely supported by both hooks | Do not use a bar that is too short for the rack or fittings that do not lock securely. |
| Hook height | A height you can clear by standing from a slight knee bend, without rising onto your toes | Set both hooks to the same height before placing the bar on them; do not compensate by twisting out of one side. |
| Safety supports | Compatible supports set for your actual bottom bar position and checked with a manageable bar | Ask staff to demonstrate the catch and exit; do not lift if the supports obstruct the squat or cannot catch the bar appropriately. |
| Bar, plates and collars | A manageable bar with known mass, evenly loaded plates and compatible secured collars | Use a lighter suitable bar or another exercise when the empty bar is already too heavy. |
| Footing and clearance | A firm nonslip surface, stable footwear and room for the bar, body and short walkout | Remove obstructions; do not stand on loose stacked plates or squat beyond the safety coverage. |
| Assistance and return | A rehearsed rerack and a known way to obtain competent help | Do not begin working sets while unsure how the equipment or assistance procedure works. |
Set the safeties just below the lowest bar position in your intended squat, close enough to provide a usable catch. The exact position depends on the rack and your squat. Check clearance and the facility's catch-and-exit procedure with a qualified instructor and a light, manageable bar before adding working weight. This is not an instruction to drop a loaded bar to test the rack. If the rack cannot provide both the required range and suitable support, change the equipment or exercise. Do not remove a safety, stand beyond its reach or invent a failed-repetition escape to make the setup work.
Ask for a specific demonstration
Ask an instructor: "Please show me how to set these hooks and safeties for my squat, return the bar to both hooks and get out if I cannot complete a repetition. Then watch me rehearse with a manageable bar." Learn the procedure before the set. Agree how help is requested and follow the facility's spotting arrangements rather than asking an unprepared bystander to catch the load.
How to Do a High-Bar Back Squat: Unrack to Rerack
High-Bar Back Squat
The high-bar position uses the muscular shelf across the upper trapezius, not the neck. Start with a bar you can control and the rack already checked. Rehearse the complete sequence, including the return, rather than learning only the downward movement.
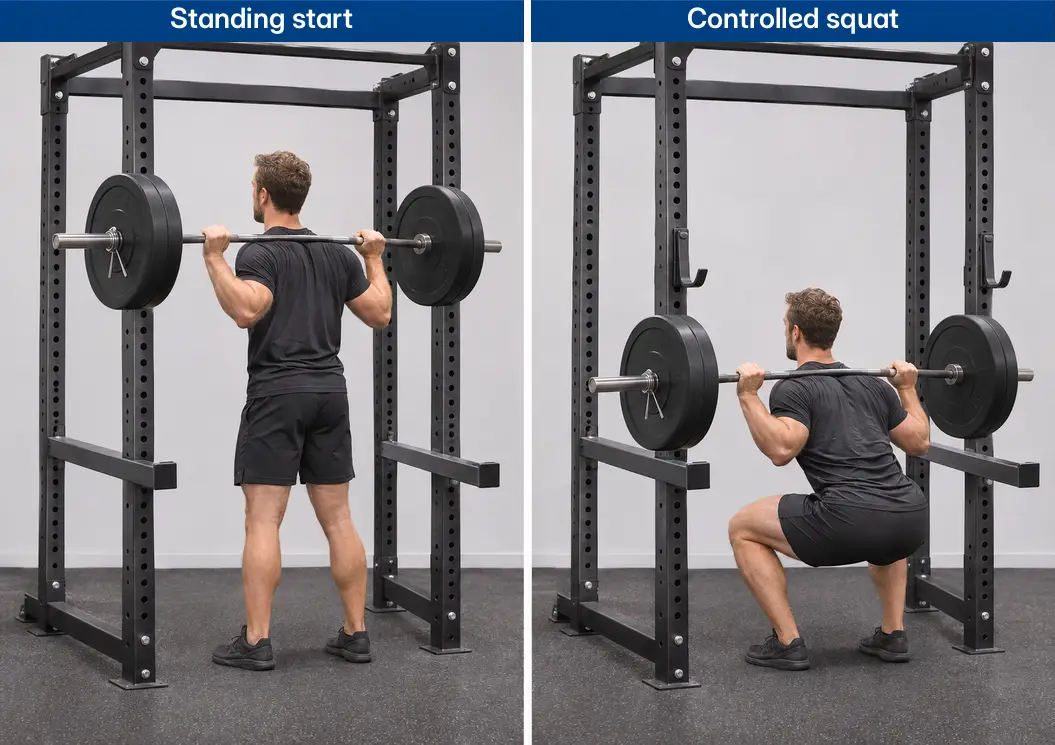
- With the bar supported by both hooks, check the safety setting, clear space and balanced loading. Secure compatible collars and confirm that the chosen bar is manageable.
- Face the rack and take an even, comfortable grip. Step under the bar, centre it on the muscular upper-back shelf and keep both hands securely around it. Do not rest it on the neck or try to carry it mainly through the wrists.
- Place both feet under you, take a comfortable breath and firm the trunk. Stand to clear both hooks without rising onto your toes or twisting one end free.
- Take only the small controlled backward steps needed to clear the hooks. Establish your stance within the safety coverage, with heels and forefeet supported and enough clearance at both bar ends.
- Settle your balance before each repetition. Look towards a steady point without craning the neck or turning towards a mirror. Prepare your breath and trunk tension before lowering.
- Bend the hips and knees together, allowing the knees to move with the direction of the feet. Keep whole-foot support and let the torso incline as needed instead of forcing it upright or holding the shins vertical.
- Lower to the position you have established in practice. Reverse under control before extra depth requires lost balance, an abrupt change in your back position or a bounce. Follow any pause assigned by your workout plan.
- Extend the hips and knees to stand, keeping the bar balanced over your base of support. Do not lean backwards at the top. Reset your breath and position as needed; do not hold one breath through the entire set or rush the next descent.
- End while the return remains reliable. Stand steadily, walk forward until the bar is aligned with both hooks, then lower it into them. Confirm that both sides are fully supported before releasing your grip or stepping out.
Stop the set before another repetition requires a movement you cannot control. If a repetition cannot be completed, use the catch and assistance procedure you have already learnt for that rack; do not try to walk a failed repetition back to the hooks. Reading these steps is not a substitute for that practical instruction.
Adjust Bar Position, Stance and Bracing Without Forcing a Shape
Support the bar rather than holding it up with your hands
Centre the bar on the upper-back shelf and use a grip that lets you keep it stable without forcing the wrists, elbows or shoulders into a painful position. Both sides should be arranged evenly, but there is no single grip width that fits every shoulder. Keep the hands in contact throughout; this guide uses a secure closed grip. An extremely narrow grip is not a goal in itself. If the bar feels unstable or the position hurts, rerack before adjusting it. A lower position across the rear shoulders is a low-bar squat, not a way to rescue a slipping high-bar set.
Find a stance you can reproduce
Start near a comfortable shoulder-width stance, with the toes turned out slightly if that helps the knees and hips move freely. Treat this as a starting point for light practice, not a required measurement. Small changes in width or toe direction should still let the soles stay supported and the knees move without being forced sharply inwards or outwards. Keep pressure through the heel and forefoot rather than shifting entirely onto either. Different body proportions and bar positions can produce different torso inclinations. A forward lean is not automatically an error; a sudden loss of the position you could previously control is more useful to investigate.
Brace, then reset between repetitions
Bracing means firming the muscles around the trunk so it can support the bar while the hips and knees move. It does not mean pulling the stomach in as far as possible, deliberately over-arching the back or holding one breath for several repetitions. Practise the breath and brace with manageable resistance and reset when needed at a stable top position. Do not begin another descent while dizzy, unable to regain control or struggling to recover your breathing. Follow individual medical advice about breathing and resistance exercise rather than copying a maximal-effort breathing technique.
Choose a Squat Depth You Can Control and Repeat
Use the greatest range you can currently manage for the intended task without losing foot support, balance or control. Do not force the bottom position to match somebody else's photograph. Equally, do not shorten the squat every time the load increases and call that the same performance.
Check the bottom position with manageable resistance
- Rehearse with body weight or a suitable light bar, using the same footwear and a clear, supported setup.
- Lower steadily while checking whole-foot contact and balance. When using a bar, check that it stays secure on the upper back.
- Stop before a noticeable loss of control, pain or an abrupt change in back position. Use a slightly shallower endpoint that you can reproduce, rather than repeatedly forcing through the problem.
- Repeat that range with the chosen working setup. Recheck the safeties whenever stance, footwear or depth changes, and build load only while the selected range remains manageable.
A shallower range can be a temporary learning adjustment, but it is not automatically equivalent to a deeper squat. Range changes affect the movement and the strength being practised. Increasing range is a change to assess at manageable resistance, not something to combine automatically with a heavier load.
Knees may travel beyond the toes
Keeping the shins vertical is not a universal squat rule. Forward knee movement can be part of a balanced squat; restricting it can shift more of the demand towards the hips and trunk. Judge the whole movement, symptoms and control rather than the toe line alone. Pelvic movement also needs context. One paused video frame does not establish an injury or a diagnosis of tight muscles. If a marked change near the bottom repeatedly disrupts control, reduce the demand and get help assessing the movement instead of chasing maximum depth.
Competition depth is a separate requirement
Under the IPF Technical Rulebook effective 1 March 2026, competition depth requires the upper surface of the thighs at the hip joint to pass below the tops of the knees. This is an IPF judging standard, not a universal training-depth rule. Competitors must check the current rules and commands for their own federation; a camera view is not an official judging decision. The Powerlifting Workout Plan provides a complete competition-lift training structure. This technique guide does not replace the applicable rulebook or require every reader to train for a meet.
Check Common Squat Changes Before Adding More Weight
Look for a change you can describe: the heel lifts, the bar shifts, or the last repetitions stop higher than the first. That is more useful than labelling the whole squat "bad". Several causes can produce a similar appearance, so begin with the setup, load and point at which the change occurs.
| What you notice | Check first | Useful response |
|---|---|---|
| A heel lifts or the foot rolls noticeably | Footwear, floor contact, stance, depth and whether it happens with light resistance | Reduce the load or depth first. Recheck one setup change; do not assume an ankle diagnosis. |
| The knees suddenly move inwards as the load rises | Whether foot contact, balance or the intended movement also changes | Use a more manageable load and review the stance with a coach; do not force the knees as far out as possible. |
| The hips rise sharply while the chest drops | Load, fatigue and whether the movement differs from the earlier repetitions | End the set before the pattern worsens. Reduce the load or review recovery rather than forcing another repetition. |
| The bar rolls or shifts on the back | Bar placement, grip symmetry and whether the upper-back shelf is secure | Rerack while you can do so reliably and reset. Do not slide the loaded bar into another position mid-set. |
| Later repetitions become progressively shallower | The intended lower position and the last repetition that reached it | Record the change and do not count the set as meeting the original depth standard. |
| The lower-back position changes abruptly near the bottom | The range and load at which control changes, rather than one isolated still image | Use a shallower manageable range and seek coaching if it persists; pain needs appropriate assessment. |
| The bar hits an upright or a safety during normal repetitions | Walkout distance, stance position and the support setting | Secure the bar before adjusting the setup. Do not lower the safeties simply to hide a problem. |
| The hands, wrists or shoulders hurt under the bar | Whether bar placement and grip can be established comfortably before loading | Stop and reassess with suitable help; choose another exercise when the position remains unsuitable. |
Check only what you can observe reliably. A knee moving inwards does not by itself identify weak glutes, and a forward torso does not by itself prove poor technique. Pain, a shifting bar or a loss of balance takes priority over finishing the planned repetitions. Do not make every correction at once. Secure the bar, identify the most relevant check and use the light comparison in the next section. If the problem cannot be made manageable, choose another suitable exercise or obtain individual instruction.
Review One Technique Issue Without Changing Everything
Use a competent coach or a permitted video to compare the same movement. A side view can help you see the bar path and lower position; an angled front view can help you see foot contact and knee movement. Neither view measures joint forces or proves the cause of pain.
- Choose one observable question, such as whether the heels stay down or the last repetition reaches the same depth as the first.
- Record or have a coach observe a few manageable repetitions with the present setup. Keep the bar position, footwear and intended range clear.
- Change one relevant feature, such as reducing the load or making a small stance adjustment. Rerack before changing the equipment or grip.
- Compare again after adequate rest, using the same view and the same question. Do not deliberately reproduce a painful or unsafe repetition for the camera.
- Keep the change only if it improves control without creating another problem. Note it in your normal training log and reassess before returning to heavier work.
Place a camera securely outside the lifting and walking area, follow gym rules and respect other people's privacy. Do not turn your head to watch a screen or mirror while supporting the bar. An observer should stay clear unless acting in an agreed, competent spotting role.
Separate a load problem from an equipment problem
If the movement is repeatable with a lighter load but changes sharply when weight is added, manage that load and fatigue before trying several new positions. If the same issue remains with a light bar, review the setup and seek coaching rather than assuming that more weight will settle it. A new shoe, stance or bar position may be useful, but it changes the comparison. Give it a manageable starting load and its own clear description. A heavier, shallower low-bar squat is not proof that your previous deeper high-bar squat suddenly became stronger.
Compare High-Bar, Low-Bar and Supported Alternatives
Choose the version for the goal and setup you can use consistently. High-bar and low-bar squats differ in bar placement, but that does not give every person a fixed torso angle or make one universally better. Stance, depth, load, experience and body proportions also affect the movement.
| Option | What changes | Decision boundary |
|---|---|---|
| High-bar back squat | The straight bar rests on the upper trapezius shelf; you control the free bar and your balance | This is the complete technique taught here, not a compulsory choice for every lifter. |
| Low-bar back squat | The bar sits lower across the rear-shoulder shelf; grip and movement demands can change | Learn the position separately. Do not assume a fixed torso angle, a guaranteed heavier lift or a direct load conversion. |
| Safety-bar squat | The shaped bar, pads and handles change how the load is supported | Use the actual bar with instruction and its own load baseline; its name does not guarantee suitability. |
| Goblet squat | One weight is held in front of the chest, without a back-loaded rack setup | Useful when the hold is manageable; it does not reproduce competition back-squat practice. |
| Leg press | The machine supports the body and determines the resistance path | Choose a fitted station when supported leg work suits the goal; its displayed load is not a squat equivalent. |
This page fully teaches only the high-bar back squat. A low-bar or safety-bar setup needs its own instruction; a table entry is not a complete tutorial. Research on muscle activity or joint motion does not establish that one variation guarantees greater muscle growth or prevents injury. Use the leg exercise selection guide for the complete goblet-squat and leg-press instructions. Replace the planned squat work rather than completing both exercises for the full number of sets. Use an appropriate prescription and starting load for the alternative; machine numbers and barbell kilograms are not interchangeable.
Footwear and a raised heel
Use stable footwear and a nonslip surface. A purpose-designed raised heel can change the ankle position and how you squat, but it is not a universal correction for limited depth. Check it with manageable resistance and reassess the safety height. Do not balance on loose stacks of plates or hide a painful setup behind a change of shoes. Keep the same footwear when comparing training sessions. Changing the heel height and then lifting more does not isolate a strength improvement from a change in the movement.
Warm Up and Choose a Manageable Starting Load
The first task is to reproduce the squat and its return, not prove how heavy you can lift. An empty bar is not automatically light enough, and bars do not all weigh the same. Use a suitable lighter training bar or a taught alternative when the available bar is beyond your current control. Begin with comfortable general movement if it helps you feel ready, then rehearse the squat itself. Use a few controlled repetitions at a manageable load to check stance, depth, balance and the rack. For heavier working sets, add weight through short preparation sets as needed, reducing unnecessary repetitions as the load approaches the working weight. Preparation should not become another exhausting workout.
Choose a load for the complete prescription
Pick a working load that leaves room for the planned sets, not just one successful repetition. Keep the same depth and handling standard as fatigue builds. A slow final repetition is different from a bar that shifts, loss of balance or a squat that becomes progressively shorter. Repetitions in reserve describes how many more repetitions you could perform to the same standard. It does not include repetitions made possible by bouncing, changing depth or accepting help. The reps-in-reserve guide explains how to use that estimate without testing failure every set. The 5x5 application below uses that plan's own starting-load and progression rules. Readers still learning the lift should use appropriate instruction and manageable practice rather than adopting five demanding sets simply because the example uses them. No maximum-lift test or sex-specific starting weight is required here.
Apply the Technique to the Existing 5x5 Workout Plan
The 5x5 Workout Plan supplies a complete schedule and progression model. The row below is its first exercise in Workout A, unchanged. It is an extract, not an additional squat workout. High-bar is the version selected for this guide's demonstration; the source plan does not require everyone to use that bar position.
| Exercise | Sets & Reps | Rest | Tempo | Target Muscles | Notes |
|---|---|---|---|---|---|
| Back Squat | 5 sets of 5 reps | 3–5 minutes | 2-1-X-1 | Quadriceps, Glutes, Adductors, Trunk | Use the deepest controlled range that preserves balance, bracing, and a repeatable bar path |
Workout B also begins with five sets of five back squats, with the same rest range and tempo. Its coaching note emphasises repeating the technical standard and reducing frequency or volume when recovery declines. The normal plan alternates A and B across three non-consecutive days. Do not add these five sets to a squat allocation you have already performed.
Read the squat tempo correctly
The source's 2-1-X-1 tempo means a controlled two-second lowering phase, a one-second pause at the bottom, an upward phase with strong intent and a one-second top reset. The X describes intent, not a guarantee that a heavy bar moves quickly or permission to bounce. Keep the bottom pause braced rather than resting the bar on the safeties. Reset breathing and position as needed; the timing is not a reason to rush an unready repetition. Use three to five minutes between these working sets, with more recovery when needed, as the source allows. Do not borrow the overhead press's different tempo or replace the squat prescription with an accessory rep range. Warm-up sets remain separate.
Keep the full plan in charge
Five sets of five contain twenty-five planned repetitions. A set stopped at four is still performed work, but the session has not met the full repetition target. Follow the source's successful-session criteria before adding load: all prescribed repetitions, consistent depth and control, suitable rest and no new or escalating joint pain. The source permits load, volume and frequency adjustments when recovery or technique requires them. It does not demand that a struggling lifter complete the printed numbers at any cost. Leave the rest of the selected workout unchanged unless you are deliberately reviewing the whole plan.
Progress the Load Without Changing the Squat
In the existing 5x5 plan, completing all five sets of five at the same depth and with controlled technique can qualify a small load increase. The other successful-session criteria must also be met; reaching the repetition target alone is not enough. The following is a hypothetical record of consecutive A/B squat sessions within that plan. Every load is the total bar-plus-plate mass, not the weight at one end. The same high-bar position, footwear, intended depth and 2-1-X-1 tempo are used throughout, with the prescribed rest. These are invented results, not starting-weight recommendations or a promised progression timetable.
| Session / workout | Total bar load (kg) | Repetitions in sets 1–5 | Repetitions meeting the standard | Next decision |
|---|---|---|---|---|
| 1: A | 50 | 5 / 5 / 5 / 5 / 4 | 24 | An isolated late shortfall; keep the load and review rest and recovery. |
| 2: B | 50 | 5 / 5 / 5 / 5 / 5 | 25 | All session criteria are met; a suitable 2.5 kg total increase may follow. |
| 3: A | 52.5 | 5 / 5 / 5 / 4 / 4 | 23 | No increase. Review this late shortfall and repeat only if setup and recovery remain suitable. |
| 4: B | 52.5 | 5 / 5 / 5 / 5 / 5 | 25 | All session criteria are met; consider the next suitable increase. |
| 5: A | 55 | 5 / 5 / 5 / 5 / 3; then 2 shorter attempts | 23 | The last two attempts missed the agreed depth. Do not increase; restore the standard with a manageable load. |
Session 5 includes twenty-five attempts, but only twenty-three repetitions meet the agreed standard. The two shorter attempts are recorded rather than hidden; they do not qualify a load increase. The set should have ended when another full-range repetition was no longer controllable.
Add weight to the whole bar
For a simple loading illustration, a 20 kg bar with 15 kg of plates at each end totals 50 kg. Adding 1.25 kg to each end produces 52.5 kg, a 2.5 kg total increase. These examples omit collar mass; include it when your actual collars contribute meaningful load and keep the convention consistent. The source commonly uses 2.5 kg squat increases, but calls them practical options rather than compulsory jumps. Use a smaller suitable increment or retain the load when the available increase prevents the same movement. Do not shorten depth just to keep the weight moving upwards in the log.
Respond to a miss rather than hiding it
An isolated late shortfall can justify repeating the load after reviewing rest and recovery. Earlier loss of control, pain or an insecure setup requires a more manageable approach, not another forced attempt. Repeated comparable failures call for the source plan's wider review; its approximate 7.5–10% reduction is a later option, not an automatic response to one missed repetition. The guide to reps dropping between sets helps assess repeated late-set problems. Keep a brief normal log of the variation, load, actual repetitions, depth change and relevant rest or recovery notes. A deliberate change in stance, shoes or bar position starts a new comparison; it is not proof of an overnight strength gain or loss.
Know When to Stop, Get Help or Choose Another Exercise
End the set when the bar shifts, balance is lost, the agreed movement cannot be retained or the rack no longer offers a reliable return. Do not treat an equipment problem as a challenge to overcome with more effort. Once the bar is secured, reassess the setup and load rather than immediately repeating the same problem.
Pain is not a technique test
Stop for sharp or worsening pain, dizziness or a sudden loss of control. Do not keep testing wider stances, deeper squats or heavier loads to diagnose the cause. Persistent or recurring symptoms need appropriate assessment; a technique video cannot identify the injured tissue. Seek urgent medical advice for a very painful knee, inability to move it or bear weight, marked swelling or a change in its shape. Follow local urgent-care arrangements. These are reasons to obtain help, not a checklist that makes every other symptom safe to train through.
A different exercise can be the correct choice
A barbell squat is not compulsory for general leg development. A taught goblet squat or fitted leg press may better suit the available equipment, holding position or current goal. Use a suitable starting load for the alternative rather than carrying over the barbell weight. For somebody new to the gym, the Beginner Gym Workout Plan teaches equipment use, manageable training and logging without assuming barbell-squat competence. Complete that kind of learning at an appropriate pace; it does not automatically certify readiness for a loaded back squat. Return to barbell practice when you have a suitable setup, understand the handling and can perform the intended movement with manageable resistance. Where health restrictions apply, follow the relevant professional advice rather than using this general guide as clearance.
Barbell Squat FAQs
Where should the bar sit in a high-bar squat?
Across the muscular shelf of the upper trapezius, not on the neck. Centre it and use a comfortable, secure grip. If you cannot establish that position without pain or instability, rerack and seek setup help.
How deep should I squat?
Use a range that fits the goal and stays controlled with the chosen load. Keep it repeatable rather than shortening it as weight rises. Competition depth has its own federation rules; the deepest possible position is not compulsory for every training session.
Can my knees go past my toes?
Yes, forward knee travel can be part of a balanced squat. The useful checks are foot support, control, comfort and the whole movement, not a rule that the knees must stop at the toes.
Does my torso have to stay upright?
No. Bar position, body proportions, stance and depth influence torso inclination. Watch for a sudden uncontrolled change from your usual movement rather than copying another lifter's angle.
Is pelvic movement at the bottom always dangerous?
One visible movement does not diagnose injury or establish its cause. A marked change that repeatedly disrupts control is a reason to reduce the demand and obtain coaching. Pain or other concerning symptoms need appropriate assessment.
Is low-bar better than high-bar?
Neither is best for every goal or person. They use different bar positions and may change handling and movement demands. Learn each separately and compare progress within the same version rather than transferring loads automatically.
Do I need weightlifting shoes or a belt?
Neither replaces a suitable rack, stable technique or appropriate loading. Stable footwear is important; a raised heel is an optional setup choice, not a guaranteed fix. A belt is optional and does not remove the need to learn bracing.
What weight should I start with?
Use a load that lets you rehearse the full movement and return, then complete the selected plan's work without losing control. The empty bar may already be too heavy. Do not copy the hypothetical log or test a maximum just to choose a starting point.
Should every squat workout be five sets of five?
No. That dose belongs to the named source-plan example. A technique lesson, another workout plan or an adjusted session may use different work. Follow the prescription that actually fits your plan and readiness.
Can I squat without suitable safety supports?
Do not use the loaded rack-based method taught here without an appropriate checked setup and assistance plan. Choose another suitable exercise or facility rather than improvising supports or learning to dump a bar from a short written instruction.
Do shorter repetitions count towards the same progression target?
Record what you did, including any shorter attempts, but do not treat them as meeting an unchanged depth requirement. A deliberate partial-squat programme is a separate task; accidental shortening does not complete the original prescription.
Are squats enough for all my leg muscles?
No single exercise covers every role equally. Squats involve knee and hip extension, while leg curls, hinges and calf work can serve other needs. Choose those through the complete workout plan rather than adding every leg exercise after squats.