
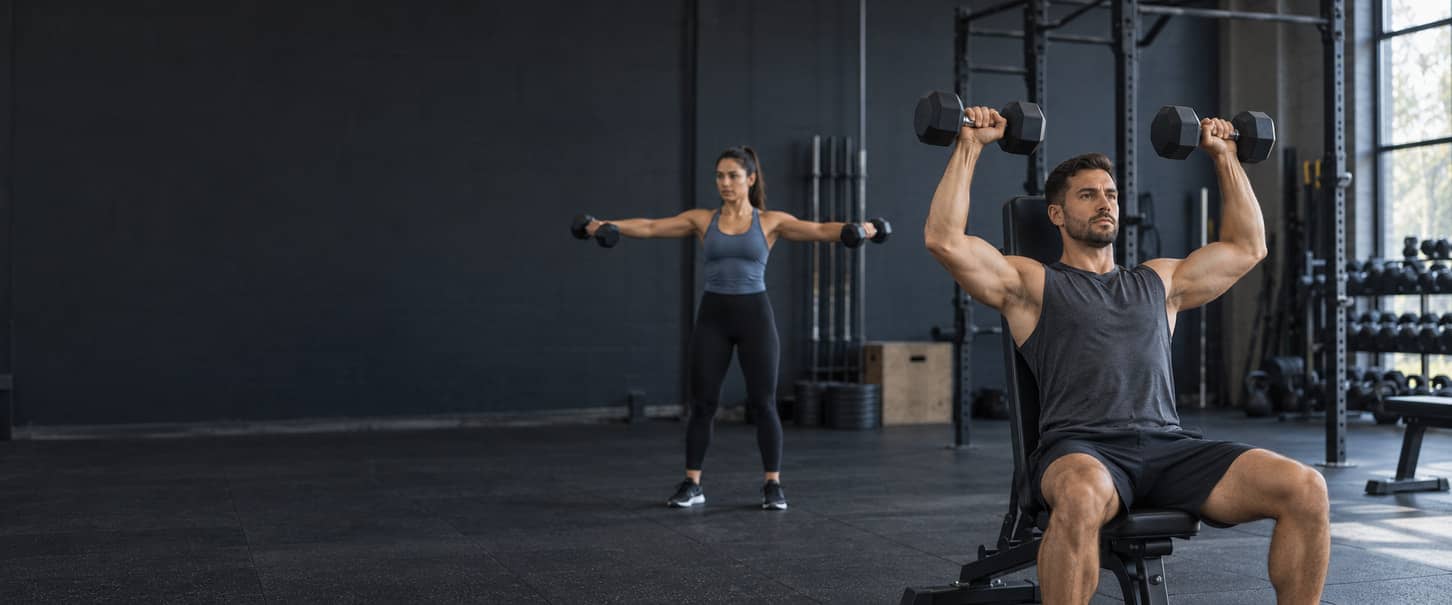
Choose Shoulder Exercises That Work Together
Choose a controllable press when overhead pressing belongs in the plan, a lateral-raise option when direct side-delt work is needed, and a reverse-fly or other suitable posterior-shoulder movement when that role needs more attention. Existing chest presses and rows already contribute shoulder work. When pressing is sufficiently covered, the better addition may be lateral and posterior work rather than another press or routine front raises. This is a selection framework, not a rule that every person needs all three roles in one session or every exercise in the guide. The best option is the one that fits the goal, available equipment, required body support, safe entry and exit, and a progression method that can be repeated. Practical choices include a seated dumbbell press or fitted machine press, a dumbbell or cable lateral raise, and a reverse pec deck or chest-supported reverse fly. A rack-based standing barbell press suits a specific barbell strength or skill goal, while a floor pike push-up can provide an equipment-light pressing option when the floor setup, wrist support, range, and strength are appropriate. Neither is a compulsory progression or a complete solution for every deltoid role. Use the comparison below to narrow the options before reading the detailed technique entries. Later sections explain pressing overlap, home and limited-equipment choices, three optional partial shoulder blocks, set accounting, and progression without turning the guide into a second weekly routine. The exercise categories describe useful emphasis and support differences; they do not prove that one movement isolates an entire deltoid region or wins for everyone. Shoulder training for strength or size is different from assessing or treating pain. Select a secure, controllable exercise that fits the existing plan, and use qualified assessment for persistent or concerning symptoms rather than treating a new movement as rehabilitation or a diagnostic test.
Compare Shoulder Exercises by Muscle Focus and Equipment
Use this matrix to compare ten focused shoulder options by their main emphasis, equipment and support, practical use, execution limit, and progression record. It is a selection tool, not a ranked ten-exercise workout or a claim that each movement isolates one deltoid region.
| Exercise | Main emphasis | Equipment and support | Useful when | Main execution check | Progression record |
|---|---|---|---|---|---|
| Seated Dumbbell Shoulder Press | Overhead pressing with anterior- and lateral-deltoid contribution plus triceps assistance | Two dumbbells, a stable adjustable bench with a locked backrest, and clear pickup and set-down space; back-supported bilateral press with separate hand paths | Independent hand paths and a reproducible supported pressing position are useful | Keep seat and back contact and a repeatable arm path; stop before increasing back arch, leg drive, or uncontrolled dumbbell drift | Add repetitions, then a manageable load per dumbbell; record backrest, grip, range, and both loads |
| Machine Shoulder Press | Supported overhead pressing for the deltoids and triceps | A fitted shoulder-press machine with permitted seat, start-position, and handle adjustments; back-supported bilateral press on the station's designed path | A guided path or simpler load handling helps and the machine actually fits | Reach the handles without losing support; use permitted adjustments and stop before lifting from the backrest or forcing the path | Add repetitions, then the smallest suitable station increment; record the exact machine and settings |
| Standing Barbell Overhead Press | Standing bilateral overhead pressing with additional trunk and balance demands | A manageable barbell, compatible plates and collars, and a secure rack with usable supports and a planned return; no backrest | A specific barbell-press strength or skill goal fits the plan and rack setup | Avoid knee dip, leg drive, and increasing backward lean; maintain grip, face clearance, and a controlled return to the rack | Use technically consistent repetitions and small total-bar increases; track separately from dumbbells and machines |
| Dumbbell Lateral Raise | Arm elevation with lateral-deltoid emphasis and normal scapular contribution | A manageable pair of dumbbells and clear standing space; bilateral raise with a small stable elbow bend and consistent arm path | A simple lateral-delt option is needed without a cable or dedicated machine | Raise through a comfortable arc without torso swing, a changing elbow bend, or forced thumbs-down rotation | Add repetitions, then a small load increase per hand while lever and range stay consistent |
| Single-Arm Cable Lateral Raise | Unilateral arm elevation with lateral-deltoid emphasis and a setup-dependent line of pull | An adjustable cable station, secure single handle, and clear cable travel; side-on stance with the working arm farther from the pulley and optional permitted fixed support | Small resistance increments, an adjustable line of pull, or explicit per-side work is useful | Keep the cable clear, stance stable, and upper-arm path controlled without torso lean or a forced cross-body start | Track repetitions per side, then a suitable station increment; preserve pulley height, body distance, and range |
| Machine Lateral Raise | Guided arm elevation with lateral-deltoid emphasis | A dedicated lateral-raise machine whose seat, pads, or handles fit; seated bilateral raise along its intended lever path | External support and a repeatable guided path are useful and the station fits | Use the intended upper-arm contact, retain support, and avoid lifting the body or forcing a misaligned path | Add repetitions, then a suitable machine increment; retain the same settings and lever geometry |
| Reverse Pec Deck | Horizontal upper-arm opening with posterior-deltoid and scapular-muscle contribution | A rear-delt-capable machine in its intended chest-supported setup; seated bilateral guided reverse fly | A repeatable posterior-shoulder movement is needed without holding a free-weight hinge | Keep chest contact and control the return; do not turn the movement into a row or force the arms behind the torso | Add repetitions and station-specific resistance while seat, handles, and start position remain stable |
| Chest-Supported Dumbbell Reverse Fly | Posterior-shoulder upper-arm opening with a largely fixed elbow angle | Two manageable dumbbells and a locked adjustable bench with clear arm travel; chest supported on an incline with feet planted | Free hand paths and external torso support suit the intended posterior-delt work | Maintain chest contact and elbow bend; avoid rowing, neck reach, and weight contact with the bench | Add repetitions, then small per-dumbbell changes; preserve bench setting and arm path |
| Cable Face Pull | Combined upper-arm pulling, elbow flexion, and controlled external-rotation contribution | A cable station, secure sufficiently long rope, and clear standing space; bilateral rope pull with a steady torso and face clearance | A combined posterior-shoulder and scapular movement fits the plan | Keep the rope clear of the face; avoid a backward body jerk, forced hands-behind-head finish, or treating it as pure external rotation | Improve control and repetitions before a small station increase; retain cable height and the chosen implementation |
| Pike Push-Up | Bodyweight pressing with raised hips; shoulder and triceps loading depends on body geometry | Clear nonslip floor space with secure hand and foot contact; hands and feet stay fixed while the body moves | A floor-based pressing choice fits the available wrist support, range, and strength | Avoid head or neck loading, sliding hands, collapsing hips, and uncontrolled descent; it does not replace every delt task | Track repetitions, controlled range, and body geometry; no compulsory handstand progression |
Choose the option that fills the actual gap
- Identify the missing shoulder role: overhead pressing, lateral raising, or direct posterior-shoulder work.
- Review the existing week's chest presses, overhead presses, and rows before adding another exercise.
- Remove options whose equipment, support, entry, exit, or path is unavailable or unsuitable.
- Choose one candidate that permits a comfortable, repeatable setup and a clear progression record.
- Read its detailed instructions before treating the comparison row as a complete technique guide.
- Rehearse the selected setup with manageable resistance or body geometry.
- Place the exercise in the work already allocated by the complete plan rather than appending another shoulder block.
The table compares roles and implementations, not skill levels, injury risk, exact joint angles, or expected muscle growth. A guided path is useful only when the machine fits, and bodyweight pressing still supplies resistance that changes with the chosen geometry.
Understand the Deltoids and Shoulder-Blade Movement
The anterior, lateral, and posterior deltoid regions are parts of one deltoid muscle on each shoulder. Their actions overlap, so exercise categories are useful for choosing an emphasis rather than assigning one movement exclusively to one region. The anterior region contributes to forward arm elevation, shoulder flexion, and pressing. The lateral region contributes strongly when the arm elevates away from the torso. The posterior region contributes when the upper arm moves backward or opens horizontally. The exact contribution changes with the arm path, equipment, support, and other muscles assisting the movement.
Locate the front, side, and rear delts
Use the three regions to understand why presses, lateral raises, and posterior-shoulder movements can complement one another. The roles below describe practical emphasis, not complete isolation or a promise that one exercise trains only one region.
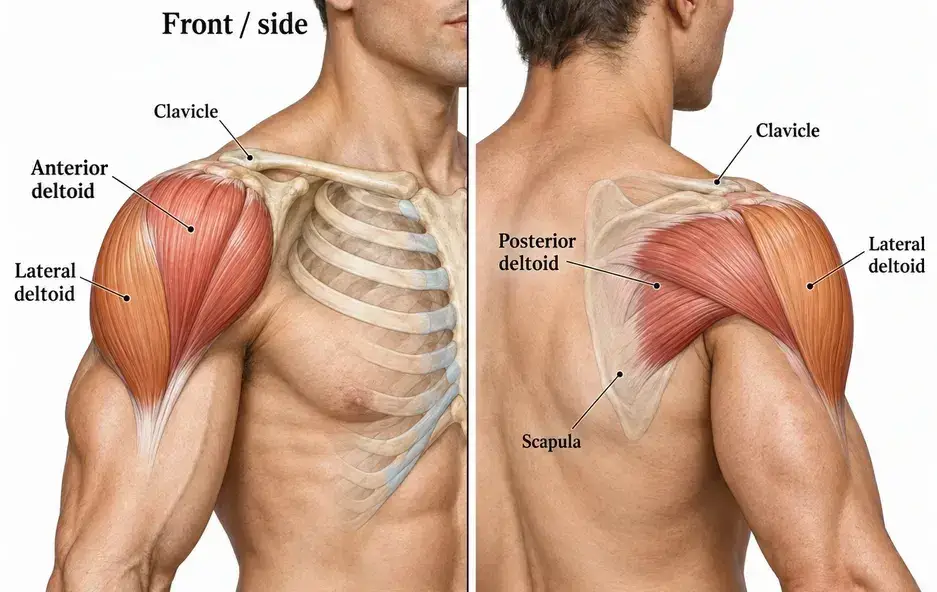
- Anterior or front deltoid: helps raise the upper arm forward and contributes to overhead and chest-pressing movements. Existing pressing work can therefore provide substantial anterior-deltoid loading before a separate front raise is considered.
- Lateral or side deltoid: contributes to raising the upper arm away from the torso. Lateral-raise variations can emphasize this role, but the scapula and other shoulder muscles still participate as the arm elevates.
- Posterior or rear deltoid: contributes to moving the upper arm backward and opening it horizontally. Reverse flyes, rear-delt machine work, rows, and face-pull patterns can involve it to different degrees without becoming identical exercises.
- Assisting shoulder and shoulder-blade muscles: the rotator cuff helps control the humeral head, while the trapezius, serratus anterior, rhomboids, triceps, chest, back, trunk, and grip can contribute according to the exercise. These muscles are not separate deltoid regions, and their involvement does not prove that the deltoid is inactive.
The upper-arm bone, or humerus, and the shoulder blade, or scapula, move together during arm elevation. Upward rotation and other coordinated scapular motion are normal parts of reaching and pressing overhead, so do not try to freeze the shoulder blades permanently down and back or force every repetition into one universal rhythm. A fixed 2:1 scapulohumeral ratio is not a coaching requirement for every person, exercise, or point in the range. Instead, look for a smooth arm path, stable equipment contact, and coordinated shoulder-blade motion that lets the intended movement continue without forcing the torso or neck into a different task. Normal upper-trapezius activity or some shoulder elevation does not mean the deltoid stopped working. The relevant distinction is between coordinated movement and a sudden shoulder hike, torso lean, leg drive, or body heave used to finish a repetition that the selected load or range no longer allows. This anatomy overview does not diagnose posture, impingement, or shoulder pain, and it does not prescribe treatment. Use it to choose and assess exercise technique; persistent or concerning symptoms require an appropriate individual assessment rather than a self-administered posture test.
Account for Pressing Overlap Before Adding Front-Delt Work
Plan direct shoulder work from the whole program, not from a shoulder-exercise list in isolation. Chest presses involve the anterior deltoid, while overhead presses train the deltoids with substantial triceps assistance. Rows, reverse flyes, and other pulling choices can contribute to posterior-shoulder work in different ways. Review those exercises before adding another press or front raise, but do not assume that bench pressing replaces lateral raises or every posterior-shoulder movement. The current Bro Split Workout Plan gives one bounded example. Its sample omits front raises because chest and shoulder pressing already provide substantial anterior-delt work, while direct lateral- and rear-delt choices remain in the plan. That is a decision within that complete routine, not a claim that front raises never work or that the source prescription should be changed. An additional front raise can have a place when it serves an identified goal and the complete plan deliberately allocates room for it. It should not be added automatically merely because the anterior deltoid appears on an anatomy diagram or because a shoulder session seems incomplete without one.
Check the existing work before adding another exercise
- Identify the intended goal: overhead pressing practice, additional anterior-delt emphasis, lateral raising, or posterior-shoulder work.
- Inspect the current chest presses and overhead presses, then review rows, reverse flyes, and other relevant pulling already performed during the week.
- Check how that workload is progressing and recovering, including whether technique, performance, and the intended exercise roles remain stable.
- Keep direct lateral- or posterior-shoulder work that still fills a useful gap rather than removing it simply because pressing and pulling are present.
- Replace or remove redundant work before adding more. Add a front raise only when its purpose and place in the existing allocation are clear.
Use this review to make an exercise-selection decision, not to diagnose a muscular imbalance from appearance or assign numerical credit to every press and row. Exact source-set accounting belongs later in this guide; this section establishes only that overlap must be considered before direct work is added.
Seated Dumbbell and Machine Shoulder Presses
Both options provide back-supported overhead pressing, but they are different exercises. Dumbbells allow separate hand paths and require the lifter to control two independent implements, while a machine follows its own guided geometry and adjustment system. Do not transfer loads between them or assume one is automatically safer or better for growth.
Seated Dumbbell Shoulder Press
Use two manageable dumbbells and a stable adjustable bench with its backrest locked in a near-upright position that permits a comfortable overhead path. The exercise suits lifters who want independent hand paths while retaining repeatable seat and back support.
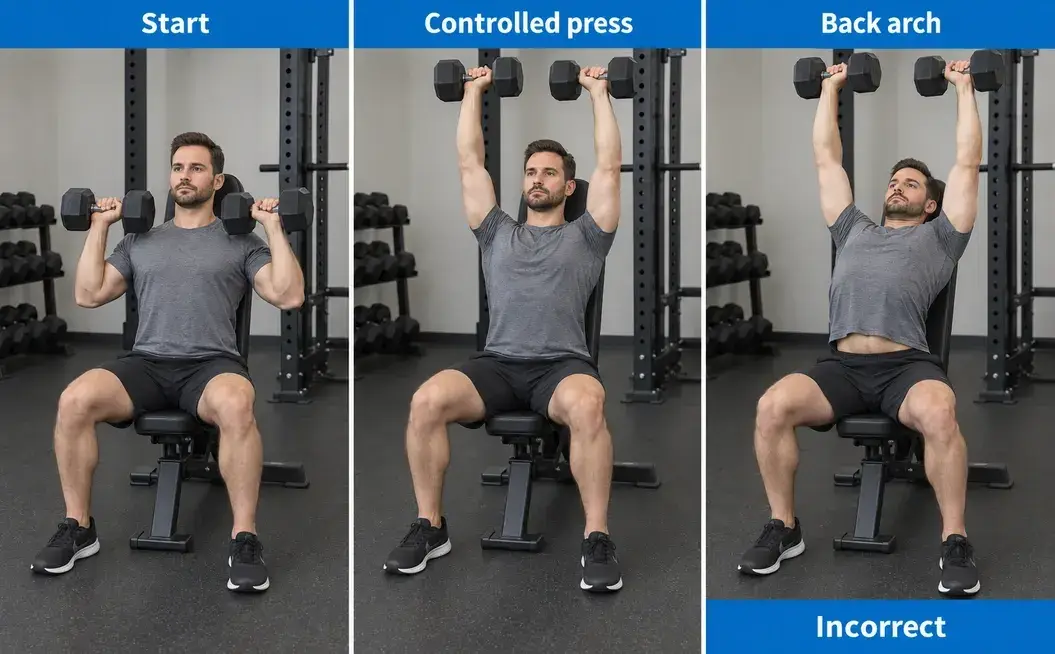
- Prepare the bench and surrounding area before lifting. Lock the backrest at a near-upright setting that fits the intended arm path without treating one angle as mandatory, clear the floor and overhead space, and choose dumbbells you can move into and out of position safely.
- Sit with both feet planted and establish firm seat and back contact. Bring the dumbbells to the chosen shoulder-level start under control, using trained assistance when appropriate. Reduce the load or use a fitted machine if setup or exit would require an uncontrolled kick, twisting pickup, or dropping the weights.
- Use a full grip with the wrists supported over the forearms. Let the elbows follow a comfortable path generally somewhat forward of the torso rather than forcing them wide, then press without a knee dip, repeated leg drive, or a progressively larger lower-back arch.
- Allow the shoulder blades to coordinate with arm elevation instead of pinning them permanently down and back. Finish with controlled elbow extension in the overhead range you can maintain without crashing the dumbbells together or reaching farther by extending the lower back.
- Lower both dumbbells to the same controllable start and repeat. End the set while you can still bring the weights out of the overhead position and set them down securely; do not force a failed repetition that cannot be exited safely.
Regress by reducing the load or using a shorter repeatable range while establishing the same supported press. A fitted machine can replace the dumbbells when independent implement control or entry and exit are the limiting constraint. Standing changes the support and balance demands and therefore needs a separate record; it is not a mandatory next level. Progress by adding technically consistent repetitions before using a manageable increase to each dumbbell. Record the backrest and seat setting, load per dumbbell with units, grip, lower and upper endpoints, completed sets and repetitions, actual rest, estimated effort, and reason for stopping.
Machine Shoulder Press
Use a shoulder-press machine only when its seat, handles, start position, and guided path can be adjusted to fit. The station can simplify load handling and provide repeatable support, but its displayed resistance and movement path remain specific to that machine.
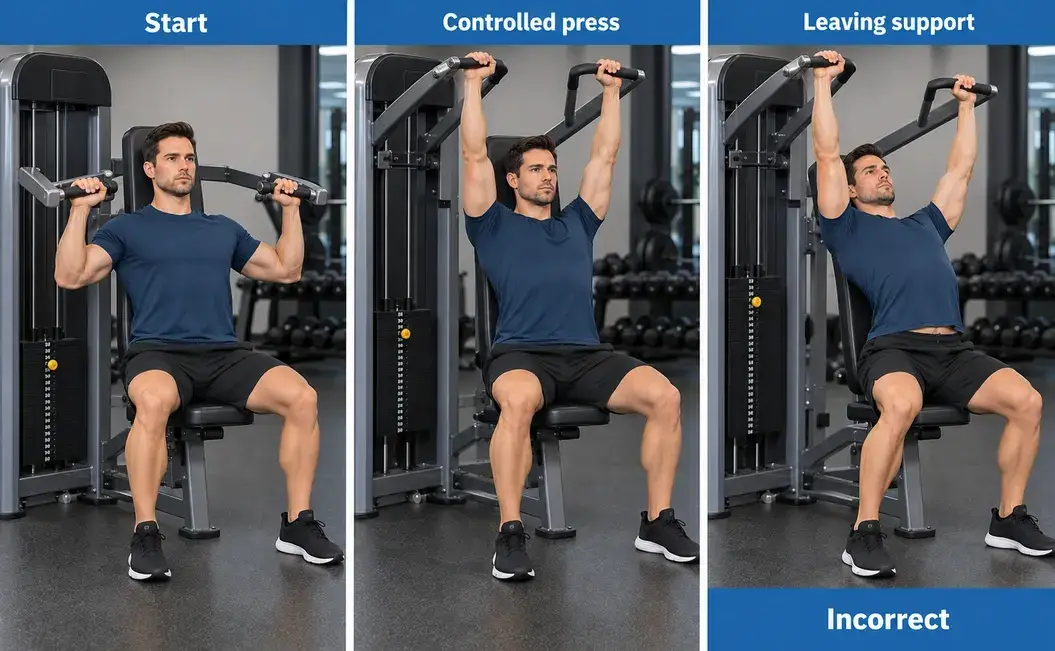
- Read the machine's operating instructions and adjust the seat, start position, and resistance while the load is at rest. Ask facility staff about unfamiliar controls or an assisted-start mechanism rather than guessing how it operates.
- Sit with stable foot and back support and select a permitted grip that gives a comfortable, reachable start. If the handles remain too far behind, too low, or otherwise inaccessible after the allowed adjustments, choose another press instead of forcing the station to fit.
- Press the handles along the machine's intended path with controlled elbow extension while retaining seat and back contact. Avoid lifting the chest, pushing repeatedly through the legs, or changing grip during the set to complete harder repetitions.
- Allow coordinated shoulder-blade movement without enforcing a fixed down-and-back position. Stop at a controllable endpoint instead of slamming the mechanical stops or aggressively locking the elbows.
- Return the handles and resistance steadily to the starting or resting position. Settle the load and follow the manufacturer's exit procedure before leaving the station or changing any setting.
Regress by reducing resistance or using a permitted shorter starting range. A guided path is not automatically comfortable, safer, or superior for growth; change equipment when the machine's geometry cannot accommodate a usable grip, start, support, and range. Progress through technically consistent repetitions and then the station's smallest suitable increment. Record the exact machine, seat and start settings, grip, displayed load and unit, lower and upper endpoints, completed repetitions, actual rest, estimated effort, and any support or path change. Choose between the two presses by support, fit, entry and exit, and whether independent or guided hand paths suit the intended work. Back support does not require permanent scapular pinning, and a comfortable grip may vary without forcing one universal forearm or elbow angle.
Standing Barbell Overhead Press
Standing Barbell Overhead Press
This entry teaches a strict standing barbell press from a secure rack with no deliberate leg drive. It suits a specific barbell-press strength or skill goal when the lifter can manage the shared bar, standing balance, trunk demand, rack entry, and controlled return.
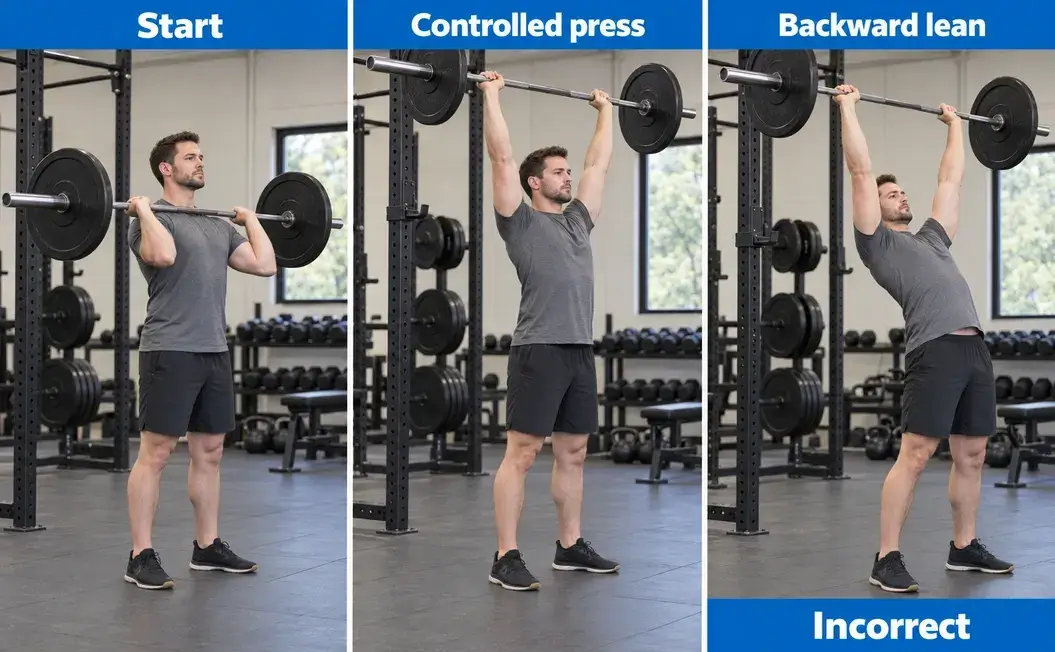
- Use a secure rack, a bar or light training bar you can control, and compatible plates, collars, and supports. Set the bar at a reachable shoulder-level height with an unobstructed overhead path, and establish how you will return it before adding load. This guide uses a rack start, not a floor clean, maximum test, or improvised support.
- Take a full overhand grip at a width that supports the bar over the forearms near the upper chest or front shoulders. Brace, lift the bar clear of the supports, and take only the small controlled steps needed to establish a stable stance.
- Press while the knees and hips remain steady. Move the head only enough for the bar to clear the face, then bring it back under the bar as the bar reaches a controllable overhead position. Do not exaggerate neck movement, force the elbows into one exact angle, or turn the ascent into a push press.
- Allow normal shoulder-blade upward rotation and controlled elbow extension. Keep the bar balanced over the base of support rather than letting it drift far forward or manufacturing the finish with progressively greater backward lean.
- Lower the bar under control to the chosen front-shoulder start while clearing the face. End the set while a controlled return remains available, walk the bar to the rack, and confirm that both ends are supported before releasing the grip. Do not drop the bar or improvise a failed-repetition escape.
Regress by reducing the total load, using a lighter training bar, or selecting a permitted supported press that fits. Overhead pressing is not compulsory when the movement remains unsuitable, and any substitution creates a different exercise record. Progress through technically consistent repetitions before using small total-bar load increments. Track this press separately from dumbbell and machine presses because the shared bar, standing support, balance, and entry and exit demands are different. Record the total bar-plus-plate load and units, bar identity, grip, stance, rack position, lower and upper endpoints, completed sets and repetitions, actual rest, estimated effort, and any leg drive or change in trunk angle. The additional standing and trunk demands do not make this press obligatory, more functional, or universally more effective for muscle growth than a supported press.
Dumbbell, Cable, and Machine Lateral Raises
Dumbbells, cables, and machines can all train arm elevation with lateral-deltoid emphasis, but their resistance, support, entry, and progression differ. In every version, choose a comfortable arm path, retain a small reproducible elbow bend, allow coordinated shoulder-blade movement, and favor a repeatable range over one exact angle.
Dumbbell Lateral Raise
Use two manageable dumbbells in clear standing space. This version provides a simple bilateral raise whose difficulty depends on the dumbbell load, arm lever, path, and range rather than a fixed machine or cable line of pull.
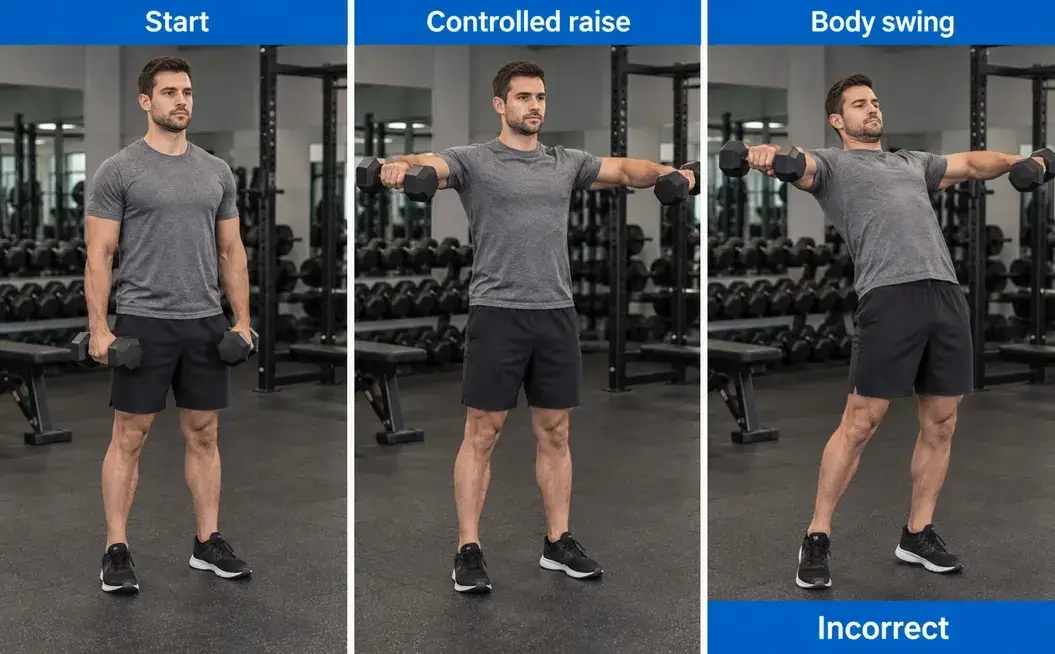
- Pick up the dumbbells in clear space and stand on a nonslip surface with stable feet. Begin with the arms beside or slightly in front of the torso and a small comfortable elbow bend.
- Raise the upper arms away from the torso through a comfortable path, often slightly forward of the body's frontal plane. Keep the chosen elbow bend similar instead of curling the dumbbells upward as the arms rise.
- Use approximately shoulder level as a practical reference when it is comfortable, not as a mandatory endpoint or universal safety ceiling. Stop sooner when the selected arc cannot be maintained, and do not force extra height.
- Keep the wrists comfortable and allow the shoulder blades to move with the arms. Do not force a thumbs-down pouring motion, swing through the hips, or replace upper-arm elevation with a sudden shoulder hike.
- Lower the dumbbells steadily along the same path and keep them controlled at the bottom. End the set before momentum or a changing lever replaces the planned repetition, then set the weights down securely.
Regress by reducing the load or using a shorter repeatable range or more manageable bent-arm lever, and record the changed version. Progress through technically consistent repetitions before making a small per-hand load increase while the stance, elbow bend, plane, and endpoints remain comparable. A cable is not automatically a better muscle-building choice simply because its resistance feels different. Record the load per dumbbell and units, stance, elbow bend, arm plane, lower and upper endpoints, completed repetitions, actual rest, estimated effort, and any swing or lever change.
Single-Arm Cable Lateral Raise
Use an adjustable cable station with a secure compatible single handle and a clear cable route. This unilateral version allows small station increments and a setup-specific line of pull, so each side and every material setup change need their own record.
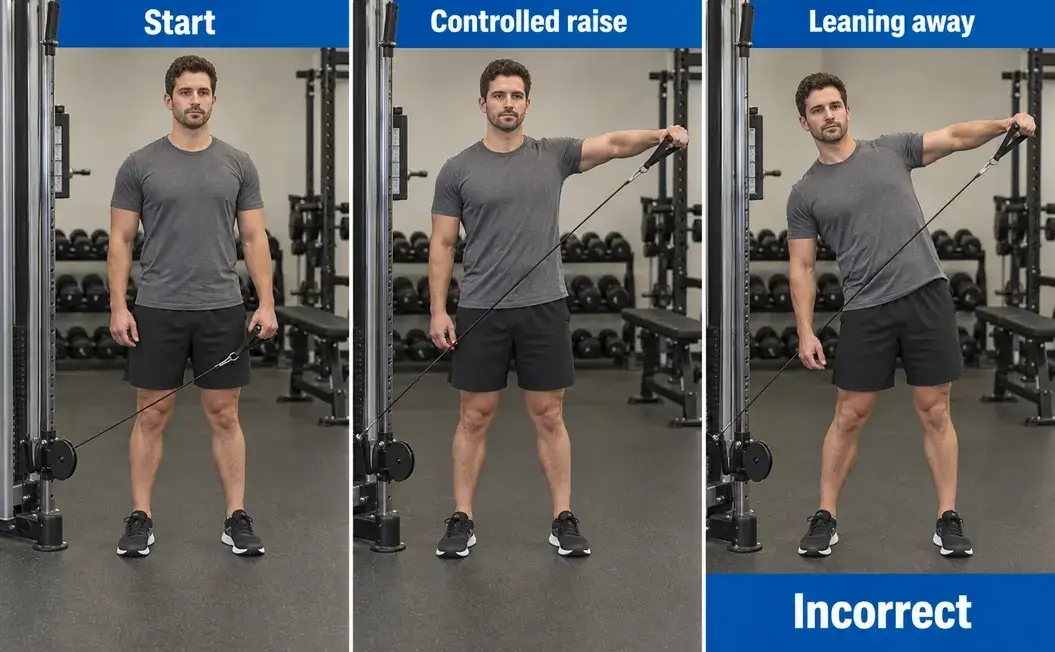
- Set the station and connect the handle while the stack rests. Choose a permitted low pulley position and confirm that the cable stays clear of sharp edges, the ankles, and any place where it could trap the body.
- Stand side-on with the working arm farther from the pulley. Bring the handle across the front of the body into a comfortable near-side start without forcing the shoulder into a cross-body stretch. Use the free hand only on an intended secure fixed support when that is part of the chosen setup.
- Raise the working upper arm away from the torso through a repeatable arc with a small consistent elbow bend. Keep the stance and trunk steady instead of leaning away to manufacture additional travel.
- Finish within a comfortable controlled range, then return slowly without letting the stack jerk the arm or the handle strike the body. Cable tension, joint torque, and muscle force are different quantities and are not constant by definition.
- Settle the resistance before changing sides, settings, or support. Reproduce the pulley height, body distance, arm path, and safe starting position on the other side. Record each side and the actual recovery rather than assuming that changing arms supplies a fixed amount of rest.
Regress by reducing resistance, shortening the controlled range, or using a permitted supported stance. Different pulley heights and across-body starting ranges create distinct variants; they are not proof that one cable setup produces better hypertrophy. Progress through repetitions per side before using an appropriate station increment while preserving pulley height, distance from the pulley, support, and range. Record the working side, station, displayed load and unit, handle, pulley height, body distance, support, range, completed sets and repetitions, between-side rest, between-set rest, estimated effort, and reason for stopping.
Machine Lateral Raise
Use a dedicated lateral-raise machine only when its seated or standing setup, pads or handles, start position, and lever path fit. A guided path can make the setup repeatable, but it remains specific to that station and does not remove the need for controlled support and shoulder movement.
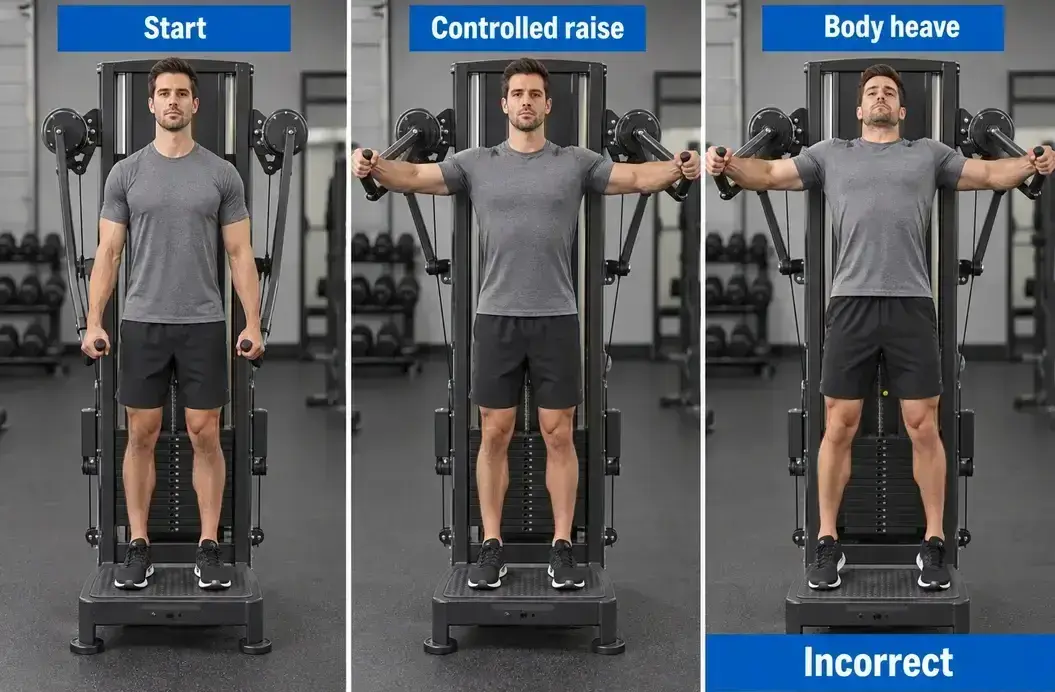
- Inspect and adjust the machine while the resistance rests. Follow its instructions for the setup, pads or handles, and starting position; machine designs differ, so do not impose one pad height or joint angle on every station.
- Use the machine's intended seated or standing setup with secure footing and a stable torso. Place the upper arms against the intended pads, or use the handles when that is the actual design, and confirm comfortable arm travel without pressure on an unsuitable contact point.
- Raise along the machine's designed path by moving the upper arms away from the torso. Maintain the intended support without lifting the hips or using body heaving to move the lever.
- Stop at a comfortable controlled endpoint rather than forcing the lever to a universal height or slamming a mechanical stop. Allow normal coordinated movement of the shoulders and shoulder blades.
- Return steadily and settle the resistance before leaving or changing the setup. If the permitted adjustments cannot provide a usable path, choose another lateral-raise option instead of contorting around the pads or handles.
Regress by reducing resistance or using a permitted shorter range. Choose dumbbells or a cable when the station does not fit. Guided movement does not remove every stabilization demand or establish zero injury risk. Progress through technically consistent repetitions before using a suitable machine increment. Record the machine identity, seat and pad or handle settings, displayed resistance and unit, arm path and endpoints, completed repetitions, actual rest, estimated effort, and any change in support.
Cable versus dumbbell lateral raises: compare the setup
Gravity, cable direction and pulley height, and machine lever geometry change the external demand across a lateral raise. Cable tension is not the same as constant joint torque or constant muscle force, and it does not guarantee a growth advantage. A 2025 randomized within-person study in trained adults found comparable changes in lateral-deltoid thickness across its tested cable and dumbbell conditions when arm range was matched. That result is specific to the tested short-term protocol and does not cover every across-body or behind-body start, every pulley height, permanent equivalence between all variants, or a requirement to copy the study's failure and set protocol. Choose the variation that offers usable resistance increments, a comfortable repeatable range, suitable support, and a setup you can reproduce. Compare progress within that defined implementation rather than treating the equipment name alone as the result.
Reverse Flyes, Reverse Pec Deck, and Face Pulls
These three posterior-shoulder choices can involve overlapping muscles, but they do not use identical joint actions. Reverse flyes keep the elbow angle relatively stable as the upper arms open, while a face pull combines upper-arm pulling, elbow flexion, and a controlled external-rotation contribution.
Reverse Pec Deck
Use a rear-delt-capable pec-deck machine in its intended chest-supported configuration. This option provides a guided reverse-fly path when the seat, handles, starting reach, and chest support can be adjusted to fit.
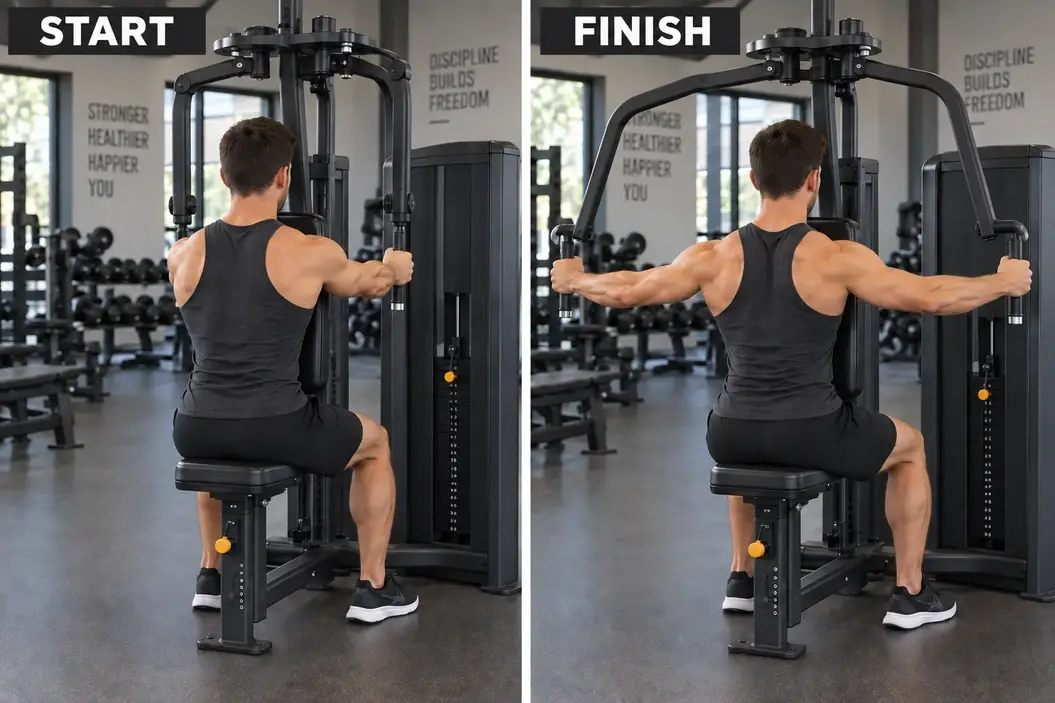
- Set the machine to its rear-delt configuration while the resistance is at rest. Adjust the seat and starting reach as directed, face the chest pad, and place the feet securely.
- Take a comfortable permitted grip and confirm that the handles are reachable without leaving the pad or forcing a stretch. Keep a repeatable slight elbow bend as the design permits.
- Open the upper arms outward through a controlled arc while maintaining chest contact. Let the shoulder blades coordinate with the arms without forcing a maximal pinch or repeatedly bending the elbows into a row.
- Return slowly to the same start and stop before the machine pulls you into an uncontrolled reach. Settle the resistance before changing the settings or leaving the station.
Regress by reducing the resistance or adjusting the permitted start position. Choose another posterior-shoulder exercise when the machine path remains unsuitable. This guided reverse fly is not an unchanged substitute for a compound row or lat pull. Progress through technically consistent repetitions and station-specific resistance while keeping the seat, handles, chest contact, and start position stable. Record the station, chest and seat position, handles, displayed load and unit, elbow bend, start and finish range, completed repetitions, actual rest, estimated effort, and any loss of chest contact.
Chest-Supported Dumbbell Reverse Fly
Use two manageable dumbbells and a stable adjustable bench that supports the chest while leaving enough room for the weights and arms to travel. The support reduces the need to hold a free-weight hinge, but each hand still controls its own path.
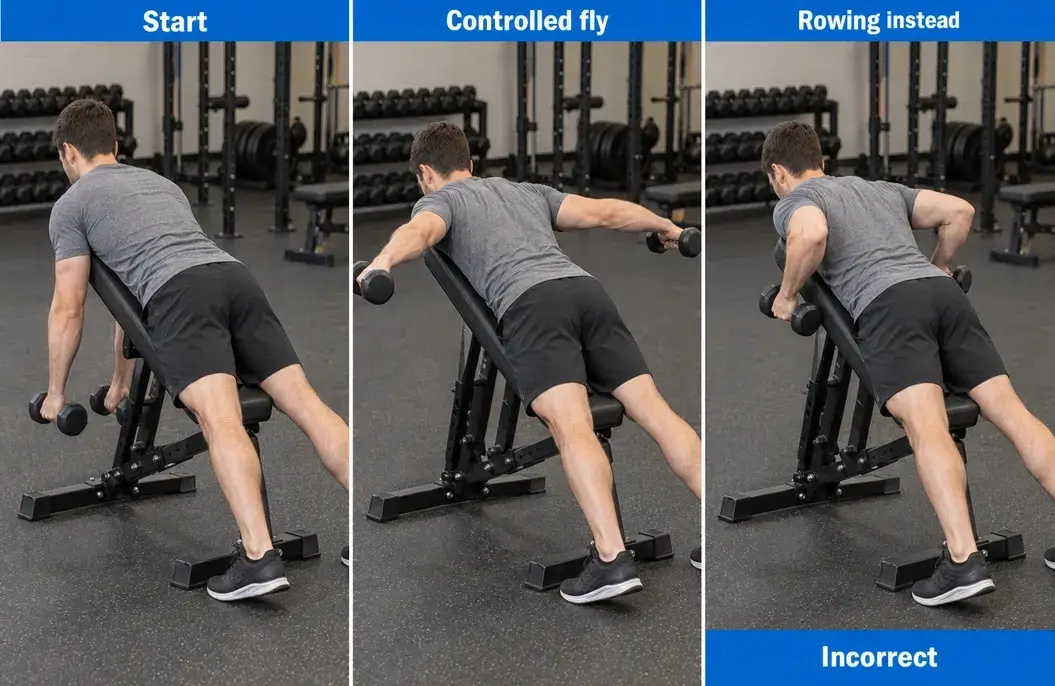
- Lock the adjustable bench at an incline that supports the chest, permits breathing, and leaves room for the dumbbells to move. One universal angle is not required. Arrange clear pickup and set-down space before starting.
- Face the bench with the chest supported and feet stable. Take a full grip, let the arms reach toward the floor with a small comfortable elbow bend, and align the head comfortably with the torso.
- Raise the upper arms outward relative to the torso while keeping the elbow angle approximately consistent. Let the shoulder blades move without lifting the chest or turning the repetition into a bent-elbow row.
- Finish where the chest, neck, and arm path remain controlled rather than driving the arms as far behind the body as possible. Lower along the same arc without dropping the weights or striking the bench.
- Set both dumbbells down securely before leaving the support. Reduce the load or change the arrangement when entry or exit cannot be controlled instead of improvising a drop.
Regress by reducing the load, shortening the controllable arm arc, or using a fitted reverse pec deck. An unsupported bent-over reverse fly adds a maintained-hip-hinge demand and needs a separate record rather than being treated as the same supported exercise. Progress through repetitions, then small per-dumbbell load changes while the bench setting, chest contact, elbow bend, and arm path remain consistent. Record the bench setting, support, load per hand and unit, grip, elbow bend, arm path and endpoints, completed repetitions, actual rest, estimated effort, and any chest lift or rowing change.
Cable Face Pull
Use a cable station with a secure rope long enough for the hands to separate beside the face. This selected version combines upper-arm pulling, elbow flexion, and a controlled external-rotation contribution rather than serving as isolated external rotation.
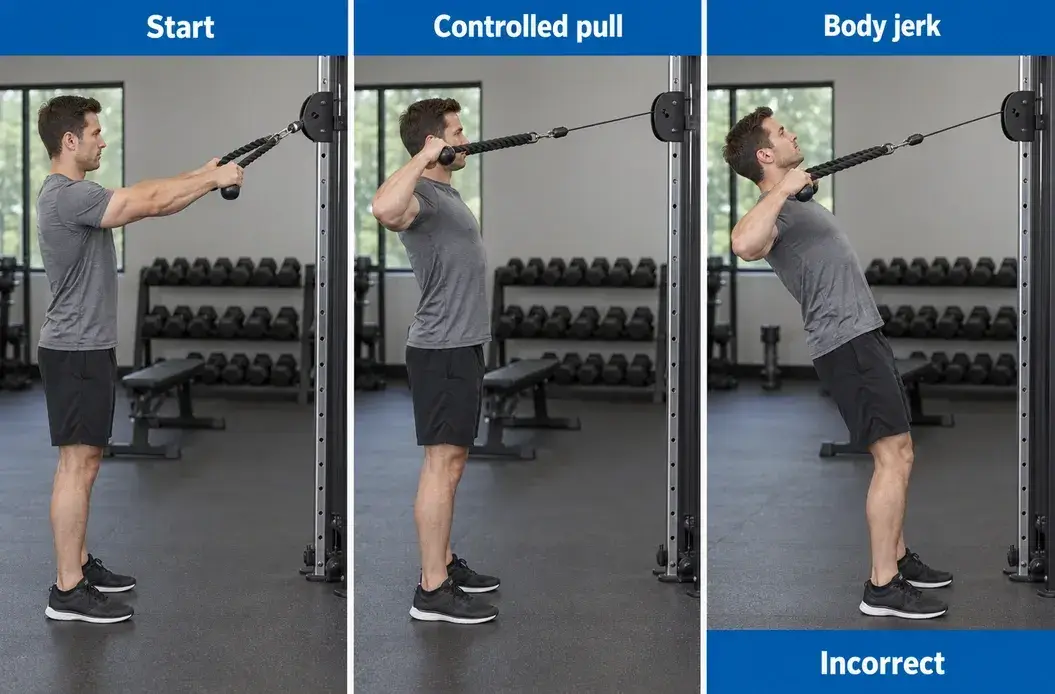
- Set the pulley around upper-chest to eye level as the station and comfortable path permit. Connect a suitable rope and choose manageable resistance while the stack rests. The rope must allow the hands to separate without hitting the face.
- Take a comfortable full grip and step back into a stable stance with the arms reaching forward. Establish a modest repeatable torso position rather than an exaggerated backward lean.
- Pull toward the upper face as the elbows bend and the upper arms move outward and back. Separate the rope ends beside the face and allow a controlled external-rotation contribution without forcing vertical forearms or a hands-behind-head endpoint.
- Finish where the shoulders, wrists, and neck remain comfortable and the torso has not jerked backward. Allow the shoulder blades to move without forcing a maximal squeeze or lifting the chin to create room.
- Return the arms and rope forward steadily while keeping the cable clear. Settle the resistance before releasing it or changing the setup, and stop when the rope length, path, or station cannot provide a secure controlled repetition.
Regress by reducing the resistance or choosing a shorter controllable endpoint, or select another posterior-shoulder option when the rope or station does not fit. A face pull is not isolated external rotation and is not a universal posture correction, injury-prevention drill, rotator-cuff rehabilitation exercise, or pain treatment. Progress through improved control and repetitions before using a small station increment while keeping the cable height and selected implementation unchanged. Record the cable height, rope or attachment, stance, torso position, grip, hand and elbow finish, displayed load and unit, completed repetitions, actual rest, estimated effort, and any recoil or face-clearance issue.
Distinguish flyes, rows, and face pulls
Reverse flyes use a relatively stable elbow angle while the upper arms open. Rows use repeated elbow flexion with their selected upper-arm path. The face pull taught here combines pulling and elbow flexion with a controlled external-rotation contribution, so it is not interchangeable with a pure cable external-rotation drill. Use the back exercise selection guide for the separate job of choosing compound rows and vertical pulls. None of these posterior-shoulder options promises complete rear-delt isolation, posture correction, injury prevention, or rehabilitation.
Shoulder Exercises at Home and With Limited Equipment
Choose home shoulder exercises by the equipment and support you actually have. A pair of dumbbells, a locked adjustable bench, an intact band with a compatible setup, and clear floor space each permit different options. They do not create interchangeable resistance records or make the complete ten-exercise menu available in every home.
Dumbbells plus a locked bench
A stable adjustable bench with a backrest that locks securely can support the seated dumbbell shoulder press and chest-supported dumbbell reverse fly already taught in this guide. Confirm that the bench permits breathing, arm and weight clearance, a controlled pickup and set-down, and the intended pressing or reverse-fly path. Do not substitute unstable household furniture for an exercise bench. Keep the bench setting, support, grip, range, and load per dumbbell with units in the record. Label each dumbbell separately rather than adding the two weights into an unexplained total.
Dumbbells without a bench
Standing dumbbell pressing removes the back support and adds stance, balance, and trunk demands. Keep the feet stable, avoid deliberate leg drive, and stop before a growing back arch or changing torso position becomes necessary. Treat it as a different exercise record from the seated supported press. An unsupported dumbbell reverse fly also changes the task. Use a comfortable maintained hip hinge, stable feet, and a steady elbow angle while the upper arms open. Stop when hinge endurance or torso support limits the movement rather than lifting the chest, rising toward standing, or turning the repetition into a row. Choose another suitable posterior-shoulder option when that position cannot be maintained.
Compatible resistance bands
Use only an intact band with compatible handles and connectors, plus a manufacturer-permitted foot setup or a purpose-designed anchor installed and used as directed. Respect the product's stretch limits, keep the band away from sharp edges, and maintain a clear recoil path before applying tension. Do not use towels over doors, furniture, railings, exposed hooks, or improvised anchor points. Band color identifies that band or product system only; it is not a universal load unit. Record the band identity, working length, foot or anchor setup, starting distance, grip, range, repetitions, rest, and stopping reason.
Pike Push-Up
Use the pike push-up as a floor-based pressing choice when wrist support, body geometry, range, and strength permit a controlled repetition. The hands and feet remain on the floor while the hips stay raised; this version does not require furniture or an overhead support.
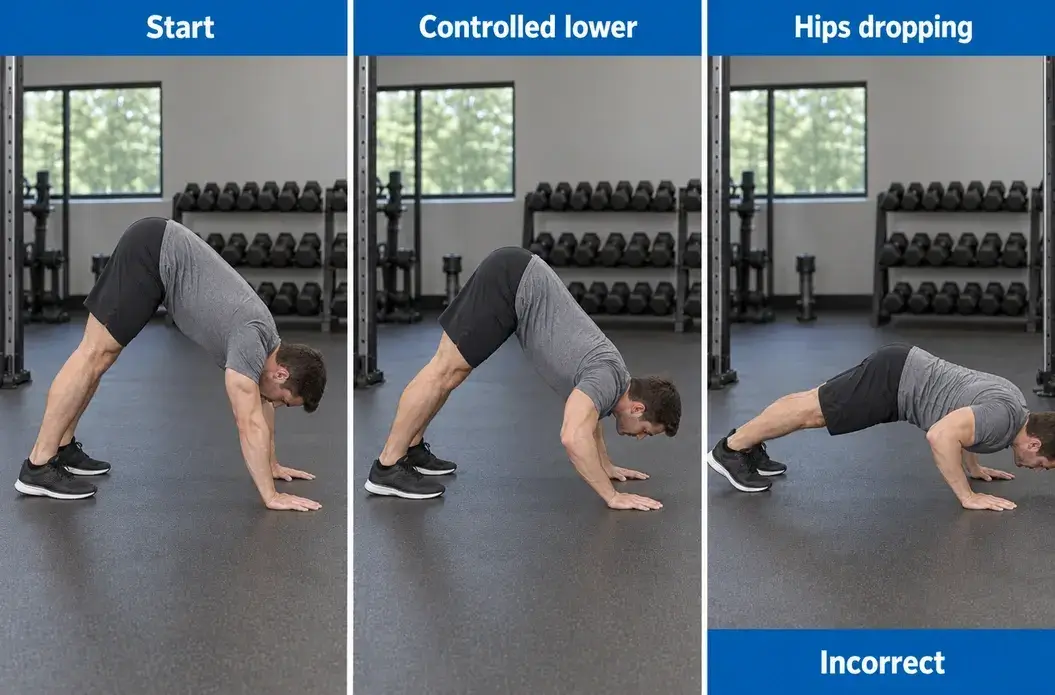
- Use a clear nonslip floor. Place the hands securely around a comfortable shoulder-width spacing with the fingers spread and the feet stable. Raise the hips into an inverted-V position; a modest knee bend is acceptable when it helps maintain the chosen position.
- Choose a hand-to-foot distance and shallow initial range that you can reverse without sliding. Keep the hands and feet on the floor; this entry does not use furniture, elevated feet, parallettes, or a headstand.
- Bend the elbows and lower the upper body with the head traveling down and slightly forward of the hands through a comfortable arm path. Keep pressure through the hands, the neck aligned, and the hips raised; do not plant the head or neck on the floor.
- Press through the palms to return to the same raised-hip position. End the set before elbow or shoulder control fails, the hips collapse into a different push-up, or the descent becomes uncontrolled.
- Lower the knees to a supported position or step out under control. Regress by reducing the range or choosing another available pressing option rather than testing a failed head-first repetition.
Use a reduced range or less demanding documented geometry when the full chosen range is not repeatable. If no controlled repetition is available, use another suitable press or qualified coaching rather than an improvised overhead support. Progress within the floor version through repetitions, controlled range, and deliberately recorded body geometry; a handstand is not a compulsory next step. Record the hand and foot positions, knee bend, hip position, a depth marker that does not bear load through the head, body mass when relevant, completed repetitions, actual rest, estimated effort, and any support or geometry change.
Keep separate resistance baselines
A pike push-up is a pressing option, not an equipment-free replacement for dedicated lateral-raise and posterior-shoulder loading. Unloaded arm movements and a burning sensation do not establish resistance equivalent to dumbbells, bands, cables, or machines. Preserve separate records when equipment or geometry changes. Do not compare displayed kilograms across different stations, convert a band or pike-push-up position into a cable number, or combine dumbbell loads without a per-hand label. For the detailed reasons apparatus numbers are not one shared scale, see why gym-machine weights differ. Choose from the equipment you already have, the support you can use securely, and the roles the complete plan still needs. There is no requirement to buy another product or pretend that every press, lateral raise, and posterior-shoulder option can be recreated at home.
Three Shoulder Workout Blocks and When to Use Them
These are three alternative constructed partial shoulder blocks. They are not source routines, a tested program, a three-day schedule, or sequential levels. Choose block A when the complete plan deliberately allocates overhead pressing, lateral raising, and posterior-shoulder work; choose block B when pressing is already covered and direct lateral and posterior work is needed; choose block C when appropriate machine support fits. A six-set block does not replace a single two-set isolation slot without a deliberate change to the wider plan. Do not append all three blocks or remove a required chest press or row merely because some muscles overlap. Inspect and rehearse every required setup with manageable resistance before the working sets. Warm-up and rehearsal work remain separate from the displayed sets. Start with a load or variation that permits the lower end of the listed range with approximately 2–3 technically sound repetitions in reserve, meaning an estimate of how many acceptable repetitions could still be completed. This is a conservative construction for these examples, not a universal optimal effort. Stop sooner when control is lost or concerning symptoms occur. Repetitions-in-reserve estimates are imperfect, and no failure test is required. Perform straight sets with the listed rest rather than silently turning a block into a superset or circuit. The stated rest also applies before moving from the last set of one exercise to the next exercise. Take additional recovery when needed to preserve the selected standard and record the actual rest instead of rushing to a time target. Tempo is written as lowering or return – controlled start pause – lift or pull – controlled finish pause, in seconds. For presses, 2-1-1-0 means lower for 2 seconds, pause for 1 at the comfortable lower position, press for 1, and use no deliberate overhead pause. For lateral raises and reverse flyes, 2-1-1-1 means lower or close for 2 seconds, pause at the start for 1, raise or open for 1, and hold the controllable finish for 1. A 0 is not a bounce. The first physical motion from the starting position is usually the lift even though the notation lists the lowering phase first. These are execution references, not uniquely growth-optimal cadences, and no stretch or joint endpoint should be forced to satisfy a pause. A bilateral set moves both arms together and is not doubled per shoulder. For block B's single-arm cable raise, complete one arm, rest 60–90 seconds, perform the other arm, rest 60–90 seconds, and repeat until each arm has completed 3 sets. Count repetitions separately for each arm, reproduce the arm order, and increase the recovery rather than forcing a poorly recovered set. This rest sequence is an explicit construction for block B, not wording borrowed from a source row with unspecified side switching.
A: Balanced press-and-raise block
| Exercise | Sets & Reps | Rest | Tempo | Target Muscles | Notes |
|---|---|---|---|---|---|
| Seated Dumbbell Shoulder Press | 2 sets of 8–12 reps | 120–180 seconds | 2-1-1-0 | Anterior and lateral deltoids, triceps | Use a reachable shoulder-level start and keep the supported torso position. |
| Dumbbell Lateral Raise | 2 sets of 12–20 reps | 60–120 seconds | 2-1-1-1 | Lateral deltoids, scapular muscles | Raise through the same comfortable arc without torso swing. |
| Chest-Supported Dumbbell Reverse Fly | 2 sets of 12–20 reps | 60–120 seconds | 2-1-1-1 | Posterior deltoids, scapular muscles | Keep chest contact and a consistent slight elbow bend. |
Use block A only when the complete plan deliberately allocates overhead pressing, lateral raising, and posterior-shoulder work in this slot. The three bilateral prescriptions total 2 + 2 + 2 = 6 exercise sets. They are not six direct sets for each deltoid region.
B: Lateral-delt priority when pressing is already covered
| Exercise | Sets & Reps | Rest | Tempo | Target Muscles | Notes |
|---|---|---|---|---|---|
| Single-Arm Cable Lateral Raise | 3 sets of 12–20 reps per side | 60–90 seconds after each arm before the next arm or set | 2-1-1-1 | Lateral deltoids, scapular muscles | Alternate arms after the stated rest; repeat 3 sets on each side and keep the same setup. |
| Reverse Pec Deck | 2 sets of 12–20 reps | 60–120 seconds | 2-1-1-1 | Posterior deltoids, scapular muscles | Use the fitted chest-supported rear-delt configuration. |
Use block B only when the wider plan already supplies the intended pressing and deliberately allocates this lateral and posterior work. Three sets per arm produce 3 + 3 = 6 one-arm work bouts, followed by 2 bilateral reverse-pec-deck sets. The resulting 8 bouts are not eight sets for each shoulder.
C: Supported-machine block
| Exercise | Sets & Reps | Rest | Tempo | Target Muscles | Notes |
|---|---|---|---|---|---|
| Machine Shoulder Press | 2 sets of 8–12 reps | 120–180 seconds | 2-1-1-0 | Anterior and lateral deltoids, triceps | Use a fitted station and retain the intended back and foot support. |
| Machine Lateral Raise | 2 sets of 12–20 reps | 60–120 seconds | 2-1-1-1 | Lateral deltoids, scapular muscles | Keep the seat and upper-arm contact consistent. |
| Reverse Pec Deck | 2 sets of 12–20 reps | 60–120 seconds | 2-1-1-1 | Posterior deltoids, scapular muscles | Control the opening and return without lifting from the chest pad. |
Use block C when external support or simpler weight handling is useful and all three machines actually fit. The three bilateral prescriptions total 2 + 2 + 2 = 6 exercise sets. This is not a pain-treatment routine or proof that machines are safer for everyone.
Progress the selected block without changing its standard
Keep the setup, tempo, range, rest, support, and stopping rule comparable. Add clean repetitions within the listed range, then increase resistance by the smallest suitable increment only when every set reaches the upper end at the intended effort and execution standard. For the unilateral cable raise, verify that standard separately for each arm. When the next increment is too large, retain the current version or use a secure permitted finer increment or alternative with its own baseline. Do not swing, force failure, or silently exceed the stated range to justify more load. Different arms do not have to use identical loads when their actual capabilities differ, and more repetitions are not required at every session.
Place one block inside the complete plan
Weekly placement belongs to the complete workout plan and must account for chest pressing, other overhead work, rows, recovery, and the current priority. Omit or reduce a block that does not fit. These examples do not create a universal weekly shoulder-set target, training frequency, or requirement to perform all three blocks.
Count Shoulder Work Without Double-Counting Every Set
The Upper/Lower Split Workout Plan supplies the selected source rows below. This reporting example assumes that one Upper A and one Upper B are each completed once within the same Monday-to-Sunday week, using one listed option per row and bilateral implementations for these selected rows. That is a counting assumption, not a new schedule or proof that either session was completed. These are selected extracts rather than two complete workouts. Warm-ups, unselected rows, lower-body days, vertical pulls, and any additional training remain outside this extract. The complete source plan remains authoritative for exercise order, weekly scheduling, progression, and recovery.
Upper A: selected source rows
| Exercise | Sets & Reps | Rest | Tempo | Target Muscles | Notes |
|---|---|---|---|---|---|
| Barbell Bench Press or Machine Chest Press | 3 sets of 4–6 reps | 3–5 min | 2-1-X-0 | Chest, Triceps, Anterior Delts | Use safeties or a competent spotter; retain a repeatable touch point and range. |
| Chest-Supported Row | 3 sets of 5–8 reps | 2–4 min | 2-1-X-1 | Upper Back, Lats, Rear Delts, Biceps | Keep the chest supported and finish without shrugging or heaving. |
| Standing or Seated Overhead Press | 2 sets of 6–8 reps | 2–3 min | 2-1-X-0 | Deltoids, Triceps, Upper Chest | Brace the trunk and avoid turning the set into repeated push presses. |
| Cable or Dumbbell Lateral Raise | 2 sets of 12–20 reps | 60–120 sec | 2-1-1-1 | Lateral Delts | Raise through a comfortable arc without swinging the torso. |
Upper B: selected source rows
| Exercise | Sets & Reps | Rest | Tempo | Target Muscles | Notes |
|---|---|---|---|---|---|
| Incline Dumbbell or Machine Press | 3 sets of 8–12 reps | 2–3 min | 3-1-1-0 | Upper Chest, Triceps, Anterior Delts | Select an incline and grip that allow stable shoulder movement. |
| Seated Cable or Machine Row | 3 sets of 8–12 reps | 2–3 min | 2-1-1-1 | Upper Back, Lats, Rear Delts, Biceps | Use a handle that complements the vertical pull without creating wrist pain. |
| Seated Dumbbell or Machine Shoulder Press | 2 sets of 8–12 reps | 90–180 sec | 2-1-1-0 | Deltoids, Triceps | Stop before the lower back or shoulder position becomes the limiter. |
| Reverse Pec Deck or Cable Rear-Delt Fly | 2 sets of 12–20 reps | 60–120 sec | 2-1-1-1 | Rear Delts, Scapular Muscles | Move through the shoulder rather than extending the lower back. |
Apply the source effort, tempo, and progression context
The source plan generally finishes most work with approximately 1–3 technically sound repetitions in reserve and may retain more on demanding free-weight lifts. Preserve its actual progression and recovery rules rather than substituting section 10's constructed effort convention. The source tables use lowering or return – start pause – ascent or pull – finish pause. X means purposeful acceleration intent under control, not a bounce, leg drive, or guaranteed bar speed. Chest and shoulder presses begin their ascent from the selected lower position, while rows begin their pull from the controlled reach.
Partition the selected extract without double-counting it
| Category | Upper A exercise sets | Upper B exercise sets | Total in this extract | Interpretation |
|---|---|---|---|---|
| Overhead pressing | 2 | 2 | 4 | Shoulder-focused compound work, not 4 isolated sets for each deltoid region. |
| Lateral raising | 2 | 0 | 2 | Direct lateral-raise allocation under the stated bilateral example. |
| Posterior-shoulder reverse fly | 0 | 2 | 2 | Direct posterior-shoulder allocation, not every pulling set. |
| Chest pressing | 3 | 3 | 6 | Additional pressing overlap; do not convert into 6 isolated front-delt sets. |
| Horizontal rowing | 3 | 3 | 6 | Additional posterior-shoulder/scapular involvement varies by row implementation; no exact rear-delt credit is inferred. |
The shoulder-focused rows contain 2 + 2 + 2 + 2 = 8 exercise sets: four overhead-press sets, two lateral-raise sets, and two reverse-fly sets. Adding the selected chest presses and horizontal rows gives 8 + 6 + 6 = 20 selected exercise sets. Neither total is a whole-program set count or a stimulus score. The five categories partition this selected extract, so do not add the same row again as both direct and indirect work to manufacture a larger grand total. No universal 0.5 multiplier or claim that 20 sets is biologically optimal is introduced.
Case A: replace one press option instead of appending it
Assume Upper B's selected press has not begun. Replacing its 2 seated-dumbbell-press sets with 2 fitted machine-press sets gives 2 − 2 + 2 = 2 press sets. Completing both full options gives 2 + 2 = 4 press sets and is added work rather than substitution. If any work has already been completed, keep it in the record and decide only what remains. Equal raw counts do not establish equal resistance, force, fatigue, or stimulus, and this shoulder-press substitution does not authorize removing the source's chest pressing.
Case B: count a separate per-arm prescription
This separate constructed example is not source wording and is not block B's three-set cable-raise construction. Assume an appropriate plan explicitly prescribes 2 sets of 12 repetitions per arm for a single-arm cable lateral raise.
| Arm | Sets | Reps per set | Repetitions for that arm |
|---|---|---|---|
| Left | 2 | 12 | 24 |
| Right | 2 | 12 | 24 |
For each arm, 2 × 12 = 24 repetitions. Across both arms, 2 + 2 = 4 one-arm work bouts and 24 + 24 = 48 one-arm repetitions. Each arm receives 2 sets, not 4 sets or 1 set. The actual plan defines rest; do not silently inherit the source's bilateral recovery or section 10 block B's after-each-arm convention.
Keep editable assumptions separate from biological claims
Use the Workout Volume Calculator when you want to enter explicit accounting assumptions. The tool does not establish a validated deltoid-region growth score, diagnose a training imbalance, or convert every overlapping press and row into one biologically proven total.
Progress Shoulder Training With Repeatable Technique
Start with the complete plan's exercise version, repetition range, effort target, and setup. Choose a manageable load, keep the same implementation, and add technically sound repetitions before increasing resistance. Use the smallest practical load increase only after every prescribed set reaches the upper end of the range at the intended effort without shortening the range, changing support, or altering the movement to finish. Repetitions in reserve, or RIR, means the estimated number of further repetitions available at that same execution standard. It does not include repetitions created by body swing, leg drive, a larger back arch, a shorter range, or another material technique change. Use the reps-in-reserve guide for the wider interpretation and limitations of this estimate.
Use one repeatable progression standard
- Begin with the exercise, setup, range, tempo, rest, and effort prescribed by the complete plan. Rehearse unfamiliar equipment and select resistance that permits the lower end of the repetition range without losing the intended support or path.
- For dumbbell presses, record the load per dumbbell rather than an unlabeled combined total. For a standing barbell press, record the total bar-plus-plate load. A new implement or a move between seated, standing, dumbbell, barbell, and machine pressing requires its own baseline.
- For machine presses and raises, keep the exact machine identity, seat, start position, pad or handle settings, grip, and displayed unit. A different station or material adjustment is a changed exercise record, not unchanged load progress.
- For lateral raises and reverse flyes, keep the arm plane, elbow bend, support, and endpoints comparable. More repetitions do not qualify when the torso begins to swing, the elbow bends further, the chest leaves the pad, or the range shortens.
- For single-arm cable work, record each arm separately along with pulley height, body distance, handle, support, range, arm order, and actual recovery. One arm reaching the upper bound does not automatically qualify the other arm or authorize a load increase for both.
- For the floor pike push-up, record hand and foot positions, knee bend, hip position, and depth. A longer lever, deeper range, slower tempo, less stable support, or progression toward a handstand changes the version and is not unchanged repetition progress.
- Add clean repetitions within the prescribed range while the full standard remains intact. Increase resistance by the smallest manageable permitted increment only after every prescribed set reaches the upper end at the intended effort and execution quality.
- Establish a fresh baseline whenever equipment, support, cable geometry, machine settings, body geometry, tempo, range, or another material variable changes. Novelty, instability, and greater difficulty are not progress unless the new version is named and tracked consistently.
Fixed dumbbell jumps can be too large for the current repetition range. Keep the present load and continue within the plan, use only secure manufacturer-permitted microloading, or choose an implement with finer increments and start a new baseline. Do not wedge improvised objects onto a dumbbell, cable stack, or machine. Ordinary muscular effort and gradual fatigue can occur during a hard set. Stop when the intended range, support, grip, equipment security, or movement control is lost, and stop for sharp or worsening pain rather than forcing another repetition or using the exercise as a self-test.
Use a constructed log to decide when load can increase
This example assumes an appropriate two-set machine-shoulder-press allocation using an 8–12 repetition range. The same machine, seat and start settings, grip, tempo, rest, range, and effort target are retained across all three exposures. It illustrates a progression decision, not an actual Upper/Lower performance record or a guaranteed visit-to-visit timeline.
| Exposure | Setup and load | Completed reps | Decision |
|---|---|---|---|
| 1 | Same machine, settings, load, tempo, rest, range, and effort target | 10, 9 | Keep the current load because both sets have not reached the upper end. |
| 2 | Same machine, settings, load, tempo, rest, range, and effort target | 11, 10 | Keep the current load and continue building technically sound repetitions. |
| 3 | Same machine, settings, load, tempo, rest, range, and effort target | 12, 12 | When both sets also finish with the target repetitions in reserve and the full standard intact, choose the smallest manageable permitted increase for a later exposure. |
The final exposure qualifies only when both sets reach 12 repetitions at the intended effort without grinding through lost position, shortened range, altered support, or a forced repetition. No specific kilogram increase is implied, and the next exposure is not guaranteed to produce more repetitions immediately.
Schedule progression inside the complete week
Review the actual week before adding more shoulder work. Account for chest presses, other overhead presses, rows, direct lateral and posterior work, current priorities, performance trends, and recovery. When direct work is no longer progressing or recovery is inadequate, redistribute or reduce workload before adding another shoulder day. There is no fixed training frequency or identical regional dose that suits everyone. Keep the work that serves the plan, reduce or replace redundant exercise, and judge progression within the same documented implementation rather than by how many shoulder exercises were added.
Common Shoulder-Training Mistakes and Practical Corrections
Use observable changes to decide what needs correcting. Restore the intended exercise with the smallest practical adjustment, then keep enough detail in the training record to show whether the movement, support, resistance, or stopping point changed.
| Mistake | What changes | Practical correction | Record to keep |
|---|---|---|---|
| Adding front raises or another press without reviewing chest-press and overhead-press overlap | The plan gains more anterior-deltoid and pressing work without first checking whether existing presses already cover that role, while lateral or posterior work may still be the actual gap. | Review the complete week, identify the missing shoulder role, and remove or replace redundant work before adding another press or front raise. | Current chest presses, overhead presses, direct raises or flyes, completed working sets, performance trend, recovery, and the stated purpose of any added exercise. |
| Forcing the shoulder blades permanently down and back or treating all normal elevation as a shrug error | Natural scapular movement during arm elevation is restricted, or ordinary coordinated elevation is mislabeled as failed technique. | Allow smooth shoulder-blade motion with the arm. Correct a sudden shoulder hike, torso heave, or loss of the chosen path rather than trying to freeze the scapulae. | Exercise, support, arm path, range, load, point where a sudden hike or body movement appeared, and whether the repetition remained controllable. |
| Turning a strict press into repeated leg drive or a progressively larger backward lean | A strict shoulder press becomes a push-press or altered torso-assisted repetition, so the recorded load and repetitions no longer describe the same implementation. | Reduce the load or end the set when the knees, hips, or trunk must add momentum. Reestablish the selected stance, support, and press path before the next set. | Implement, load and units, stance or support, completed repetitions, leg drive, trunk-angle change, range, effort, and stopping reason. |
| Swinging lateral raises, sharply changing the elbow bend, or forcing a thumbs-down arm position | Momentum, a shorter lever, or forced rotation replaces the selected upper-arm elevation pattern and makes later performance comparisons unreliable. | Use less resistance or a shorter comfortable range, keep the elbow bend and arm plane repeatable, and stop before torso swing or forced wrist and shoulder rotation appears. | Load per hand or station setting, stance, elbow bend, arm plane, endpoints, repetitions, any swing, and the first material lever or rotation change. |
| Turning a reverse fly into a row, lifting away from support, or pulling a face-pull rope into the face | Repeated elbow flexion, lost chest support, or an unsuitable rope path replaces the intended reverse-fly or face-pull implementation. | Reduce resistance, restore chest contact or the selected elbow angle, and use a rope and cable height that allow the hands to separate clear of the face. Choose another option when the setup cannot fit. | Exercise version, bench or machine settings, rope and cable height, elbow bend, hand finish, chest-contact loss, recoil, face clearance, and stopping reason. |
| Ignoring bench or machine fit, unsafe entry and exit, or an insecure band or support | The exercise depends on unstable support, unreachable handles, uncontrolled pickup or set-down, or equipment that cannot safely resist the intended direction of force. | Stop and settle the resistance, use only permitted adjustments and secure equipment, reduce the load if entry or exit is uncontrolled, or choose a different exercise that fits. | Bench or station identity, settings, support and anchor condition, entry and exit method, load, fit problem, action taken, and whether the exercise was changed. |
| Copying load numbers across implements, hiding per-side work, or comparing changed ranges as identical progress | Different dumbbells, barbells, cables, machines, sides, ranges, or body geometries are merged into one misleading performance record. | Keep separate baselines for each implement and material setup. Label dumbbell load per hand, total bar load, machine identity, cable geometry, each side, and the actual range used. | Implement or station, units, per-hand or total-bar convention, side, settings, cable height and distance, support, range, geometry, repetitions, rest, and effort. |
| Treating pain, numbness, unexpected weakness, damaged equipment, or failed control as a reason for another harder test set | A normal training set becomes an uncontrolled retest under symptoms or defective conditions, so the result no longer represents ordinary progression. | End the set, settle the load, and remove damaged or insecure equipment from use. Seek appropriate assessment for sharp, radiating, worsening, persistent, or otherwise concerning symptoms rather than forcing another attempt. | Symptom or equipment issue, exercise and setup, point where control failed, load and range, action taken, and whether further training was stopped. |
When to stop or change the exercise
Finish the repetition only while the implement, support, range, and body position remain controllable, then settle the resistance safely. Stop when equipment security or movement control fails. Sharp, radiating, worsening, persistent, or otherwise concerning pain, numbness, or unexpected weakness warrants appropriate assessment; an acute injury or severe symptom needs prompt help rather than another forced set. Ordinary muscular effort and fatigue can occur without automatically meaning an injury, but they do not justify continuing after the selected standard has failed. Exercise substitution is not a diagnosis or treatment. Keep a familiar exercise while it fits, progresses, and serves the plan. Change it for a real equipment, support, tolerance, recovery, or progression constraint, not because a rotation calendar says every productive movement must be replaced.
Shoulder Exercise and Workout FAQs
What are the best shoulder exercises?
The best choices are the exercises that match the shoulder role your current plan needs, fit the equipment and support available, can be entered and exited securely, and offer a repeatable progression method. A controllable press can fill an overhead-pressing role, a lateral raise can provide direct side-delt emphasis, and a reverse fly or suitable posterior-shoulder movement can address that role. No single exercise or three-exercise combination is best for everyone.
Are shoulder presses enough to train all three deltoid regions?
Shoulder presses involve the anterior and lateral deltoid regions with triceps and other assisting muscles, but they do not automatically replace every lateral-raise or posterior-shoulder function. Existing chest presses, overhead presses, rows, and reverse-fly choices should be reviewed together. Add direct lateral or posterior work only when the complete plan needs it rather than assuming one press isolates or fully develops all three regions.
Do I need front raises if I already bench press?
Not automatically. Bench and incline presses already involve the anterior deltoid, and overhead presses add more pressing work. A front raise needs a specific purpose and allocated room in the plan; it should not be added merely because it appears on a shoulder-exercise list. When pressing is already sufficient, lateral- or posterior-shoulder work may be the more useful addition.
Are cable or dumbbell lateral raises better?
Neither is a universal winner. Dumbbells use gravity and allow a simple free-weight setup, while cable direction, pulley height, body distance, and starting position alter the line of pull. A short-term within-person study using matched arm ranges found comparable lateral-deltoid thickness changes in its tested cable and dumbbell conditions, but that does not cover every cable height, across-body or behind-body start, set protocol, or training population. Choose the version with usable increments, a comfortable repeatable range, and a setup you can reproduce.
Should I use seated, standing, or machine shoulder presses?
Choose by goal, support, fit, entry and exit, and the progression record you can maintain. Seated dumbbells provide back support with separate hand paths; a fitted machine uses its own guided geometry and station-specific resistance; a strict standing barbell press adds balance, trunk, rack, and shared-bar demands. Those differences do not make one option automatically safer, more functional, or better for growth, and loads should not be converted directly between them.
How many shoulder exercises and sets should I do?
The complete plan should determine the allocation. Review chest pressing, overhead pressing, rows, direct lateral work, posterior-shoulder work, current priorities, effort, progression, and recovery before adding more. One exercise may be enough for a specific missing role, while a larger partial block requires deliberate room in the overall plan. The constructed blocks in this guide are alternatives, not a universal shoulder dose or instructions to append all of them.
How often should I train shoulders?
There is no fixed frequency that fits everyone. Scheduling depends on the complete week, direct and overlapping work, how hard the sets are, whether technique and performance are progressing, and whether recovery is adequate before the next exposure. Redistribute or reduce redundant work before creating another shoulder day simply to increase frequency.
Can I train shoulders at home without a gym?
Yes, within the limits of the equipment and support actually available. Dumbbells plus a locked exercise bench can support seated presses and chest-supported reverse flyes; dumbbells without a bench create different standing or unsupported records; bands require intact compatible components and a manufacturer-permitted foot or purpose-designed anchor setup. A floor pike push-up is a pressing option, but it does not replace dedicated lateral-raise and posterior-shoulder loading, and unstable furniture or improvised anchors should not be used.
Do face pulls replace rear-delt flyes or fix shoulder pain?
No. A reverse fly uses a relatively stable elbow angle while the upper arms open. The face pull taught here combines upper-arm pulling, elbow flexion, and a controlled external-rotation contribution, while pure external rotation is another movement again. These exercises can overlap in the muscles involved, but they are not interchangeable and none is a guaranteed posture correction, injury-prevention method, rehabilitation exercise, or pain cure.
When should I stop a shoulder exercise?
Stop the set when the intended range, support, grip, equipment security, arm path, or body position changes materially, then settle the load safely. Stop for sharp, radiating, worsening, persistent, or otherwise concerning pain, numbness, unexpected weakness, damaged equipment, or loss of safe control and seek appropriate assessment when needed. Ordinary muscular effort and fatigue can occur without automatically indicating injury, but they do not justify forcing another repetition after the selected standard has failed. Next, identify the shoulder role the existing plan still needs, choose one secure and controllable option, establish its setup and progression record, and place it in the work already allocated rather than appending a second shoulder workout. Use the site's complete workout plans when you need the full weekly structure.