
Workout Plan for Women: Build Strength Across Your Whole Body
Follow three gym workouts that train your legs, back, chest, shoulders, arms and trunk. Each session has six exercises, clear rests and a way to progress. Choose weights you can control rather than copying a weight suggested for women in general. This plan is for women starting structured strength training after learning the basic gym setups, or returning to a manageable routine. It includes practical help with equipment fit, upper-body loading, crowded gyms and adjusting a difficult day. You do not need a weight-loss goal, a menstrual-cycle calendar or a five-day schedule. Use the plan when the equipment and movements fit you. It is general training, not pregnancy, postpartum, pelvic-health or injury rehabilitation. An existing workout that already suits your goals does not need replacing simply because it is not labelled for women.
Choose the Plan for Your Goal and Experience
What is different about this guide?
The exercises use ordinary strength-training principles. The additional guidance addresses choices that can get lost in women-focused fitness advice: building upper-body strength, finding equipment that fits, progressing beyond very light weights, handling unwanted attention and adjusting training without a hormone-based calendar. These concerns are not shared by every woman, and the same practical solutions can help other lifters. A survey of women’s gym experiences described appearance judgement, competition for space and unwanted attention alongside positive experiences of learning skills. It was an exploratory survey, not evidence that every woman feels intimidated or that a particular workout fixes those barriers.
Check your starting point
The standard routine uses dumbbells, an adjustable bench, leg-press, chest-press and leg-curl machines, seated rowing and pulldown stations, and a high pulley with a rope. You also need floor space and a fixed hand support. Check that these or the taught alternatives are available. You should be able to follow a demonstration, use the required equipment and stop a set under control. Get instruction for any unfamiliar exercise before loading it. The Beginner Gym Workout Plan is the better starting point when you need a structured equipment induction and help learning the basics. This plan is not designed around competitive lifting, advanced bodybuilding or a medical condition. Pregnancy, recovery after childbirth or surgery, and a condition affecting exercise require advice suited to that situation; a general women’s title does not provide clearance.
Choose a useful measure of progress
Pick one training goal, such as completing the scheduled sessions or improving a press with the same technique. Appearance goals are a personal choice, not an entry requirement. There is no special “toning” exercise, and you do not need to make every session a leg or glute workout. You can continue the Full Body Workout Plan when it already fits. This routine is an alternative with its own prescriptions, not an upgrade that all women need.
Your Weekly Schedule and First Sessions
Train on non-consecutive days. With three available days, complete A, B and C in order. With two days, keep the same sequence moving across weeks rather than dropping Workout C.
| Schedule | Week 1 | Week 2 | Week 3 |
|---|---|---|---|
| Three days: Monday, Wednesday, Friday | A / B / C | A / B / C | A / B / C |
| Two days: Monday, Thursday | A / B | C / A | B / C |
The two-day schedule completes two A/B/C rounds over three weeks instead of three. It provides less work in that period; do not combine sessions to compensate. Keep at least one full non-lifting day between these workouts, with more recovery when needed. For the first complete A/B/C round, use one working set of each exercise, including one set per side where stated. Learn the settings and choose manageable resistance. For strength exercises, leave about three or four controlled repetitions available; use the form and breathing limits below for dead bugs and side planks. Move to the normal two-set tables when the movements and recovery are manageable. Repeat the introductory amount when needed. Complete an exercise’s sets before changing stations. For split squats and side planks, work one side, take the full listed rest, then work the other side and rest again. Repeat for the second set. Rehearsals are separate from working sets; do not add an unlisted circuit or finisher.
Workout A: Squat, Press and Row
Complete the goblet squat, chest press and cable row in the order shown. Use one set per row during the introductory round; the table shows the normal session.
| Exercise | Sets & Reps | Rest | Tempo | Target Muscles | Notes |
|---|---|---|---|---|---|
| Goblet Squat | 2 sets of 8–12 reps | 120 sec | 3-1-1-0 | Quadriceps, glutes, adductors | Hold one manageable dumbbell close to the chest. |
| Machine Chest Press | 2 sets of 8–12 reps | 120 sec | 2-1-1-0 | Chest, anterior delts, triceps | Adjust the seat and starting position before loading. |
| Seated Cable Row | 2 sets of 8–12 reps | 120 sec | 2-1-1-1 | Upper back, lats, elbow flexors | Use the intended seat and foot supports; keep the torso steady. |
| Seated Leg Curl | 2 sets of 10–15 reps | 90 sec | 2-1-1-1 | Hamstrings | Secure the thighs; the moving roller sits behind the lower legs. |
| Standing Floor Calf Raise | 2 sets of 10–20 reps | 60 sec | 2-1-1-1 | Calf muscles | Use light fixed support and a level floor; add one dumbbell only when suitable. |
| Dead Bug | 2 sets of 4–8 reps per side | 60 sec after each complete set | 2 sec reach, 1 sec pause, 2 sec return | Abdominals and other trunk-control muscles | Alternate sides within one set; shorten the reach before control changes. |
A dead-bug set includes both sides, alternating within the set. Two sets of six repetitions per side give twelve repetitions per side, across two complete sets.
Workout B: Hinge, Overhead Work and Split Squats
Perform the RDL while fresh, then the pulldown and shoulder press. Split squats and side planks take separate sets on each side, so this session has more individual work periods than A or C.
| Exercise | Sets & Reps | Rest | Tempo | Target Muscles | Notes |
|---|---|---|---|---|---|
| Dumbbell Romanian Deadlift | 2 sets of 8–12 reps | 120 sec | 3-1-1-0 | Hamstrings, glutes, spinal erectors | Start standing; the weights do not need to reach the floor. |
| Lat Pulldown | 2 sets of 8–12 reps | 120 sec | 2-1-1-1 | Lats, upper back, elbow flexors | Use a fitted seat and thigh restraint. |
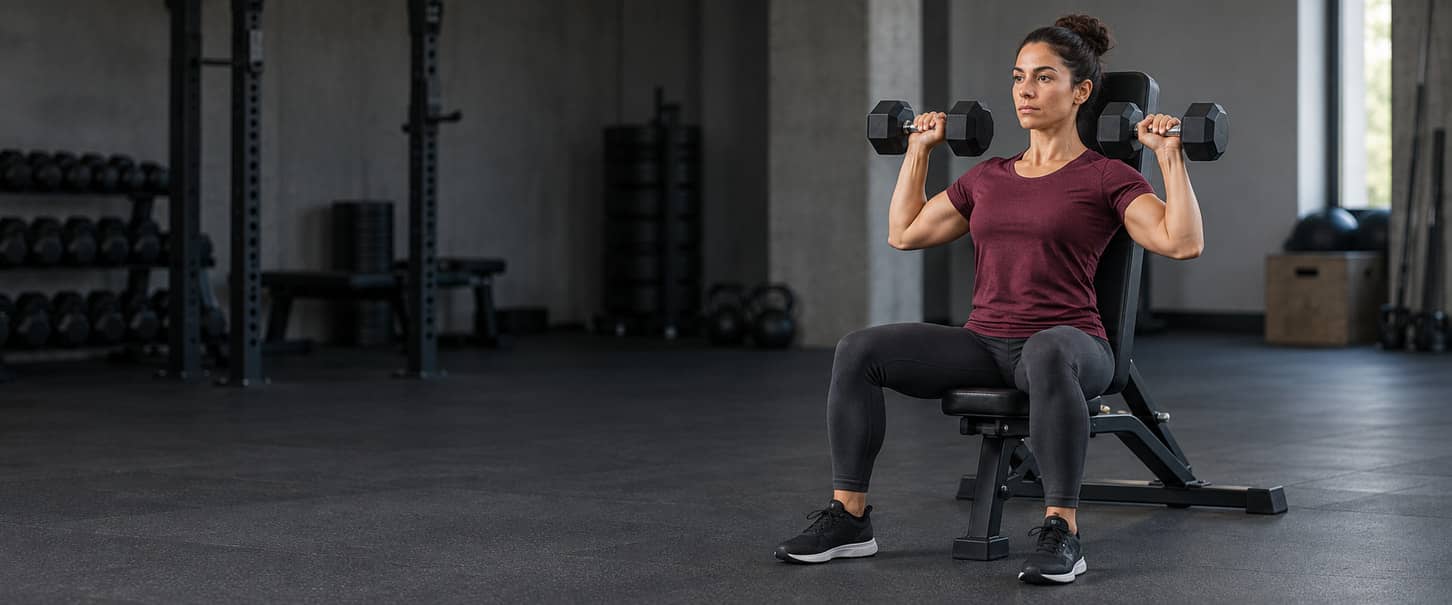
| Seated Dumbbell Shoulder Press | 2 sets of 8–12 reps | 120 sec | 2-1-1-0 | Deltoids, triceps | Use a locked near-upright bench and weights you can position and return. |
| Static Split Squat | 2 sets of 8–12 reps per leg | 90 sec after each leg | 3-1-1-0 | Quadriceps, glutes, adductors | Keep one leg forward for the set; begin without weights when needed. |
| Standing Dumbbell Curl | 2 sets of 10–15 reps | 90 sec | 2-1-1-1 | Biceps, brachialis | Both arms curl together; do not swing the torso. |
| Side Plank | 2 sets of 15–30 sec per side | 60 sec after each side | Steady hold; breathe normally | Obliques and other trunk-control muscles | Use bent knees or straight legs that allow a steady hold. |
Two sets of eight split squats per leg means sixteen repetitions with each leg leading, across four sets. The rear leg still helps. Two side-plank holds per side also mean four holds; rest after each side, not only after the pair.
Workout C: Supported Leg Work and Upper-Body Practice
Use the leg press for supported leg work and repeat familiar pressing, rowing and hinging patterns. Keep the order shown; moving the RDL from first in Workout B to fourth here can change the load you manage.
| Exercise | Sets & Reps | Rest | Tempo | Target Muscles | Notes |
|---|---|---|---|---|---|
| Leg Press | 2 sets of 10–15 reps | 120 sec | 3-1-1-0 | Quadriceps, glutes, adductors | Keep the pelvis and feet supported through a repeatable range. |
| Machine Chest Press | 2 sets of 8–12 reps | 120 sec | 2-1-1-0 | Chest, anterior delts, triceps | Keep the selected machine and setup; compare Workout C separately. |
| Seated Cable Row | 2 sets of 8–12 reps | 120 sec | 2-1-1-1 | Upper back, lats, elbow flexors | Control the return without rocking backwards. |
| Dumbbell Romanian Deadlift | 2 sets of 8–12 reps | 120 sec | 3-1-1-0 | Hamstrings, glutes, spinal erectors | Choose a load for this later position in the session. |
| Standing Floor Calf Raise | 2 sets of 10–20 reps | 60 sec | 2-1-1-1 | Calf muscles | Use the same support and ankle range. |
| Rope Triceps Pressdown | 2 sets of 10–15 reps | 90 sec | 2-1-1-1 | Triceps | Extend the elbows without dropping body weight onto the rope. |
The three sessions include knee-dominant work, hip hinges, knee curls, presses, rows, a vertical pull, calves and trunk work. Curls and pressdowns supplement the pulling and pressing; they are not a separate arm day to add.
Choose Starting Weights and Equipment That Fits
Warm up and learn the controls
Begin with a few minutes of easy walking or cycling, then light rehearsals of the exercises you are about to perform. Use additional gradual warm-up sets when a heavier movement needs them. Preparation should leave you ready, not exhausted. Learn unfamiliar machine controls with the resistance resting.
Choose the load from the movement
For normal strength sets, choose a weight that lets you reach the lower repetition target with about two or three more controlled repetitions possible. During the introductory round, leave about three or four. These are estimates, not a requirement to test failure. The reps-in-reserve guide explains the scale. Stop before swinging, losing support or shortening the movement changes the repetition. Use a lighter load when you cannot reach the lower target with control. Dead bugs and side planks instead stop when position or breathing changes; do not assign them a precise spare-repetition estimate. There is no required starting kilogram value for women. The right chest-press load can differ greatly from the right squat load. On dumbbell exercises, a clear note such as “8 kg dumbbells” identifies the pair without a separate record for each hand.
| Problem | Practical check | Next action |
|---|---|---|
| Handles are unreachable while your back stays supported | Use the permitted seat, grip and start adjustments. | Ask staff to fit the machine; use the taught floor press if the path still does not fit. |
| A goblet hold is uncomfortable or fails before your legs | Check a lighter dumbbell and comfortable holding position. | Use the fitted leg press for that squat allocation. |
| A chest-supported row pad is uncomfortable | Check the actual pad and seat settings. | Use the seated cable row rather than lifting your chest away from a pad. |
| The next upper-body weight step is too large | Check the smallest manufacturer-permitted increment. | Keep the current load and technique; change equipment only with a fresh starting load. |
Different machines do not share one resistance scale. Use the exact equipment name and its displayed unit in your log; why gym machine weights differ explains why the number cannot simply be transferred.
Use the listed rest and timing
Take the listed rest after each set and extra recovery when needed. Do not shorten rest to make a session feel harder or to meet an untested time estimate. For four-number tempos, read the lowering or return phase, pause before the effort, effort phase and finish pause. For example, 3-1-1-0 means three seconds down, one second paused, one second up and no timed top pause. In a row or curl, 2-1-1-1 means two seconds returning, one paused, one pulling or curling and one at the finish. The pressdown’s return travels upwards. Dead bugs and side planks use their written timing instead.
Squats, Hinges and Lower-Body Technique
Learn these movements before choosing demanding loads. Knee bending and hip hinging are different tasks; a glute exercise does not replace every leg exercise.
Goblet Squat
Use one dumbbell held close to the chest on a clear, nonslip floor.
- Choose a dumbbell whose shape and locking system permit a secure goblet grip. Pick it up through a controlled route and hold it close.
- Stand with a comfortable foot width and toe angle. Keep pressure through the whole feet.
- Bend the hips and knees together. Let the knees follow the feet and lower only as far as balance and control allow.
- Pause, then stand without bouncing or leaning backwards. Keep the weight close to the body.
- Finish while you can still return the dumbbell securely. Reduce the load or depth when needed.
When the hold limits you before your legs, use the leg-press replacement below. Do not balance extra weights on the dumbbell.
Dumbbell Romanian Deadlift
This hinge begins standing with a dumbbell in each hand. The pickup and final set-down are not working repetitions.
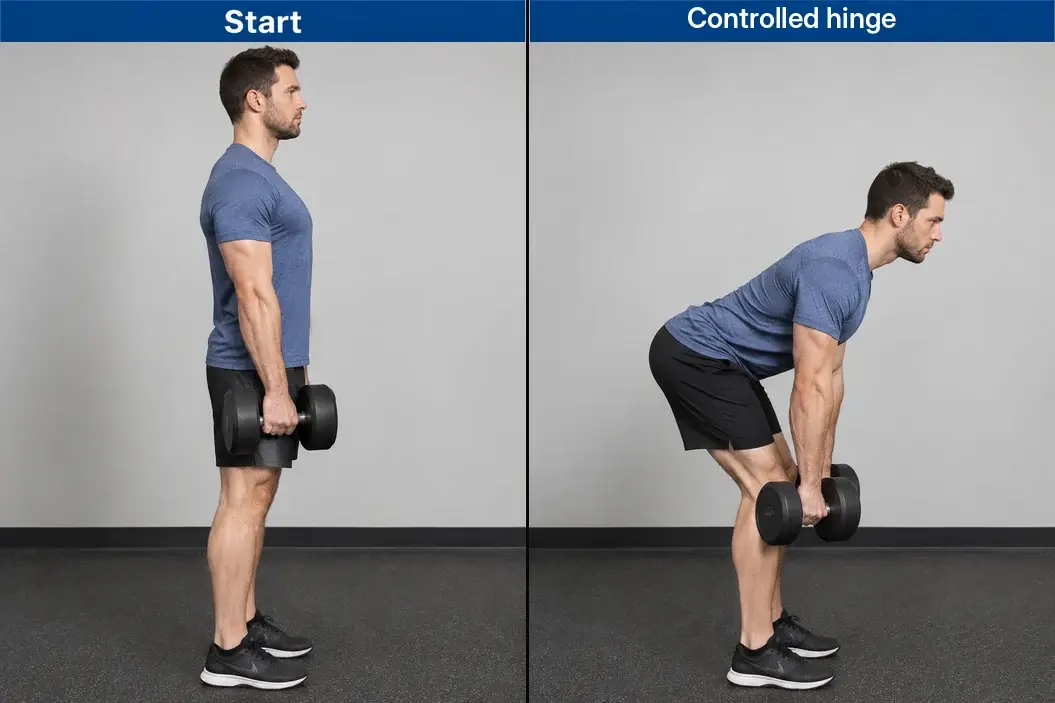
- Inspect both dumbbells and rehearse a controlled pickup and set-down. Ask for help learning the handling before using a challenging load.
- Stand with stable feet, long arms and softly bent knees. Hold the weights beside or just in front of the thighs.
- Move the hips backwards as the torso inclines. Keep the dumbbells close and the knee bend broadly steady.
- Stop before extra depth requires rounding, squatting farther or losing balance. Extend the hips to stand without leaning backwards.
- Finish the set while both weights can still be returned under control. Lower them through the rehearsed route.
Use a lighter pair or a shorter controlled range while learning. The floor is not a target. The Romanian deadlift guide explains the hinge in more detail.
Static Split Squat
Keep one foot forward and one behind throughout a set. Start with body weight; add dumbbells only when balance and handling remain controlled.
- Take a staggered stance with enough width for balance and the rear heel raised. Use body weight with light contact on a fixed support when needed.
- Bend both knees and lower between the feet. Keep the front whole foot supported; a comfortable slight torso lean is acceptable.
- Stop before the rear knee hits the floor or balance changes. Push through the front foot, with help from the rear leg, to stand.
- Complete the assigned repetitions with the same leg leading, settle any weights, and rest for 90 seconds before changing sides.
- When adding load, use one manageable dumbbell in each hand without hand support. Return to body weight and support if balance becomes the limit.
Two sets per leg mean four separate sets. Rear-foot elevation is not required, and holding two dumbbells leaves no hand free for support.
Leg Press
Use a purpose-built leg press whose seat, footplate and controls fit you. Learn the actual release and resting procedure.
- With the resistance secured, adjust the seat, permitted stops and load. Ask staff to demonstrate unfamiliar controls.
- Sit with back and pelvis supported and both whole feet on the intended footplate. Take the resistance using the demonstrated procedure.
- Bend the knees and hips through a range that keeps the pelvis supported and the feet planted.
- Press smoothly along the machine’s path without bouncing or pushing on the knees with your hands.
- Engage the supports or settle the resistance as required by that machine. Check it is supported before leaving.
Use less resistance or a shorter permitted range if support is lost. The leg exercise guide covers wider equipment choices.
Seated Leg Curl
The thighs stay under a fixed restraint while a separate roller moves behind the lower legs.
- Adjust the seat and backrest with the resistance resting so the knees fit the machine’s intended pivot.
- Place the moving roller against the backs of the lower legs above the heels. Secure the thigh restraint and choose a comfortable starting angle.
- Bend both knees, moving the lower-leg roller down and back while the thighs and pelvis stay supported.
- Return slowly towards the selected straighter-knee position. Do not lift the hips or let the stack crash.
- Settle the resistance and release the restraint as designed before leaving or adjusting the machine.
A roller against the fronts of the shins describes a different exercise. Use the taught lying-curl alternative when the seated station cannot be fitted comfortably.
Standing Floor Calf Raise
Use both feet on level floor with light hand contact on a fixed gym support. Begin with body weight.
- Stand with the forefeet fully supported and knees comfortably near straight. Keep a secure supporting hand.
- Raise both heels without pulling yourself up with the arm or rolling onto the outer edges of the feet.
- Pause at the top, then lower both heels to the floor slowly. Do not bounce or bend the knees to restart.
- When body weight is too easy, hold one manageable dumbbell at the free side. Keep the same support and use both legs together.
- Finish with both heels down and set any dumbbell down securely before leaving the support.
Both calves work together; do not double the sets because a dumbbell is held in one hand. Do not add a loose step or progress by removing useful balance support.
Pressing and Pulling Technique
Give the upper-body exercises the same attention as the leg work. Use equipment that fits your reach, support and comfortable movement; a larger displayed number is not a reason to abandon that setup.
Machine Chest Press
Choose a back-supported chest-press machine with handles you can reach around chest level.
- Adjust the seat, permitted starting position and resistance while the load rests. Learn any assisted-entry control from the machine’s instructions or staff.
- Sit with feet, pelvis and back supported. Take full comfortable grips without forcing the upper arms far behind the torso.
- Press along the machine’s path without lifting from the pad, repeatedly driving through the legs or slamming a stop.
- Return to the same comfortable start under control. Keep the shoulders supported rather than chasing a deeper stretch.
- Settle the resistance and use the designed exit procedure. Change machines or use the taught floor press if adjustments cannot provide a suitable path.
Keep the setup consistent. A machine is a valid training choice, not a stage that must be abandoned for a barbell.
Seated Cable Row
Use an intended low-cable rowing station with a seat and foot supports. This version has no chest pad.
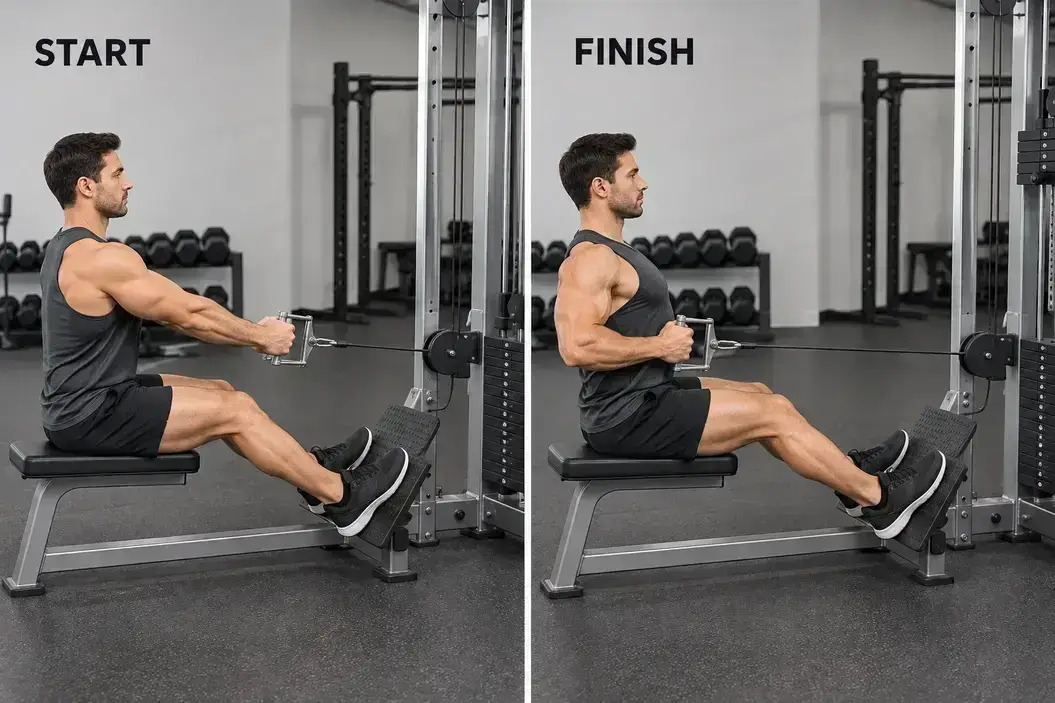
- Choose a compatible handle and set the load while the stack rests. Adjust the intended seat or foot position for a reachable start.
- Sit with stable feet and comfortably bent knees. Take the handle without leaning far forwards or rounding to reach it.
- Pull towards the torso as the elbows bend and upper arms move back. Allow the shoulder blades to move without rocking backwards.
- Return the handle as the elbows straighten, keeping the same torso angle and controlled reach.
- Settle the stack before releasing the handle. Do not brace against a weight stack or improvise a loose seat.
The handle does not need to hit the stomach. Reduce the load if swinging replaces the pull; the supported-row alternative is taught below.
Lat Pulldown
Use a fitted pulldown seat and thigh restraint with a compatible attachment you can reach safely.
- With the stack resting, choose a comfortable grip and manageable load. Set the seat and restraint so the thighs remain supported.
- Learn how to take the attachment and sit without jumping, climbing or being pulled upwards. Ask for a safe handoff when appropriate.
- Pull towards the upper front of the torso as the elbows bend. Keep a steady torso instead of a growing backward swing.
- Return the arms upwards slowly while staying seated under the restraint. Do not pull behind the neck.
- Return the resistance securely using the station’s intended procedure before releasing the attachment and leaving.
Choose a comfortable grip rather than automatically using the widest one. The lat-pulldown guide explains further setup choices.
Seated Dumbbell Shoulder Press
Use two manageable dumbbells and a stable adjustable bench locked near upright.
- Clear the floor and overhead space. Check the bench lock and select weights you can position and set down.
- Sit with feet planted and back supported. Bring the dumbbells to a comfortable shoulder-level start under control.
- Press with full grips and a comfortable arm path, generally with the elbows slightly forward rather than forced wide.
- Allow the shoulder blades to move with the arms. Lower steadily without using a larger back arch or leg drive.
- End before the weights become difficult to return. Lower and set them down through the rehearsed route; use the taught machine alternative if handling is the limit.
A backrest does not remove the need to control the trunk. The shoulder exercise guide explains other pressing and raise options.
Arm and Core Technique
Curls and pressdowns add direct arm work to the larger pulling and pressing movements. The trunk exercises use control or time rather than a lifted-weight target.
Standing Dumbbell Curl
Stand with a dumbbell in each hand and palms facing forwards. Both arms move together in this version.
- Choose a pair you can hold securely. Stand with stable feet and upper arms near your sides.
- Bend both elbows to curl the weights without swinging the torso or driving the elbows forwards.
- Stop at a comfortable finish with the wrists aligned, rather than lifting the shoulders to gain height.
- Lower steadily to the same controlled start and pause before the next repetition.
- Finish while the weights can still be set down securely. Use lighter dumbbells if you cannot keep the body steady.
Record the weight used and the actual repetitions. Log a different curl variation by its name.
Rope Triceps Pressdown
Face one high cable outlet and hold a compatible rope with both hands. Keep the upper arms near your sides.
- Inspect the rope and clip with the stack resting. Set a clear high outlet and a manageable load.
- Take full grips and stable feet. Start with bent elbows and a steady torso, without letting the cable pull the shoulders upwards.
- Extend both elbows to bring the hands down towards the thighs. Do not drop your body onto the rope or swing the upper arms backwards.
- Let the elbows bend on the controlled upward return. Keep the same upper-arm position and usable range.
- Return the stack fully to rest before letting go. Reduce the load if the return is insecure.
One two-arm extension and return is one repetition. The arm exercise guide covers other curl and extension choices.
Dead Bug
Lie on your back with both feet raised, knees comfortably bent above the hips and arms pointing towards the ceiling.
- Keep the head and trunk supported and breathe normally. Establish a comfortable back and pelvic position.
- Reach one arm and the opposite leg away slowly. Start with a short reach.
- Stop the reach before the back arches farther, the pelvis turns or breathing changes.
- Return the pair, then move the opposite arm and leg. Each reach and return counts on that side.
- Continue alternating until both sides reach the target, then rest. Shorten the reach or stop the set if control is lost.
Two sets of six per side are two complete alternating sets, not four sets. Increase the controlled reach only after the stated progression check.
Side Plank
Lie on one side on a nonslip mat. Use bent knees initially, or straight legs when you can hold that version comfortably.
- Place the lower forearm securely with the elbow under or near the shoulder. Align the shoulders and hips.
- For bent knees, lift into a line from shoulders to hips to knees. For straight legs, support through the sides of the feet, staggered if helpful.
- Breathe while holding the pelvis steady. Do not roll towards the floor or keep raising the hips to chase height.
- Lower fully, rest for 60 seconds, then repeat on the other side. Rest again before the next hold.
- End before sagging, shoulder discomfort or breath-holding. Use bent knees or a shorter hold when needed.
Two twenty-second holds per side give forty seconds per side across four holds. The ab exercise guide explains other trunk tasks, not extra exercises to append here.
Equipment Alternatives and Busy-Gym Decisions
Use one suitable alternative for the allocated exercise, not both versions. Preserve the listed prescription unless this table states a change. Any replacement needs a fresh manageable starting load.
| Allocated exercise | Replacement | Prescription to use | Important difference |
|---|---|---|---|
| Goblet squat in A | Leg press | 2 sets of 8–12 reps; 120 sec; 3-1-1-0 | Supported machine work; select a new load. C still uses its own 10–15 range. |
| Machine chest press in A or C | Dumbbell floor press | 2 sets of 8–12 reps; 120 sec; 2-1-1-0 | Independent weights and a floor-limited lower position. |
| Seated cable row in A or C | Chest-supported machine row | 2 sets of 8–12 reps; 120 sec; 2-1-1-1 | The chest pad must fit without painful pressure. |
| Seated dumbbell shoulder press in B | Machine shoulder press | 2 sets of 8–12 reps; 120 sec; 2-1-1-0 | Guided path and different starting resistance. |
| Seated leg curl in A | Lying leg curl | 2 sets of 10–15 reps; 90 sec; 2-1-1-1 | Different hip position, pads and machine load. |
| Static split squat in B | Leg press | 2 sets of 8–12 reps; 120 sec; 3-1-1-0 | Two bilateral sets replace four separate-side sets; it is not unilateral practice. |
For replacements that keep the same two-set structure, a completed set still counts: perform only the remaining set after changing equipment. Choose the split-squat-to-leg-press replacement before starting that exercise. If you stop partway through split squats, record the work as partial rather than adding two new leg-press sets. When a machine is occupied, wait or use a taught alternative. If you change the exercise order, note it so you do not mistake a fresher performance for progress.
Dumbbell Floor Press
Use manageable dumbbells and a clear nonslip floor. Practise getting into and out of position before a working set.
- Sit with the weights controlled close to the body, then settle onto your back deliberately, using trained assistance if needed.
- Bend the knees and plant the feet. Hold the weights above the chest with full grips and aligned wrists.
- Lower until the upper arms lightly contact the floor or reach an earlier comfortable endpoint. Do not strike the elbows down.
- Press without bridging the hips or colliding the dumbbells. Keep the same range on each repetition.
- Finish while the weights can be lowered and set down securely. Use a lighter pair if handling is difficult.
The floor limits the lower range. Do not transfer the chest-machine number to the dumbbells.
Chest-Supported Machine Row
Choose a fitted row with a real chest pad and reachable handles.
- Adjust the seat, chest pad and load while the resistance rests. Check that pad contact is comfortable.
- Plant the feet and reach the handles while keeping chest support. Use a permitted grip that clears the body.
- Pull by bending the elbows and moving the upper arms back, without lifting away from the pad.
- Return smoothly as the elbows straighten and shoulder blades move. Avoid shrugging or forcing a maximal squeeze.
- Settle the resistance before releasing the handles. Choose the cable-row baseline when the pad cannot be fitted comfortably.
A seat alone is not chest support. The back exercise guide compares other support arrangements.
Machine Shoulder Press
Use a shoulder-press station whose seat and handle path fit you.
- With the load resting, adjust the seat and permitted start so the handles are reachable near shoulder level.
- Use the designed entry control only as instructed. Keep the feet, pelvis and back supported.
- Press through a comfortable overhead path without repeated leg drive or lifting from the backrest.
- Lower under control to the same fitted start without forcing a deeper position.
- Settle the resistance and leave using the station’s intended procedure. Ask for instruction when the controls are unfamiliar.
A guided press is not automatically pain-free. If neither overhead version is comfortable, seek a suitable adjustment rather than forcing the exercise.
Lying Leg Curl
Use a purpose-built prone leg-curl machine. This is not a dumbbell held between the feet.
- Adjust the body pad, roller and load with the resistance resting, following the machine’s instructions.
- Lie with the torso and pelvis supported, knees aligned as intended and the moving roller behind the lower legs above the heels.
- Bend both knees without lifting the pelvis or arching farther to move the roller.
- Return slowly through the selected range without dropping the weight.
- Settle the resistance before leaving or changing settings. Use another fitted machine if the support is uncomfortable.
Keep its load record separate from the seated curl. Replacing a knee curl with an RDL would change the training task, not simply the equipment.
Make the training space workable
Ask staff for a demonstration or a permitted adjustment rather than accepting discomfort as a requirement. A quieter time, a trusted training partner or a staffed area can be useful choices. You do not owe another gym user a performance demonstration or an explanation of your body or goals. Unwanted comments, filming or harassment are facility-management issues, not failures of confidence. Seek staff support or leave the situation when necessary. These options do not replace the gym’s responsibility to provide an appropriate environment.
Progress Without Rushing the Weight Increase
For strength exercises, keep the same exercise, support, range and rest while building repetitions. Once every working set reaches the top of its range with about two controlled repetitions still possible, use the smallest suitable increase at the next comparable session. There is no need to add weight every week. For split squats, both sets on both legs must qualify. Compare repeated exercises within the same workout: Workout A chest press with previous A sessions, not automatically with C. An introductory, shortened or reduced session does not qualify the normal two-set prescription.
| Comparable A session | Set 1 | Set 2 | Next decision |
|---|---|---|---|
| 1 | 8 | 8 | Retain the load and build controlled repetitions. |
| 2 | 10 | 9 | Retain the load. |
| 3 | 12 | 11 | The second set has not reached the upper target. |
| 4 | 12 | 12 | If effort, range and rest also qualify, try the smallest suitable increase next time. |
| 5, after an increase | 10 | 8 | Remain within the range and rebuild. |
These numbers illustrate the rule; they are not a promised rate of improvement. A result of 10/7 is seventeen completed repetitions but the second set is below the eight-repetition minimum. Check recovery, rest and form. Repeat a suitable load after an isolated late miss, or reduce it when the problem begins early or keeps recurring.
When the smallest jump is too large
Do not swing, shorten the range or work to failure to justify the heavier setting. Keep the current load while improving controlled performance. Use only manufacturer-approved small increments. Another suitable machine or implement is an option when its increments solve a persistent problem, but start its record separately rather than converting the displayed number.
Progress the core exercises differently
For dead bugs, reach eight controlled repetitions per side in both sets, then lengthen the reach slightly and return to four per side. For side planks, reach thirty controlled seconds on both holds for each side before trying a longer lever at fifteen seconds. Keep the set count and rest unchanged. A longer reach or hold does not qualify if position or breathing changes.
Review the plan, not the calendar
Review after several complete A/B/C rounds. Look for better repetitions, load, control, recovery or consistency. Keep the routine when it remains useful. There is no automatic phase change, twelve-week transformation promise or requirement to progress to barbells.
Periods, Symptoms and Lower-Energy Days
Adjust training to what you can comfortably do today. Not everyone menstruates, and neither a period nor a predicted cycle phase automatically requires heavier or lighter training. A randomised training study in 24 healthy women with regular cycles found no strength or muscle-growth advantage from concentrating training volume in one cycle phase. It studied leg training over three cycles, not this routine or every hormonal or medical situation. That finding does not mean symptoms should be ignored.
| What you notice | Session choice | How to record it |
|---|---|---|
| Movement, warm-up and energy are suitable | Use the normal table, without a compulsory load increase. | Record the actual sets and repetitions. |
| You prefer less work, but ordinary movement and light warm-ups are comfortable | Use one set of each selected exercise, with an easier load when needed and normal rest. | Mark the session reduced; it does not qualify the normal two-set progression. |
| You cannot move or warm up comfortably, or symptoms are concerning | Do not force the workout; recover or seek appropriate assessment. | Record the session as missed or stopped, not completed. |
The reduced option is a workload choice when the movements remain comfortable, not a treatment for pain, dizziness or illness. It uses one set per leg for split squats and one hold per side for side planks. Keep the usual rest; do not compensate with a finisher. Do not repeat a set already completed before deciding to shorten the session.
When symptoms need assessment
Period pain that interferes with usual activities, becomes worse or accompanies other changes deserves medical advice. Do not dismiss severe or unusual symptoms as something to train through. Seek advice about unexplained menstrual changes rather than assuming training caused them. Missed or late periods have several possible causes. This workout does not diagnose low energy availability, prescribe hormones or replace pregnancy-related advice. Urine leakage during lifting or a feeling of pelvic heaviness or bulging also warrants assessment, not an automatic extra core routine. A qualified clinician or pelvic-health physiotherapist can advise. Stop exercise and seek medical advice for chest pain. Get emergency help if it persists, spreads or comes with breathlessness, sweating or light-headedness. This routine is not a symptom-screening test.
Keep personal information private
You may note energy or symptoms privately when it helps your decisions. You do not need a cycle-tracking app, hormone measurements or disclosure to gym staff to follow the schedule. Menopause, contraception or irregular cycles are not reasons to invent a cycle-day rule; use appropriate individual advice where needed.
Support Training With Food, Cardio and Recovery
Eat for your chosen goal
Include regular meals with protein-containing foods, enough food for the work you do and fluids through the day. This plan does not require a calorie deficit, a fixed “women’s” calorie target or supplements. Muscle-building and fat-loss goals call for different food decisions; the nutrition guide covers those choices. Do not respond to persistent fatigue or falling performance by automatically cutting food and adding exercise. Review the whole routine and seek individual advice when the problem continues. Changes in scale weight alone do not establish a change in muscle.
Make cardio compatible with lifting
Keep enjoyable walking, cycling or other aerobic activity when it fits recovery. Public-health guidance treats aerobic activity and strengthening as complementary: the CDC adult activity guidance includes at least 150 minutes of moderate activity weekly alongside strengthening on at least two days. Build towards suitable activity gradually; it is not an instruction to add that much new exercise at once. Avoid placing demanding leg intervals before a strength session when they impair its technique or recovery. There is no compulsory post-workout cardio finisher. If the combined schedule becomes unmanageable, reduce the overall demand rather than rushing rests or removing all upper-body work.
Rest without chasing soreness
Give yourself enough opportunity to sleep and recover between sessions. Soreness is not a target. Allow more recovery when soreness prevents normal movement or a comfortable warm-up; persistent or worsening symptoms need assessment. Non-lifting days can include comfortable everyday activity.
Track Progress and Continue After Missed Sessions
Use a notebook or ordinary digital note. Record date, workout letter, exercise, equipment settings, weight and unit, repetitions or seconds for each set, actual rest and the next decision. Note a meaningful change in setup or comfort. Body measurements and photographs are optional, not required evidence that you belong in the gym.
| Session / exercise | Planned | Actual record | Next decision |
|---|---|---|---|
| A / machine chest press | 2 sets of 8–12 reps; 120 sec | Same machine and setup; 10, 9 reps; 120 sec | Retain the load. |
| B / split squat | 2 sets of 8–12 reps per leg; 90 sec after each leg | Left 8/8; right 8/7; same bodyweight stance | Review the final right-side shortfall; do not increase load. |
| C / reduced session | Normal table: 2 sets per row | 1 set per row; actual repetitions recorded individually; normal rest | Resume normal work when suitable; no progression qualification. |
The split-squat example contains thirty-one completed repetitions across four sets, not thirty-two. An incomplete set is still work performed; a skipped set is not. For dead bugs, record repetitions on each side within each complete set. Keep the length of a side-plank hold in seconds, not repetitions.
Missed and partial sessions
| Slot | Original plan | Adjusted plan |
|---|---|---|
| Week 1 Monday | A | A completed |
| Week 1 Wednesday | B | Missed |
| Week 1 Friday | C | B |
| Week 2 Monday | A | C |
| Week 2 Wednesday | B | A |
| Week 2 Friday | C | B |
The first two weeks now contain five completed sessions instead of six. Continue with C at the next suitable slot, then A/B/C. Do not double a workout or shorten recovery to catch up. The missed-workout guide discusses wider scheduling choices. If a session is partly completed, record what happened and continue to the next letter at the next suitable visit. Do not add its unfinished sets to that workout. If this keeps happening, choose fewer weekly visits or another routine that fits. After a longer interruption, rehearse manageable loads and use the introductory amount when appropriate.
Decide what comes next
Continue when the plan fits and your performance, technique or consistency is improving. A more specialised goal or a different schedule may call for another programme. The Upper/Lower Workout Plan is one option to assess, with its own training days and workload. Change because it fits, not because a twelve-week calendar ended.
Workout Plan for Women FAQs
Do women need a different workout from men?
The main principles are shared: suitable exercises, progressive resistance and enough recovery. This guide addresses practical concerns and choices without prescribing a different set of muscles or a hormone-based calendar.
Will this plan make me bulky?
Training can increase muscle size, but “bulky” is a personal judgement, not a predictable result from one weight. Review changes against your own goals and adjust the plan when needed; no one can promise a particular appearance.
Can a complete beginner use it?
Use the introductory amount after learning the equipment and movements. Someone who needs step-by-step gym induction should use the Beginner Gym Workout Plan rather than guessing at unfamiliar controls.
Is this a weight-loss plan?
No. It is a strength routine. You can have an appearance goal, but the workout does not assign a calorie deficit, spot-reduce fat or guarantee weight loss.
Can I train only twice a week?
Yes. Continue A/B, then C/A, then B/C over three weeks. Do not drop C or combine sessions. You complete less work per week than on the three-day schedule.
Should I change the plan with my menstrual cycle?
There is no compulsory phase-based change. Use your actual comfort, warm-up and recovery to choose normal, reduced or missed work. Persistent or concerning symptoms need appropriate advice.
Can I use this during pregnancy or after giving birth?
This is not a pregnancy or postpartum programme. Obtain individual guidance for that stage before using a generic plan; a light weight or a familiar exercise is not automatic clearance.
Is it suitable after menopause?
Suitability depends on your health, ability, goals and recovery, not age alone. The plan is not treatment for menopause symptoms, osteoporosis or another condition. Seek individual guidance when those affect training.
What if I cannot use the smallest machine setting?
Ask staff about a permitted adjustment or use a taught alternative with a manageable starting resistance. Do not force the repetitions or assume every machine fits every person.
Do I need to add more glute or arm exercises?
Not by default. The sessions already contain lower-body, pressing, pulling and direct arm work. Review your goal and recovery before adding anything; more exercise names do not automatically mean a better plan.
Should I shorten rests to burn more calories?
Not as this plan’s progression method. Use the listed rest to preserve technique and make performances comparable. Do not turn the routine into a circuit to chase a calorie estimate.
How long should I follow the plan?
Continue while it suits your goals, equipment and recovery and you can make useful progress. Review the training record after several complete rounds rather than expecting a fixed transformation deadline.