
Barbell Row: Choose the Start and Keep the Pull Repeatable
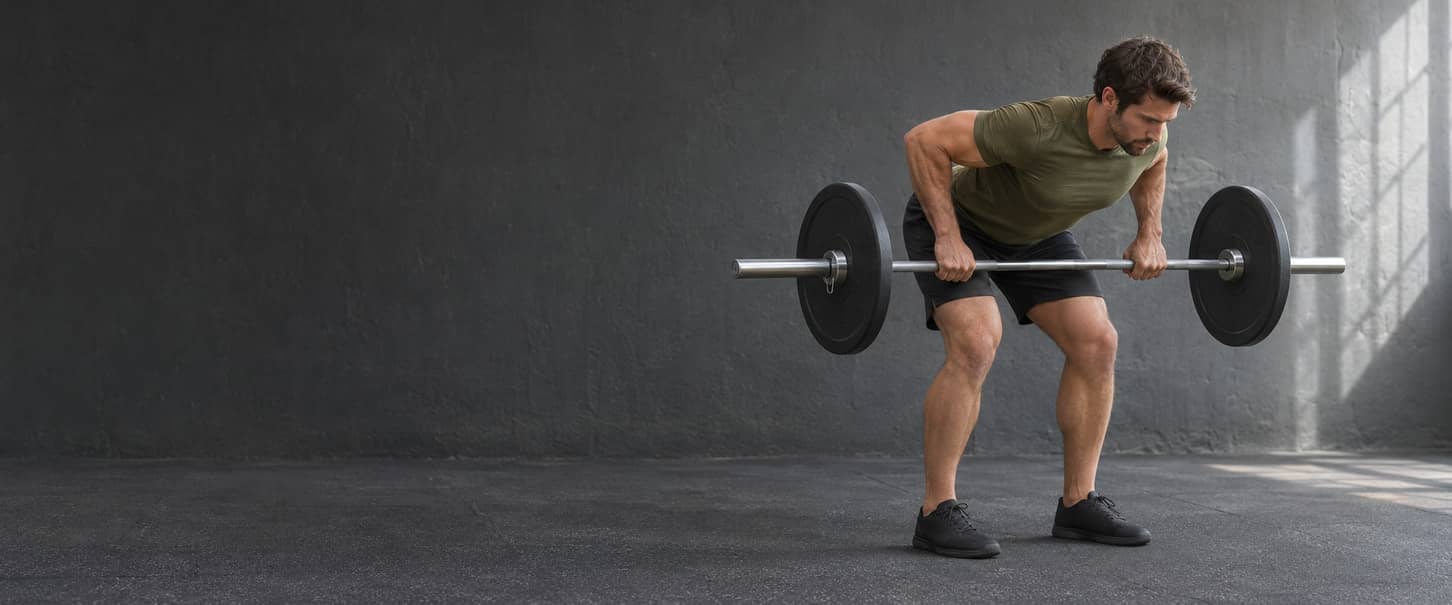
A barbell row combines pulling with holding an unsupported bent-over position. For the sustained-hinge version taught first here, take an overhand grip, establish a manageable hip hinge, pull the bar towards your torso and lower it to the same hanging start. Keep the feet and chosen torso position steady rather than standing up to finish each repetition. A floor-reset row is a different version: the plates settle on the floor between repetitions before you rebuild the start. Neither version supplies a chest pad, and neither is compulsory when maintaining the hinge prevents the intended rowing work. Choose the version your workout plan requires and that you can set up, perform and finish under control. This guide explains both starts, grip and arm-path choices, observable technique changes and a worked application of the existing 5x5 plan. It is not a new back workout or a claim that one row builds the most muscle. Learn the handling before adding working weight, and keep each variation's performance record separate.
Choose Between a Sustained Hinge, a Floor Reset and Chest Support
Choose by the task you want to practise and what limits it. Holding the bar off the floor, resting its plates between repetitions and supporting your chest are three different arrangements. A name alone does not tell you which one a workout intends.
| Arrangement | What happens between repetitions | When it fits | Important limit |
|---|---|---|---|
| Sustained-hinge barbell row | The bar hangs from straightening arms while you retain the hinge | You want to practise that row and can maintain its stance, torso position and controlled return | Grip and unsupported trunk endurance may limit the set |
| Floor-reset barbell row | Both ends of the bar settle on the floor before the next pull | A deliberate floor start fits the goal, equipment height and position you can reproduce | The floor supports the bar during the reset, not your torso throughout the pull |
| Chest-supported row | A fitted pad or stable inclined bench supports the chest | Maintaining an unsupported hinge repeatedly prevents useful rowing | The support, handle path and loading record change; a seat alone is not chest support |
A useful row moves the upper arms back relative to the torso while the elbows bend. That is why a bent-over row is described as horizontal pulling even though the bar travels mainly upwards in the room. A shrug or hip hinge does not become the same task just because it uses some of the same muscles. Use an appropriate barbell variation when that specific skill belongs in your plan. For general back training, there is no obligation to reject a supported row or to add both barbell versions. A difficult hinge, painful movement and unavailable equipment are different problems; changing to a floor reset does not automatically solve all three.
Check the Bar, Starting Height and Set-Down Before Loading
Decide how the bar will reach the working position and where it will finish before you add demanding weight. Use a firm nonslip surface, clear space for both ends of the bar and equipment intended for the load. Ask qualified facility staff to demonstrate unfamiliar supports or handling rather than improvising them.
| Check | What you need | When to change the setup |
|---|---|---|
| Bar and resistance | A manageable bar, compatible plates and collars, with equal plate loading at each end | Use a lighter training bar or another exercise when even the available bar is too demanding |
| Starting support | A stable floor setup or properly secured rack supports at a reachable height | Set the supports before placing the bar on them; do not move hooks holding a bar or improvise with furniture |
| Floor-start height | Plates and a position that let you reach the bar without losing control | Do not add heavy plates merely to raise the bar; choose suitable training plates, intended lifting blocks or another version |
| Clearance | Room for the bar, plates, hands and knees through the intended pull and return | Rehearse with manageable resistance; change the stance or setup if the bar strikes the legs or rack |
| Footing and grip | Stable footwear, whole-foot contact and full, comfortable grips | Do not continue with a slipping foot, loose plate, damaged bar or unreliable hand contact |
| Final return | A rehearsed route back to the floor or intended supports before grip or trunk control fails | Choose a different starting arrangement or lighter load when you cannot complete the return reliably |
The bar's starting height is not a strength target. Smaller-diameter plates can place it lower without making your arms longer. A rack or suitable lifting blocks can make entry more manageable, but an elevated reset is not an unchanged floor-start record. Follow the actual equipment's loading and stability requirements; loose plate stacks are not substitute supports. For the sustained-hinge version, a controlled pickup brings you to standing once before you establish the rowing position. That handling movement is not a row repetition. For the floor-reset version, the bar begins each pull on its plates. Keep the two sequences clear rather than letting the floor become an accidental endpoint when you tire.
Perform the Sustained-Hinge Bent-Over Barbell Row
Sustained-Hinge Bent-Over Barbell Row
Use a manageable bar with an overhand grip and no chest support. In this version, the bar stays off the floor during the working repetitions while you retain the chosen hinge. Rehearse the pickup and final return before starting a work set.
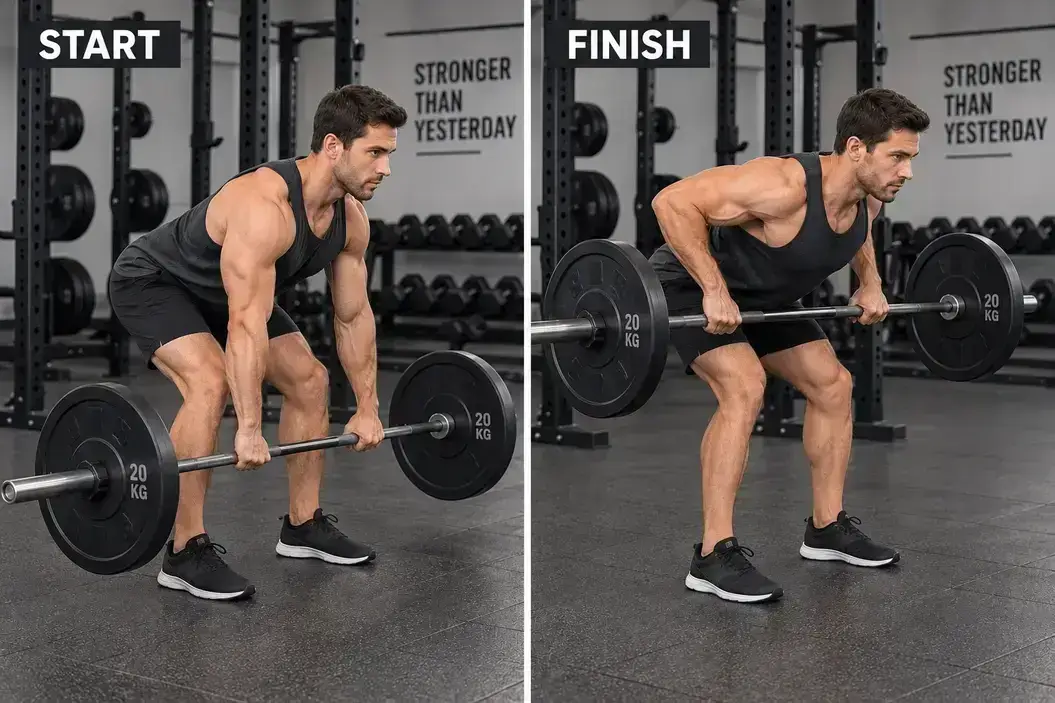
- Prepare the floor or properly secured rack supports, balanced plates and collars, and a clear return route. Set the starting height while the supports are unloaded. Choose a load that you can handle both before and after the row.
- Place your feet securely and take a full overhand grip, with the thumbs around the bar and hands spaced so the arms clear the legs. Keep the wrists comfortable rather than folding them to manufacture extra reach.
- Bring the bar to standing through a controlled pickup. From a floor or low support, bend the hips and knees as needed, brace and stand with the bar close and arms straight. Obtain instruction or choose a more manageable starting height when that pickup is unfamiliar or unreliable.
- With the bar held securely, soften the knees and move the hips backwards into a hinge you can maintain. Let the arms reach down under control, with the plates clear of the floor. Keep the head aligned with the trunk and whole-foot pressure stable; no single torso angle is required.
- Prepare your breath and firm the trunk, then move the upper arms back as the elbows bend. Guide the bar towards a comfortable lower-chest or upper-abdominal region without driving the hips forwards, straightening the knees to launch it or rising towards standing.
- End the pull where the intended arm path and torso position remain controlled. Let the shoulder blades move with the arms; do not force a maximal pinch, shrug or bar-to-body impact. Lower steadily to the same straight-arm reach without relaxing into a collapse.
- Repeat with the same grip, hinge and endpoints, resetting breathing as needed. End the set before another pull requires a changed torso position, shortened return or unreliable grip. A slower controlled pull is different from a repetition completed by heaving.
- Finish through the route rehearsed at the start. With the bar controlled and close, stand before returning it to the intended rack supports, or bend the hips and knees to settle both plate ends onto the floor. Confirm that the bar is fully supported before releasing it. Stop the set early enough that this return remains available.
Use less resistance or a shorter, clearly recorded comfortable range while learning. Do not keep adding repetitions after the hinge or handling has failed. When unsupported positioning continues to limit otherwise suitable pulling, a fitted chest-supported row may be the better choice. Keep the start and finish recognisable. The purpose is not to freeze every body segment, but to avoid using an increasingly different movement to move the same bar. Record a deliberate change rather than comparing it as though nothing changed.
Match the Grip, Arm Path and Shoulder-Blade Movement
The lats help move the upper arms, the upper-back muscles help control the shoulder blades, and the rear delts and elbow flexors also contribute to the row. The hands hold the bar while the trunk and hips maintain the unsupported position. Work felt in the arms or lower back does not, by itself, show that the intended back muscles are inactive.
Start with a grip you can repeat
Use an overhand grip for the baseline in this guide, with enough hand spacing for the arms to clear the legs and the wrists to remain comfortable. Grip width, palm orientation and elbow path are different choices. Widening the hands does not guarantee a wider back, and pulling with the elbows close does not isolate one part of the lats. An underhand row changes the forearm position and the way the exercise feels and fits. It is not automatically safer, better for growth or required next. This guide does not add a second underhand tutorial; retain the selected comfortable overhand implementation or seek instruction for a deliberate variation.
Choose an endpoint, not a compulsory touch point
The bar can move towards the lower chest or upper abdomen depending on your proportions, hinge and arm path. Use an endpoint that does not require the wrists to curl, elbows to flare forcibly or torso to move into the bar. Contact may occur, but hitting one exact place is not the test of a good repetition. Allow the shoulder blades to move with the pull and controlled reach. Permanently squeezing them together can restrict the return; gaining more reach by collapsing the trunk changes a different part of the movement. Keep the chosen trunk position while the arms and shoulder blades move. For the broader roles of rows, vertical pulls and accessories, use the back exercise selection guide. Here the narrower question is whether the selected barbell row stays comparable from its first repetition to its last.
Perform a Deliberate Floor-Reset Barbell Row
Floor-Reset Barbell Row
This version starts and ends each repetition with the plates resting on a suitable floor. Choose it only when the available bar height permits a controlled bent-over start and pull. It is not the sustained-hinge row with an accidental floor touch, and it is not a way to turn a painful or exhausted back into a suitable rowing setup.
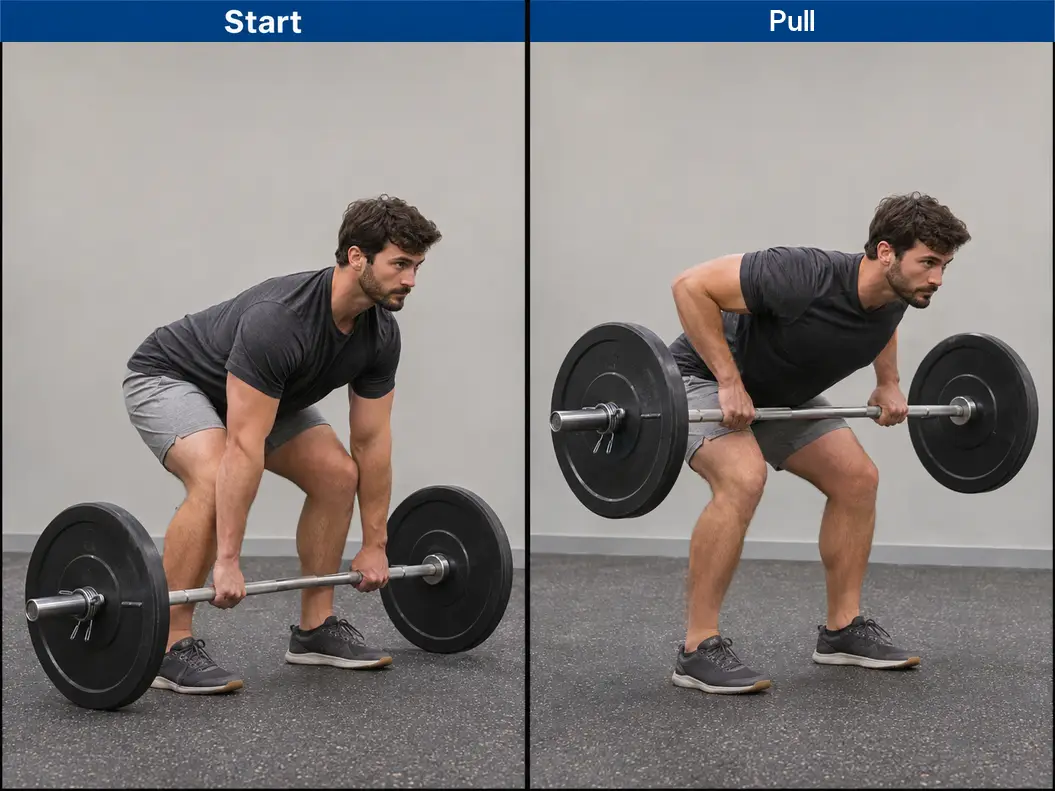
- Use a level lifting surface, a manageable bar, compatible equal-diameter plates at both ends and secured collars. Leave clear space for the bar to settle without rolling. Learn the setup with light resistance rather than adding heavy plates solely to obtain a taller starting position.
- Stand with the bar close enough for a controlled pull and whole-foot balance, leaving room for the knees and bar path. Take a full overhand grip with the hands clear of the legs. Do not begin from a bar that is still bouncing or rolling.
- Bend the knees and hinge to reach the bar while establishing a trunk position you can repeat. Keep the head aligned and the arms long at the start. If reaching the floor requires a position you cannot control, use another version rather than forcing the reach.
- With both plate ends still resting, settle the stance and grip, prepare the breath and brace before taking the load. Keep the arms straight while establishing tension; do not jerk the bar loose with a sudden torso movement.
- Lift the bar by bending the elbows and bringing the upper arms back. Keep the chosen torso inclination recognisable instead of turning the repetition into a partial deadlift followed by a row. Finish at a controllable endpoint without crashing the bar into the body.
- Lower the bar under control until both plate ends rest on the floor again. Let it become still rather than bouncing into the next pull. One pull and controlled return make one repetition; the floor contact is not an additional rep.
- Re-establish the same foot position, grip, starting trunk position and readiness before the next pull. Take the necessary reset rather than rushing an unready repetition, but record prolonged rests or changes to the planned set instead of calling them an unchanged cadence.
- After the last controlled return, leave the bar fully resting and stable, release the grip and stand without holding its weight. Do not add an extra lift simply to finish standing with the bar. End earlier if the start, pull or return cannot be reproduced.
Floor-reset and Pendlay labels need a defined technique
Floor-start rows are often discussed as Pendlay rows, but coaching descriptions differ in their intended torso and upper-back movement. The version taught here uses a deliberate reset and a repeatable torso position, without deliberately launching the bar with the hips. The name is not permission to mix techniques inside a set. The floor carries the bar only while it rests there. Your body still has to control the unsupported pull, so the reset does not provide the support of a chest pad or guarantee less back discomfort. A suitable elevated-reset setup can change the reach, but record its actual height and new starting conditions rather than calling it the same floor row. Do not apply the 5x5 example below to this variant automatically. Its selected implementation is the sustained-hinge row. A deliberate variation change needs a manageable baseline and a prescription that fits its pull, return and reset.
Match an Observable Technique Change to a Useful Check
Use what changed in the repetition to decide what to check. A changing posture, a sensation or a single video frame does not diagnose an injury or identify one muscle as weak. The table concerns ordinary non-painful execution problems; stop for concerning symptoms or unreliable equipment rather than testing them with another set.
| What you notice | What to check | A useful response |
|---|---|---|
| The torso rises progressively during the pulls | Load, actual rest and fatigue from earlier squats or hinges | End the set, then reduce the demand or use an appropriate supported row rather than count the heaves as the same technique |
| The bar strikes the knees | Starting distance, knee bend, hand clearance and intended pull path | Rehearse a clearer path with light resistance; do not force the knees straight or swing the bar around them |
| The wrists curl to complete the pull | Grip fit and whether you are chasing a compulsory touch point | Keep a secure grip and stop the pull before wrist movement manufactures the endpoint |
| The shoulder blades stay pinned throughout the return | Whether a bracing cue has become a permanent maximal squeeze | Allow controlled shoulder-blade movement while maintaining the trunk position |
| The hanging return becomes shorter as fatigue rises | The intended straight-arm start, load and available control | End the set when that range is lost; do not count shortened repetitions as unchanged progress |
| Plates bounce during a floor-reset row | Lowering control, surface and whether the next pull starts before the bar is still | Settle the plates and rebuild the start; reduce resistance when that cannot be repeated |
| Grip starts to open or slip | Bar condition, hand placement, load and preceding grip work | Put the bar down under control and correct the actual limit; do not carry on with an unreliable grip |
| The floor start is unreachable at a manageable load | Plate diameter, starting height and the position you can control | Choose appropriate equipment or another variation instead of loading heavier plates just to raise the bar |
One difficult late set does not establish a permanent problem. Compare like with like: the same version, relevant preceding work, actual rest and intended range. The guide to reps dropping between sets explains the wider fatigue context without making another row or another set the automatic answer.
Use a Light Technique Check Before Changing Several Things
Prepare for the version you intend to train, including its starting support and final return. A few controlled repetitions with light resistance can check the arrangement; they are not a series of exhausting tests. An empty bar is not automatically light enough.
- Name one observable issue, such as a bar striking the knees or the torso rising on later pulls. Stop the exercise instead if the issue is pain, neurological symptoms or equipment damage.
- Check the relevant setup and earlier work. Confirm the bar, grip, start height, intended range, actual rest and whether a squat, deadlift or other grip-intensive exercise changed what you could maintain.
- Choose one relevant adjustment, such as less load, a permitted starting height or more recovery. Keep the other main variables recognisable so the result can be interpreted.
- Rehearse the adjusted version with manageable resistance and a controlled set-down. Obtain practical instruction when you cannot judge the setup or reproduce it. A video from a clear angle can show movement, but it is optional and does not diagnose the cause.
- Decide whether to retain the adjustment, choose a suitable supported exercise or stop that allocation. Record what changed and count any working sets already performed before deciding what remains.
Genuinely light preparation stays separate from working sets. A demanding set that stopped early is still work; it cannot be renamed a warm-up afterwards to create another full allocation. There is no requirement to keep rehearsing until a particular load becomes possible.
Leave room for all the planned work
Repetitions in reserve estimates how many more repetitions you could perform to the same standard. It does not include pulls that would need a rising torso, a shorter return or help. Use the estimate alongside handling and observed performance, without testing failure to prove the number. The source 5x5 plan offers a conservative start that leaves about three to four good repetitions after the first work set when no reliable maximum is known. That is not a promise that the fifth set will feel the same. You do not need a maximum-row test to start, and an unfamiliar row may need fewer learning sets rather than five demanding work sets.
Apply the Technique to Workout A in the Existing 5x5 Plan
The 5x5 Strength Workout Plan supplies the full schedule and progression rules. This is its third exercise in Workout A, unchanged. It follows the five-set squat and bench-press allocations; it is not five extra row sets to add to work you have already done.
| Exercise | Sets & Reps | Rest | Tempo | Target Muscles | Notes |
|---|---|---|---|---|---|
| Barbell Row | 5 sets of 5 reps | 2–4 minutes | 2-1-1-1 | Lats, Rhomboids, Trapezius, Rear Delts, Elbow Flexors | Hold a repeatable torso angle; use a chest-supported row when lower-back fatigue prevents consistent pulling |
The sustained-hinge overhand version is the implementation selected for this guide's worked example. The source row does not require a floor reset. Its note already permits a chest-supported row when lower-back fatigue prevents consistent pulling; the named category does not specify a particular machine, bench angle or replacement load.
Read the row's four-part tempo in its actual order
For the selected hanging version, 2-1-1-1 means a two-second return as the elbows straighten, one second at the controlled hanging start, about one second to pull and one second at the controllable finish. The first moving phase is the pull even though the notation lists the return first. Keep the lower pause supported by your grip and hinge, not by unexpectedly resting the plates on the floor. Use the prescribed two to four minutes between these working sets, with more recovery when needed as the source allows. Record a meaningful change. The one-second pauses are not instructions to hold one breath for the whole set, force bar contact or turn an unready reset into a rushed repetition.
Workout B is not another five-by-five row allocation
Workout B offers Barbell Row or Pull-Up for three sets of five to eight, with two to three minutes' rest and the same written tempo. That is its fourth exercise, after the deadlift allocation. Do not substitute Workout A's five sets or its two-to-four-minute rest merely because both rows mention a barbell row. The complete plan alternates A and B on non-consecutive days. Keep each session's prescription and the relevant earlier work visible. The next example follows only successive Workout A exposures, not every workout or a promised weekly progression.
Progress the Same Row Without Counting Altered Repetitions
For the source Workout A, five sets of five mean twenty-five planned repetitions. Qualify the session through all sets, the intended range, repeatable body position, appropriate rest and acceptable recovery, not just a total. The final set should not become an uncontrolled maximum effort, and new or escalating joint pain is not a progression target. The following invented record uses successive Workout A exposures, the same sustained-hinge overhand row, and the source 2-1-1-1 tempo and rest. Each listed repetition meets the chosen standard. The intervening Workout B choice and workload remain governed by the full plan, not this table. Loads are hypothetical total bar-plus-plate masses, not recommended starting weights.
| Workout A exposure | Total bar-plus-plate load (kg) | Reps in sets 1–5 | Qualifying repetitions | Next decision |
|---|---|---|---|---|
| 1 | 40 | 5 / 5 / 5 / 5 / 4 | 24 | Retain the load for an isolated late shortfall when recovery and technique otherwise permit |
| 2 | 40 | 5 / 5 / 5 / 5 / 5 | 25 | Consider a suitable small increase only when the other successful-session criteria also hold |
| 3 | 41 | 5 / 5 / 5 / 4 / 4 | 23 | Do not increase again; review the late shortfall and retain or reduce the demand as needed |
| 4 | 41 | 5 / 5 / 5 / 5 / 5 | 25 | The repetition target is met; another increase remains a conditional choice, not an obligation |
The totals are 24, 25, 23 and 25. Exposure 1 did not complete the prescription, whereas Exposure 2 does. This plan does not require two successful sessions before considering a suitable increase. No particular number of exposures is promised to produce these results.
Count the total load at both ends
For the illustration, a 20 kg bar plus 10 kg at each end gives 20 + 10 + 10 = 40 kg. Adding 0.5 kg at each end adds 1 kg overall, giving 41 kg. Collar mass is excluded from these example figures; include meaningful collar or other hardware mass in an actual total where applicable and keep the convention consistent. The source suggests row increases commonly around 1–2.5 kg or 2.5–5 lb, but those are practical choices, not exact unit conversions or compulsory jumps. Use a smaller suitable increment when available rather than forcing a larger one. Keep five as the source target instead of silently converting the example to an accessory repetition range.
Preserve attempts that no longer met the standard
In a separate hypothetical record, sets of 5, 5, 5, 5 and 3 technically consistent repetitions give twenty-three. If two further attempts were completed only by heaving the torso, the record contains twenty-five attempts but still only twenty-three repetitions meeting the intended standard. Keep the attempts visible; do not repeat that behaviour to finish the printed target. The set should end before the movement changes. An ordinary load increase with the same execution remains part of that variation's history. A deliberate switch from hanging to floor resets, a different support height or chest support creates changed conditions and needs its own baseline. Repeated comparable misses call for the source plan's recovery and workload review; one short set is not an automatic deload or a reason to add more rows.
Use Support Without Restarting the Row Allocation
Maintaining a hinge is part of the barbell row, but it does not have to be the limiting task in every rowing exercise. Review the load, actual rest and preceding squat, hinge and grip work when the trunk repeatedly gives out first. Do not diagnose an injury from ordinary fatigue, and do not treat pain as something to solve by forcing a supported version. For complete instructions on a suitable alternative, use the chest-supported machine and dumbbell rows. Actual chest contact is different from a seated position without a pad or a bench used only by the hand and knee. Read the selected tutorial before using it; neither supported choice is an automatic extra exercise.
Count work already performed
This ledger applies only to a deliberate bilateral-to-bilateral change within the five-set Workout A row allocation, when continuing is appropriate. It is a practical maximum for the example, not a claim of equal stimulus or a requirement to complete five demanding sets on unfamiliar equipment. Use fewer sets or stop when the new task does not fit.
| Situation | Work already recorded | Maximum remaining work in this example |
|---|---|---|
| Change before any row working set | 0 sets | Up to 5 suitable bilateral sets, not both full allocations |
| Change after two barbell-row working sets | 2 sets | At most 3 further suitable bilateral sets; 2 + 3 = 5 |
| Change after four barbell-row working sets | 4 sets | At most 1 further suitable bilateral set; 4 + 1 = 5 |
| All five row working sets are already complete | 5 sets | No replacement sets are needed; 5 + 0 = 5 |
| Concerning symptoms or unreliable control stop the work after two sets | 2 sets | Stop now; no compulsory remaining sets or catch-up work |
Two completed sets followed by five new replacement sets would make seven sets, not the original five-set allocation. A first work set that stopped at three repetitions still counts as performed work. Keep genuine light preparation separate, but do not relabel a demanding attempt as a warm-up to restart the count. The same bookkeeping does not automatically prescribe work for a one-arm replacement. That needs its own per-side and recovery arrangement. The guide to counting workout sets explains the wider distinction between performed work and muscle-specific accounting.
Start the replacement's own load record
Choose the new load through manageable rehearsal and the intended prescription, not by transferring the barbell total to a machine or dividing it between two dumbbells. Gym-machine weight differences explains why displayed loads do not provide a conversion. Record the exercise and support actually used, the sets and repetitions on each version, the reason for the change and what remains. A mixed session can contain a valid exercise-specific result, but its different exercises do not form one combined barbell-row personal best. Stop within the remaining allocation if the new exercise is not suitable.
Know When to Stop and How to Revisit the Chosen Row
Stop rowing for sharp, spreading or worsening pain, numbness, tingling, unexpected weakness or loss of normal control. Put the resistance down through the planned controlled route where possible and seek appropriate help. Do not use another grip, a floor reset or a chest pad as a test to diagnose the problem. Persistent symptoms, or pain affecting ordinary activities, warrant clinical advice. Seek urgent medical advice for back pain that is suddenly severe, worsening quickly or accompanied by fever, shivering or feeling generally unwell. Seek emergency care immediately for back pain with symptoms such as pain, tingling, weakness or numbness in both legs; altered feeling around the genitals or anus; new bladder or bowel problems; new changes in sexual sensation or function; chest pain; or a serious accident. Use the appropriate local urgent or emergency service. These examples are not an exhaustive checklist or clearance to keep lifting.
Revisit a setup problem without treating it as rehabilitation
The following sequence is for an ordinary equipment or non-painful execution problem. It does not set a return-to-training timetable after injury or override individual clinical advice.
- Identify what has actually changed: suitable equipment, a manageable starting height, enough recovery or an appropriate reduction in load or work. Do not return simply to retest a symptom.
- Rehearse the intended row and its finish with manageable resistance, obtaining instruction where needed. Choose the hanging or reset version deliberately rather than mixing them during the set.
- Perform only the appropriate allocated work while the setup, range and handling remain controlled. Stop rather than force a previous load or count when the problem returns.
- Record the chosen variation, actual work and next plan-based decision. Keep a useful supported alternative when it still fits; returning to a barbell is not compulsory for general back training.
A return after symptoms or injury needs guidance appropriate to the actual condition. This page does not diagnose the cause, provide rehabilitation clearance or promise that a particular rowing technique prevents injury.
Barbell Row FAQs
What muscles does a barbell row work?
The row uses the lats, upper-back muscles, rear delts and elbow flexors, while grip, trunk and hip muscles help maintain the load and position. Their involvement does not assign an equal share of every set to each muscle or make the exercise a complete replacement for every other back-training role.
Does the bar have to touch the floor between repetitions?
Not in the sustained-hinge version. Its working return ends at the selected hanging reach. A floor-reset row deliberately returns the plates to rest each time. Choose and record one version rather than allowing the floor to become an accidental rest as fatigue builds.
Is a Pendlay row the same as every bent-over row?
No. Floor-start and Pendlay descriptions can specify different torso, reset and pulling conventions. This guide teaches one controlled floor-reset version separately from its sustained-hinge baseline. Follow the version actually intended, not the name alone.
How far forwards should I bend?
Use a hinge you can hold with a controlled pull, return and final set-down. No single degree measurement fits every person and setup. Changing the inclination materially changes the task; progressively standing up is not unchanged technique. A floor-reset version also needs a workable reach to the resting bar.
Must the bar touch my stomach or chest?
No fixed touch point is compulsory. Pull towards a repeatable comfortable region without curling the wrists, driving the hips or moving the torso into the bar. Stop the pull where the chosen arm path and position remain controlled.
Is an underhand grip better than an overhand grip?
Not universally. It changes the forearm position and may change comfort and execution. The fully taught baseline here is overhand. Keep that grip unless you deliberately choose and learn another variation; do not switch mid-set to force additional repetitions.
Should I feel my lower back working?
An unsupported hinge requires trunk work, so effort there is not automatically an injury or proof that the row is ineffective. If it repeatedly ends the set before useful pulling, review load, rest, earlier work and support. Pain, spreading symptoms, numbness or weakness are different concerns and should not be tested by continuing.
Does a floor reset protect the lower back?
It rests the bar between pulls, but your body still controls each unsupported pull and its starting position. It is not chest support, a pain treatment or a guarantee of lower injury risk. Choose the version by its requirements and your plan rather than assuming that floor contact makes it suitable.
Can I use straps or a belt?
They are optional equipment, not requirements or permission to ignore symptoms. Use compatible equipment only when you understand its setup and release. Straps do not fix an unstable hinge or create a safe set-down, and a belt does not certify a technique or remove the need to breathe and control the load.
What weight and repetition range should I use?
Use a load that fits the selected row and your actual workout plan, including all its sets. The five-by-five example belongs to Workout A of the quoted plan, not every rowing session. Its Workout B choice has a different set count, repetition range and rest. You do not need a maximum test or a fixed percentage of another exercise's load.
Should I add weight after twenty-five attempts?
Only repetitions meeting the intended standard count towards the five-by-five target, and the other source-plan success criteria still apply. Record shorter sets and altered attempts rather than hiding them. A total achieved by heaving, changing the range or taking unplanned long breaks does not qualify unchanged progression.
Can a chest-supported row replace the barbell row?
It can when the workout permits it and the supported setup fits the reason for changing. The quoted Workout A note already allows that category for limiting lower-back fatigue. Use a new manageable load, count the work already done and avoid restarting a full allocation. A supported alternative is not clinical clearance for a painful back.