
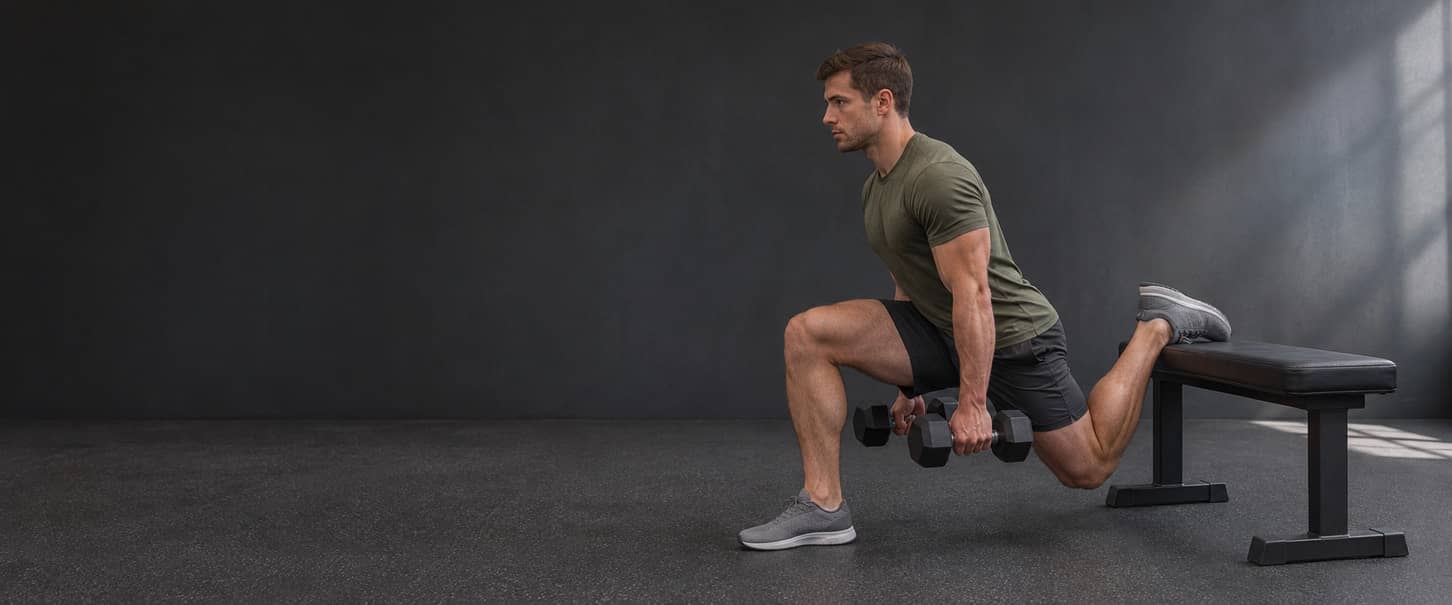
Bulgarian Split Squat: Learn a Repeatable Rear-Foot-Elevated Setup
A Bulgarian split squat is a split squat with the rear foot resting on an elevated support. Keep the whole front foot on the floor, lower by bending the front hip and knee while the rear knee bends, then rise to the same supported start. The front leg names the working side. Keep that leg in front for the whole side-specific set rather than stepping or alternating after each repetition. The movement trains the quadriceps and glutes, with the adductors contributing and the trunk helping control the position. The rear leg remains in contact with a support; it does not disappear from the movement. Rear-foot elevation is not a compulsory upgrade from a floor-based split squat, and a heavier dumbbell is not progress when balance, range or the exit changes. This guide teaches a two-dumbbell version and a separate one-dumbbell, hand-supported option. It explains support height, foot placement, entry and exit, then applies the movement to an existing Upper/Lower workout slot. It is not a new leg workout, a posture diagnosis or a guarantee that this exercise will suit everyone.
Choose a Rear Support and Starting Position You Can Actually Use
Use a stable exercise bench or purpose-designed rear-foot support that permits this use. Check its instructions, contact surface, locking points and resistance to sliding or tipping. A familiar bench height is not automatically the right height for you. Start without weights and choose a support you can reach, use and leave without hopping, twisting or forcing the rear hip and ankle. The selected baseline rests the top of the rear foot on a padded surface. It does not require twisting that foot onto its outer edge or balancing on the toe tips. Choose another suitable height or contact surface when the position is uncomfortable; do not pad an unsuitable setup with loose stacks of cushions or plates.
| Check | What to establish | Change the setup when |
|---|---|---|
| Rear-foot support | A stable exercise support with its permitted adjustments locked and a comfortable padded contact | It slides, tips, rotates unexpectedly or requires an improvised stack. |
| Support height | You can place and remove the rear foot while the front foot stays securely grounded | Reaching it forces a hop, pelvic twist or uncomfortable rear-leg position. |
| Front-foot position | Whole-foot contact, useful side-to-side stance width and room for the knee to move | The stance becomes a tightrope or the foot must shuffle during every repetition. |
| Movement and exit space | Clearance for both knees, the dumbbells and the rear foot returning to the floor | The weights strike the bench or there is no clear place to regain two-foot standing. |
| Dumbbells | A matched manageable pair, secure retention and full handle grips | The pair can be lifted but cannot be carried into position and put down reliably. |
| Optional hand support | A fixed, reachable exercise support suitable for the force applied to it | You must reach across the body, grip a moving part or use a support that can tip. |
Keep some sideways separation between the feet rather than placing them on one narrow line. Find the front-foot distance by trying a few controlled unloaded repetitions: the front foot stays grounded, the rear contact stays comfortable and the pelvis can lower and rise without a forced reach. There is no compulsory distance measured in shoe lengths. Set both feet on the floor and settle any weights before moving the bench, changing its height or repositioning a load. Check both lead-leg arrangements before working sets. A mark for your own front-foot position can help repeat the setup, but another person's mark or photograph is not your required stance.
How to Do a Dumbbell Bulgarian Split Squat: Entry to Set-Down
Dumbbell Bulgarian Split Squat
Use one manageable dumbbell in each hand, a stable padded rear-foot support and clear nonslip floor space. The top of the rear foot rests on the support; the front foot stays fully on the floor. Rehearse the same movement without weights first. Two occupied hands leave no free hand for balance support.
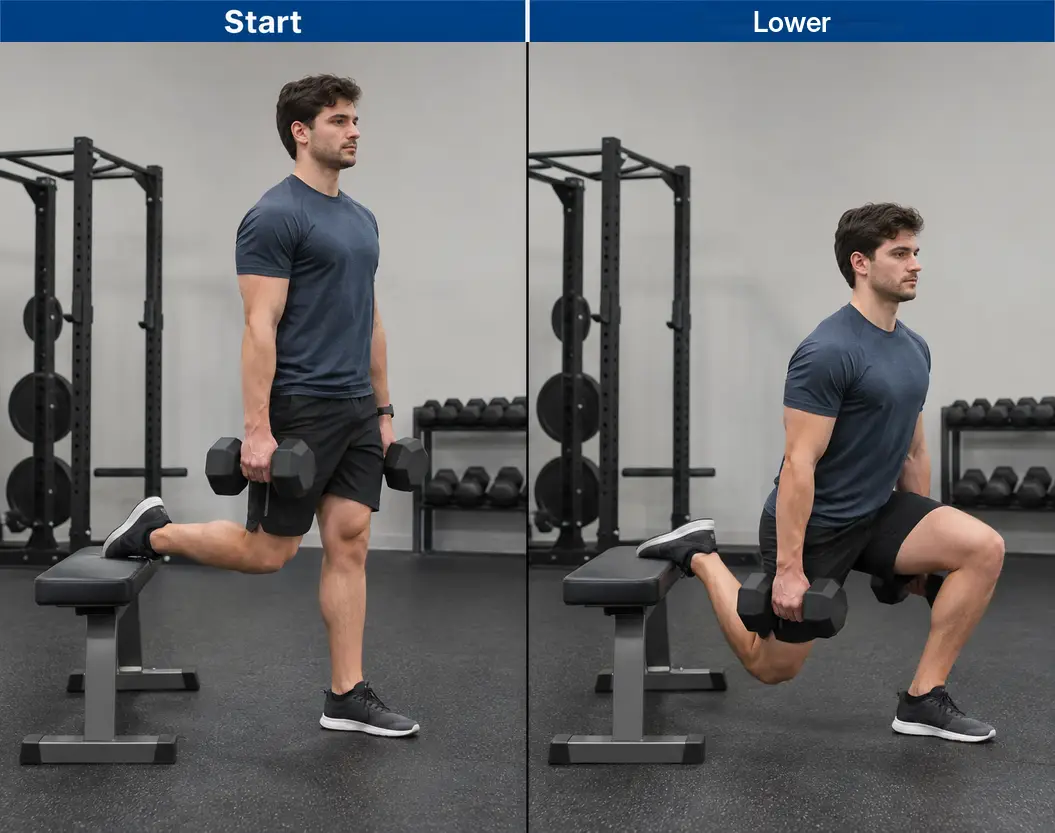
- Check the support, its locks and the clear return path. Rehearse placing the rear foot, lowering, rising and returning that foot to the floor without weights. Learn a workable exit before choosing a loaded set.
- Return to two-foot standing. Pick up a matched, manageable pair with fingers and thumbs around the handles and stand securely. Keep the weights beside the body; do not try to collect heavy dumbbells while already balanced with the rear foot elevated.
- Facing away from the rear support, place the front foot in the position established during rehearsal. Lift the other foot back onto the padding with control, keeping the front foot grounded and the dumbbells clear. Return both feet to the floor, put the weights down and reset if this requires hopping or twisting.
- Settle the top of the rear foot comfortably on the pad. Keep the pelvis facing broadly forwards, the trunk controlled and the head aligned. A modest comfortable torso inclination is allowed; do not force a vertical torso or a large back arch.
- Bend the front hip and knee as the rear knee bends, lowering the pelvis through the chosen range. Let the front knee move naturally with the foot while the heel and forefoot remain supported. Keep the same lead leg and foot positions.
- Reverse at a depth you can control before the rear knee or dumbbells strike the floor, the front foot loses contact or the rear support becomes uncomfortable. A floor touch, horizontal thigh or particular knee angle is not compulsory.
- Extend the front hip and knee to rise to the same staggered top position. The rear leg remains supported, but do not use a sudden push from it to launch the body. Breathe and reset as needed rather than rushing the next descent.
- Finish while the exit remains reliable. From a stable top, lift the rear foot off the support and place it on the clear floor under control. Regain secure two-foot standing before bending to put down the dumbbells; do not turn or reach for the floor while the rear foot is still elevated.
- Set both weights down through the rehearsed route and confirm they are supported before releasing them. Take the workout's required recovery before changing sides. A stopped set remains recorded; symptoms do not create a duty to complete the other side.
Begin with bodyweight or lighter dumbbells when the entry, balance or return is not yet dependable. A small number of manageable rehearsal repetitions is different from a demanding working set. There is no need to demonstrate failure or invent an escape from a loaded repetition you cannot complete. Record the front leg, actual rear support and height, foot contact, stance, range and mass per dumbbell. Raising the support or allowing a deeper descent changes the setup; neither should be combined automatically with a heavier pair.
Adjust Foot Placement, Torso Lean and Depth Without Forcing a Shape
Find a distance that lets you move rather than reach
Too little or too much front-to-back separation can make a particular setup awkward. Instead of correcting from a ruler, check an unloaded repetition. The front foot should stay supported while the front hip and knee bend, and the rear leg should not pull the pelvis into a twist or uncomfortable stretch. Make a small change with both feet on the floor, then try again. Change only one feature at a time: support height, front-foot distance or sideways stance width. Do not keep moving the front foot during a loaded set to chase a lower position.
Let the knee and torso move together
The front knee may travel beyond the toes. That is not automatically a fault, and forcing a vertical shin can create a different movement rather than improve the same one. Look at foot support, controlled travel and symptoms together. Do not push the knee hard outwards to match a photograph. A comfortable forward torso inclination can also be part of the exercise. Keep it broadly repeatable instead of becoming progressively more folded or throwing the chest up to finish. Stance, support height, torso position and loading interact; leaning forwards does not switch the quadriceps off or isolate the glutes. A stronger stretch or burning sensation cannot measure the force on a joint or predict muscle growth.
Choose and retain a usable lower endpoint
Stop the descent where you can reverse with the same contact and control. The rear knee need not touch the floor, and the dumbbells are not depth gauges. A lower support may fit better than a high bench, but it is not automatically the correct answer to every balance or comfort problem. When you intentionally change the range or support, rehearse it with manageable resistance and label the change. A shorter repetition with heavier weights is not unchanged progress. Pain, numbness or a slipping support takes priority over preserving a range target.
Use Hand Support Without Inventing an Extra Hand
A hand-supported Bulgarian split squat still elevates the rear foot. It adds a separate fixed support for one hand. That is different from simply resting the foot on a bench, and different again from the floor-based supported split squat. Hand contact can help control balance, but it does not guarantee a suitable movement or a pain-free exercise.
Hand-Supported Bulgarian Split Squat
For the version taught here, the support hand is on the same side as the front leg, and any single dumbbell is held in the opposite hand. With the left leg in front, use the left hand on the fixed support and the right hand for the weight. Mirror the complete arrangement for the right side. This is a defined setup, not a claim that this loading side is universally superior.
- Arrange a stable rear-foot support and a separate fixed exercise handhold within easy reach. Rehearse both mirrored sides without a dumbbell. The handhold must not move, tip or require reaching across the torso.
- With both feet on the floor, pick up one manageable dumbbell in the hand opposite the intended front leg. Keep the other hand free. Use no load while learning when that is more appropriate.
- Set the front foot and take a secure hold with the same-side hand. With the body stable, place the rear foot onto the padded support. Keep the weight clear of the leg, bench and handhold; do not pass it between hands while balancing.
- Settle the rear-foot contact, front whole-foot support and comfortable torso inclination. Use a consistent supportive hand contact, not a hanging position or an arm pull that lifts you through the repetition.
- Lower by bending the front hip and knee while the rear knee bends. Retain both supports and reverse at the chosen controllable endpoint rather than lowering farther because a handhold is available.
- Rise to the same top position without twisting towards the dumbbell or progressively hauling on the support. End when the original contact, range or control cannot be retained.
- Keep the handhold while returning the rear foot to the floor and establishing stable two-foot standing. Once stable, settle the dumbbell through the rehearsed clear route; release or reposition the support hand only when it is no longer needed for balance. Do not reach to the floor from the elevated-foot stance.
- Rest, then mirror the front leg, support hand and load hand for the other side. Keep separate side results and note this one-dumbbell arrangement rather than copying the two-dumbbell load record.
The support need not be removed to make progress. Build repetitions and choose appropriate loading while keeping the chosen arrangement consistent. One 10 kg dumbbell with hand support is not a calculated equivalent of two 5 kg dumbbells without it; external mass alone does not describe balance, bodyweight support or joint demand. If a suitable handhold cannot be reached on both sides, choose a different fitting station or the taught floor-based alternative. Do not grip a moving cable, loose bar, chair or an unprepared person's hand to complete this setup.
Check What Ends the Set Before Changing Everything
Describe the first change you can observe, not a presumed diagnosis. A front foot that shifts, a rear foot pressed against an edge, a tiring grip and joint pain call for different responses. Put down the weights before adjusting the equipment or taking another look.
| What you notice | Check first | Practical response |
|---|---|---|
| Hopping or shuffling is needed to enter | Rear-support height, front-foot distance and whether the load leaves control for entry | Return to both feet on the floor, settle the weights and rehearse a more manageable setup. |
| The front heel lifts or the foot rolls | Stance, footwear, range and whether the same change appears without weights | Reduce the demand and recheck contact rather than forcing the foot flat through pain. |
| Pressure or pulling at the rear foot or hip | Pad contact, support height and front-to-back distance | Leave the support, adjust unloaded and choose another version if discomfort persists. |
| The torso twists or the pelvis shifts suddenly | Sideways stance width, balance and load | Use a lighter demand or the separately taught hand-supported version; do not diagnose a weak muscle from one view. |
| The grip or exit fails before the leg work | Dumbbell handling, set length and the complete return route | End the set and reduce the handling demand; a successful descent does not guarantee a controlled exit. |
| Later repetitions become shallower or launch from the rear leg | Earlier range, rest and the last repetition that kept the selected movement | Record the altered attempts and stop; do not qualify a heavier load from them. |
| Pain, numbness, dizziness or unusual weakness appears | Whether the load can be settled as safely as possible | Stop and obtain appropriate assessment; do not keep testing heavier variations. |
Compare one change with light practice
- Secure the weights and choose one observable question, such as whether the front foot stays planted.
- Check the present setup without load or with an easy demand, using a coach or permitted fixed-view recording when useful.
- Change one relevant feature while both feet are on the floor: for example, reduce the load or use a different suitable support height.
- Repeat only a few manageable repetitions after enough recovery for a useful comparison. Do not reproduce pain or turn the check into extra hard sets.
- Keep a change only when it improves control without creating another problem. Record it, then resume appropriate planned work or stop when the setup remains unsuitable.
A camera belongs outside the lifting and walking area, with gym rules and other people's privacy respected. Do not turn your head to watch a screen while balancing under load. A video can compare movement but cannot diagnose the cause of pain or measure muscle force.
Apply the Technique to Upper/Lower Lower B Without Adding a Leg Workout
The Upper/Lower Split Workout Plan already allows a Bulgarian split squat or reverse lunge in Lower B. The row below is its third exercise out of seven, unchanged. It follows two deadlift sets and three sets of a front squat, hack squat or leg press, so arrive at this slot with that earlier work in mind.
| Exercise | Sets & Reps | Rest | Tempo | Target Muscles | Notes |
|---|---|---|---|---|---|
| Bulgarian Split Squat or Reverse Lunge | 2 sets of 8–12 reps per leg | 90–180 sec | 3-1-1-0 | Quadriceps, Glutes, Adductors | Use support when balance limits the target muscles. |
Choose one option in that row, not two full allocations. The two-dumbbell Bulgarian version is the implementation used for the worked log below. The hand-supported version is another deliberate implementation of the source's support advice, not a second exercise to add. Neither selected loading arrangement is prescribed word for word by the source table.
Read the tempo and effort in their actual context
For 3-1-1-0, lower for about three seconds, pause for one second at the controlled lower position, rise in about one second and use no deliberately prolonged top pause. Do not bounce at the bottom or rush an unready reset to satisfy a zero. Keep breathing and the entry and exit manageable. The Upper/Lower plan suggests about one to three good repetitions in reserve for moderate compound exercises. The worked illustration selects about two, not failure. Repetitions in reserve refers to repetitions you could perform with the same movement standard, not extra heaves, shortened repetitions or an unsafe exit. The plan uses double progression: build technically acceptable repetitions across the working sets, then consider a suitable small increase. It does not require a weekly increase or a second qualifying session. The next section shows how to organise the individual side sets and their recovery within this example.
The extract is not the complete workout
Leave the rest of the chosen workout intact unless the wider plan is deliberately revised. Less work or unloaded learning may be appropriate when the movement is unfamiliar or fatigue prevents control. The printed two sets per leg are not an instruction to learn elevated-foot balance under a demanding load.
Count Each Lead Leg and Keep Work Already Performed
For this implementation, complete the left-leading set, settle the weights, rest 90–180 seconds, then do the right-leading set and rest again. Repeat that order for the second set on each side. Take more recovery when needed, and keep the chosen order and actual rest visible in the log. This example places the listed rest after every side; the workout table gives the interval but does not spell out the switching sequence. At ten repetitions in both sets, the left-leading record contains 2 × 10 = 20 repetitions and the right-leading record another twenty. Two sets per lead leg create four separate work bouts and forty lead-leg repetitions across both sides, not four sets or forty repetitions for each leg. The rear leg still contributes within each repetition; this is a recording convention, not isolated-muscle measurement.
A support change does not restart either side
Suppose a non-painful balance problem prompts a switch from the two-dumbbell setup to the already learnt hand-supported version. Change only after returning both feet to the floor and settling the load. Select a manageable single dumbbell independently and record the new support. Continuing is optional, and a new unfamiliar setup may be better learnt on another occasion.
| Situation | Performed left / right sets | At most still available | What the record means |
|---|---|---|---|
| No working set has started | 0 / 0 | 2 left and 2 right sets, if suitable | Four planned side bouts, not four per leg. |
| One left-leading working set is complete or stopped | 1 / 0 | 1 left and 2 right sets, if continuing is appropriate | A short first left set is not erased. |
| One working set has been done on each side | 1 / 1 | 1 left and 1 right set, if suitable | Two side bouts remain; a change of support adds none. |
| Two working sets have been done on each side | 2 / 2 | None in this allocation | Another two on each side would add four more bouts. |
| Symptoms stop the exercise after the first left set | 1 / 0 | Stop; no matching-side catch-up is required | Record the asymmetrical work and seek appropriate help. |
After one set on each side, one remaining set on each side keeps the example at four bouts. Completing all four original bouts and another four supported bouts gives eight, not four. A first left set of five repetitions still uses one left-side working set even though it falls below eight; it leaves at most one left and two right sets when continuing remains appropriate. These are practical caps for this example, not proof that supported and unsupported sets produce equal stimulus. They do not authorise converting a bilateral squat or leg-press prescription into a per-leg allocation. The guide to counting workout sets explains the wider accounting distinction. Genuine light preparation remains separate; demanding trial sets do not disappear from the record.
Progress Both Side Records Before Increasing the Dumbbells
Keep the same rear support, stance, contact, range, side order and rest while building repetitions. For this guide's shared-pair example, both working sets on both lead legs must reach twelve with the intended effort and secure handling before considering a suitable increase. One better side does not qualify the other. This applies the workout plan's all-working-sets rule to the selected shared load; it is not a diagnosis or a requirement for identical repetition results on every visit.
Read a complete Lower B record
The following records are fictional successive Lower B exposures, not consecutive daily sessions or a promised calendar. Every entry uses the same two-dumbbell implementation, about two good repetitions in reserve and the stated after-each-side recovery. The load is the mass of each dumbbell, used for all four side bouts in that exposure; these are not recommended starting weights.
| Lower B exposure | Load per dumbbell (kg) | Left-leading reps in sets 1 / 2 | Right-leading reps in sets 1 / 2 | Left / right totals | Decision |
|---|---|---|---|---|---|
| 1 | 8 | 10 / 9 | 10 / 8 | 19 / 18 | Keep the pair; build controlled repetitions on both sides. |
| 2 | 8 | 12 / 12 | 12 / 11 | 24 / 23 | The right second set is below twelve; the shared pair has not qualified an increase. |
| 3 | 8 | 12 / 12 | 12 / 12 | 24 / 24 | All repetition targets are met; also check effort, range, support and handling before increasing. |
| 4 | 9 | 9 / 8 | 8 / 8 | 17 / 16 | One possible result after a suitable increase; retain this pair while rebuilding repetitions. |
The combined lead-leg repetition totals are 37, 47, 48 and 33. They are sums of the two side records, not a measure of muscle stimulus or a reason to match the earlier total immediately after adding load. Exposure 4 is conditional on having a suitable pair and being ready; remaining at 8 kg is also valid. Moving from 8 to 9 kg adds 1 kg per dumbbell, or 12.5%, and 2 kg across the pair. That describes external mass only. It is not a safe-increase threshold, a bodyweight-adjusted intensity or a prediction of growth. The percentage can look modest while the entry, grip or lower target becomes unsuitable.
Handle an unsuitable increase without adding sets
If the first working side cannot reach eight with the intended standard, keep that work recorded. Settle the weights and reassess. A lighter suitable pair may be used for only the remaining side-specific allocation, with the changed loads noted; do not retest the first side until its failed target disappears. Stop if control, symptoms or recovery makes further work inappropriate. When no suitable increment exists, retain a useful pair, use only a secure manufacturer-permitted finer increment or deliberately revise the exercise with its own setup and prescription. Do not make the bench taller, remove hand support or shorten the movement merely to claim heavier Bulgarian split squats. Ordinary load increases stay in the same exercise history; a new support or range is a labelled change within that record. An isolated late-set shortfall is a reason to check rest, earlier work and recovery rather than declare a plateau. The explanation of reps dropping between sets covers that broader check. Repeated problems may justify less work or a different fitting exercise, not extra sets for the supposedly weak side.
Choose a Different Version for a Real Constraint
A rear-foot-elevated squat is useful only when its support, handling and training role fit. There is no obligation to work towards it from a floor-based split squat, and inability to use a particular bench is not proof that the legs need strengthening before any other exercise is allowed.
| Option | What changes | Boundary to keep clear |
|---|---|---|
| Floor-based static split squat | Both feet stay on the floor; no rear-foot support is needed | It is a different recorded setup, not an elevated repetition performed incorrectly. |
| Reverse lunge | The rear foot steps back and returns on each repetition | It is already the other option in the quoted source row; learn the stepping and per-leg convention. |
| Fitted leg press or back-supported hack squat | The machine supplies body support and its own resistance path | It is not a direct per-leg load conversion and may duplicate earlier Lower B work. |
| Barbell or Smith-machine Bulgarian split squat | Loading, balance, bar access and exit arrangements change | Neither is taught by placing a bar into the dumbbell tutorial; learn the actual rack and controls separately. |
The floor-based split-squat and reverse-lunge instructions teach the first two choices. A table name is not a complete tutorial. The Upper/Lower row already permits a reverse lunge, but that does not mean you should perform both it and the Bulgarian allocation in the same slot. The Leg Press Alternatives guide explains the broader support and equipment decision. Its Lower A application is separate from this Lower B example. Since Lower B already includes a secondary squat or leg press before this slot, do not append another full machine allocation without reviewing the complete session. When no available setup is manageable, omit or deliberately revise the unsuitable work. A substitute need not be found during the same session, and changing exercises is not a treatment for unexplained pain.
Know When to Stop and How to Revisit the Setup
Stop the set while you can still return the rear foot to the floor and settle the weights. End earlier for slipping equipment, unreliable grip, marked loss of balance or a movement that no longer matches the intended repetition. You do not have to reach a printed total to justify stopping.
Symptoms are not a stance-selection test
Sharp or worsening pain, spreading symptoms, unusual weakness, numbness or dizziness needs a different response from ordinary effort. Stop and obtain appropriate advice rather than testing a heavier pair or forcing another foot position. Recurring pain, worsening swelling or symptoms that disturb sleep or ordinary activities warrant healthcare assessment; no video or stretch sensation identifies the cause. Seek urgent medical advice for a painful joint that is hot and swollen, or joint pain with fever, shivering or feeling generally unwell. A very painful knee, a knee that locks or cannot move normally, or sudden severe hip pain without an injury also needs urgent assessment. Do not use the workout to decide whether an infection or structural injury is present. Seek immediate emergency assessment for very severe joint pain after a fall or injury, inability to walk or put weight on the affected leg, an obviously displaced joint, or new tingling or loss of feeling after an injury. Tight or squeezing chest pain, pain spreading from the chest to an arm, neck or jaw, severe breathing difficulty or someone unresponsive also needs emergency help. Use the appropriate local service; these are examples, not an exhaustive checklist.
Revisit the exercise after an equipment or technique interruption
- Resolve the actual equipment or setup problem before returning; symptoms and injury-related restrictions take priority over this technical check.
- Rehearse the entry, a few controlled repetitions and the exit without load, using both intended lead-leg arrangements.
- Introduce manageable resistance only when the support, contact, movement and return remain reliable. Record any changed setup rather than claiming the earlier load is already suitable.
- Resume only appropriate work within the actual plan and current recovery. Keep previously performed work recorded; do not add catch-up sets to prove the interruption is over.
This check is for a manageable technical or equipment issue, not rehabilitation clearance. After illness or injury, follow individual advice rather than treating unloaded repetitions, a pain-free moment or this four-step sequence as permission to resume demanding training.
Bulgarian Split Squat FAQs
What is a Bulgarian split squat?
It is a split squat with the rear foot resting on an elevated support. The front leg names the working side, and that leg stays in front throughout each side-specific set. It is not an alternating lunge or a true unsupported one-leg squat.
Which muscles does it train?
The main leg work involves the quadriceps, glutes and adductors, with trunk and grip demands depending on the setup. The rear leg remains supported and contributes to the movement; do not assign all force to the front leg or treat the exercise as perfect muscle isolation.
How high should the bench be?
Use a stable purpose-designed support that you can reach and leave under control and that permits comfortable rear-foot contact and your chosen range. One knee-height rule does not fit everyone. Rehearse unloaded and change an unsuitable support rather than stacking loose objects.
How far in front of the support should I stand?
Use enough front-to-back distance and sideways width for a controlled descent with the front foot grounded. Try small unloaded adjustments rather than hopping into position with weights. Shoe lengths and another person's stance are not universal measurements.
Should the top of my rear foot or my toes rest on the support?
The versions taught here use the top of the rear foot on a comfortable padded support. A toes-supported version changes the contact and needs its own check; it is not a required correction. Do not force the ankle or twist the foot sideways to tolerate a poor setup.
Can my front knee go past my toes?
Yes, forward knee travel can be part of the chosen movement. Check the whole foot, control and symptoms rather than treating the toe line as a universal limit. Do not force either vertical shins or extra forward travel.
Should I stay upright to train my quads or lean forwards for glutes?
Stance, torso position and support affect the task together. Neither position switches one muscle group off. Use a comfortable repeatable inclination and avoid turning later repetitions into a torso heave merely to finish the load.
Is holding a support cheating?
Not when hand support is part of the chosen setup. This guide uses the same-side hand as the front leg and any one dumbbell in the opposite hand. Keep the contact consistent and record it; two dumbbells leave no free support hand.
Is two sets per leg two sets altogether?
No. In the quoted Lower B example, each lead leg receives two sets, creating four separate side bouts. The guide's implementation rests after each side. Both legs can contribute to a repetition without changing which front-leg record it belongs to.
When should I increase the dumbbells?
For the shared-pair example, both working sets on both lead legs must reach twelve with the intended effort, range, support and secure handling before considering a suitable increase. One qualifying side or a calendar week is not enough; repeating a usable pair remains valid.
What should I do if my back foot, hip or knee hurts?
Stop rather than force the position or test several loaded variations. Equipment contact may need changing, but pain does not prove a particular setup diagnosis. Persistent or concerning symptoms need suitable healthcare advice, with urgent or emergency signs acted on promptly.
Are Bulgarian split squats better than regular split squats or squats?
Not universally. They have different support, balance, loading and movement demands. Select the exercise for the actual goal and setup, keep the workout's allocation clear and do not convert weights or claim that matching set counts guarantees equal results.