
Pull-Up Progression: Build the Movement Before Testing the First Rep
Work towards a pull-up by practising a version you can raise and lower under control, then reducing assistance when all your planned sets meet the intended standard. A purpose-built assisted machine can make that practice manageable. A pulldown can remain useful training when the machine or an accessible pull-up station is unavailable; it does not provide a number that guarantees your first pull-up. This guide teaches a kneeling-platform assisted pull-up and an unassisted overhand pull-up. It then shows how to use an existing workout's pulling allocation, handle a reduction in assistance that is too large, and make an optional first-repetition attempt without adding a second workout. There is no fixed week, body weight or assistance setting at which everyone should succeed. An unassisted repetition is a particular skill, not a test of your worth or a requirement for building your back. Choose it as a goal only when it suits you and the available setup can be used securely.
Choose a Workable Pulling Setup, Not a Compulsory Exercise Ladder
Start with access, control and the purpose of the session. A pull-up moves your body towards fixed hand support; a pulldown moves a loaded attachment towards your seated body. They overlap in muscular work without being interchangeable tests. A row has a different pulling direction and is not an unassisted pull-up performed with your feet down.
| Your situation | Useful starting option | Boundary to keep clear |
|---|---|---|
| A fitted counterweighted station and instruction are available | Practise its assisted pull-up | Learn the moving support, assistance direction and exit before a working set. |
| A secure fixed bar is accessible and you can control your body beneath it | Rehearse or perform the unassisted version as appropriate | Having a bar does not establish that you can pull up or return securely. |
| A fitted pulldown is available but pull-up access or assistance is unsuitable | Use the pulldown for the planned vertical-pulling work | Its stack number does not predict unassisted pull-up readiness. |
| You have a band but no established compatible setup or handling instruction | Obtain the missing instruction or choose another available exercise | A band alone does not supply a rated bar, secure attachment or controlled entry and exit. |
| Pain, a slipping grip or unreliable equipment prevents controlled work | Stop and address that problem | A harder attempt or another variation is not a diagnostic or safety test. |
The Lat Pulldown guide supplies complete seated-machine instruction. You do not have to abandon a suitable pulldown to make your training legitimate, and you do not have to perform both full allocations in one session. A first unassisted pull-up also needs a clear definition. Here it means starting with comfortably straight elbows in a controlled overhead position, pulling until the chin clears the bar without reaching the neck forwards, then returning under control. A shorter comfortable practice range can be useful, but record it as that range rather than an already completed full repetition. Do not force an endpoint or a painful passive hang to meet the definition.
Learn the Kneeling-Platform Machine-Assisted Pull-Up
Kneeling-Platform Assisted Pull-Up
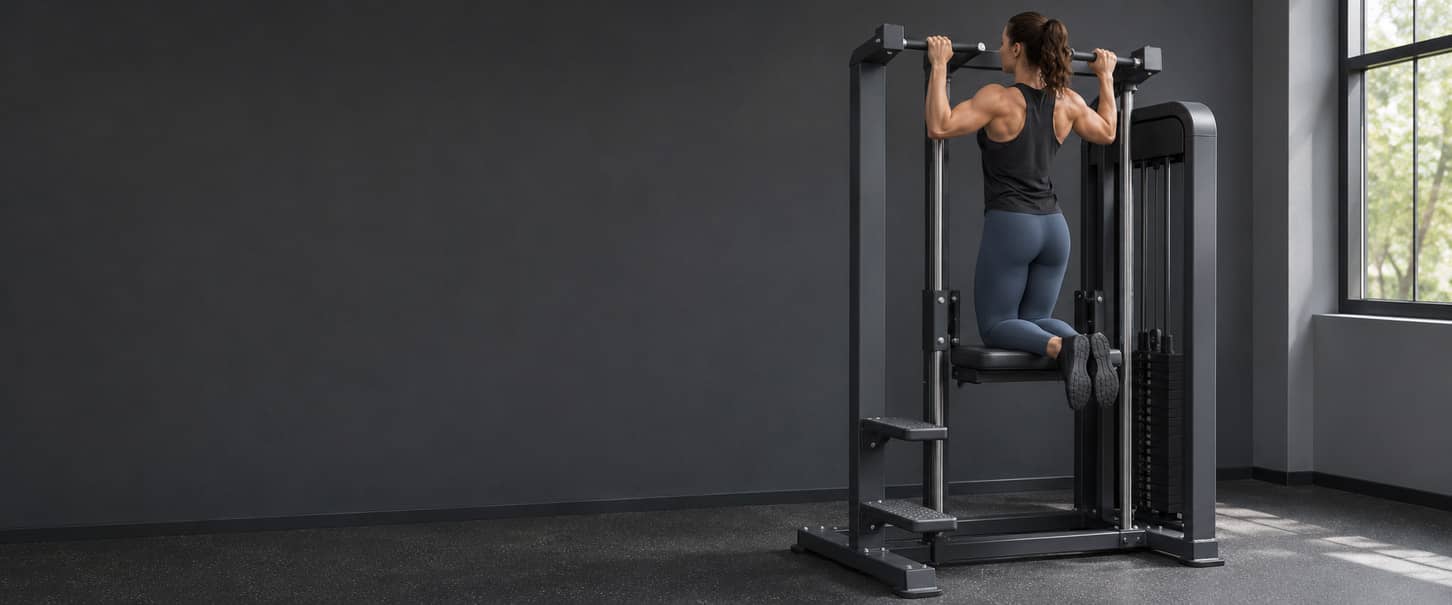
This tutorial uses a counterweighted station with fixed access steps, overhead pull-up grips and a moving knee pad. The pad supports both knees during the repetition. It is not a seated pulldown, a foot-assisted floor exercise or a dip performed on the lower handles. Learn the actual model's entry, return and exit before loading the support with your body.
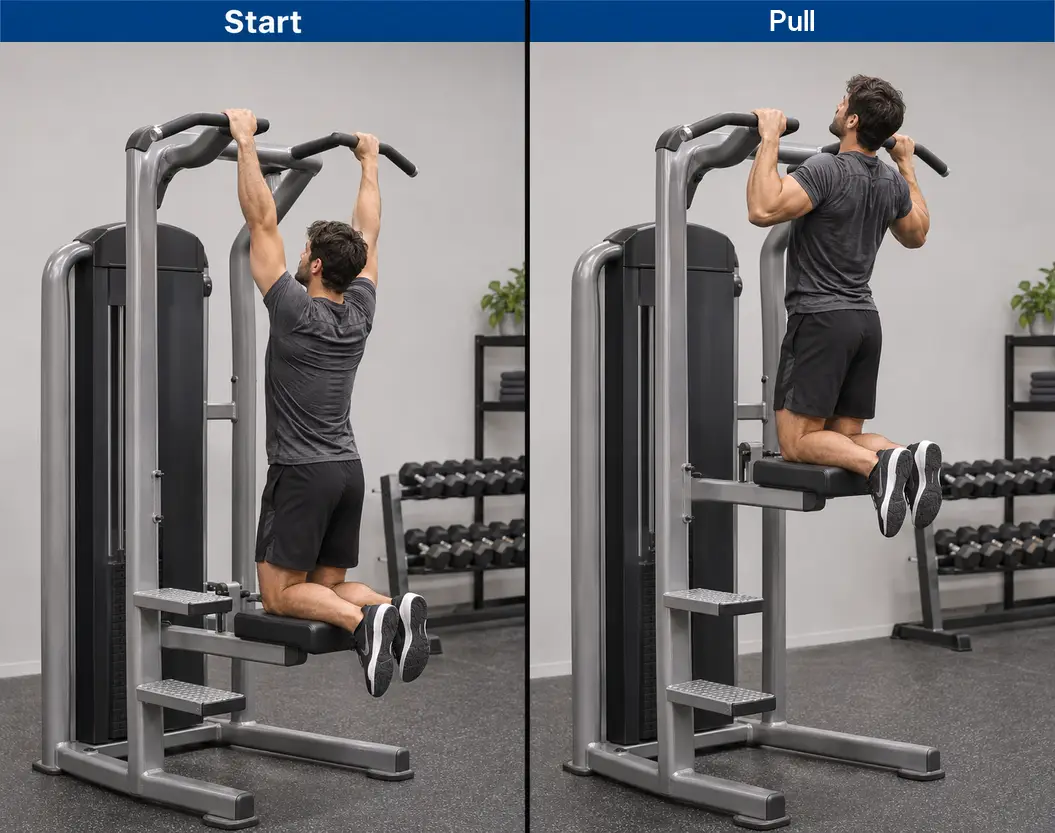
- Check the station's instructions, grips, fixed steps, pad and visible working condition. Ask facility staff to demonstrate the complete sequence, including how the knee support is returned to rest. Do not use a loose grip, damaged cable or unpredictable mechanism.
- With the stack settled and nobody loading the moving support, select permitted assistance and secure the selector. On the counterweighted design taught here, more selected assistance makes the pull easier. Rehearse a manageable setting; the largest or smallest number is not automatically appropriate.
- Use the fixed access steps and take both overhead grips with fingers and thumbs securely around them. Place the knees onto the moving pad in the station's demonstrated sequence, retaining hand control. Do not jump onto the pad or stand on a surface intended only for knees.
- Settle into a controlled overhead start with both knees supported, the elbows comfortably straight and the body steady. Let the shoulder blades follow the overhead reach. Check that the pad has usable travel and that your feet remain clear rather than pushing on the steps.
- Pull the body upwards as the upper arms move down and the elbows bend. Keep both knees on the pad and the trunk controlled. Do not kick, push from the steps or bounce the pad to launch the repetition.
- Finish through the arm movement at a repeatable, comfortable height without craning the neck or forcing the chest into the handles. Lower steadily to the same starting reach, allowing the shoulder blades to move with the arms. Keep control of the body and pad throughout.
- Repeat only while the grip, range, knee contact and return remain reliable. End before fatigue prevents the learnt exit. Do not change the selector, remove a knee or reach towards the stack while the support is loaded.
- Use the model's demonstrated finish. On the kneeling design described here, guide the knee pad to its upper resting position so the stack settles, then transfer back to the fixed steps under control and descend before releasing the final hand support. If your station uses a different procedure, follow its instructions rather than forcing this sequence onto it.
The moving pad is not a fixed step or a seat. Rehearse mounting and dismounting with assistance from a qualified instructor when needed; an image of the working phases does not teach the complete exit. Choose another fitted station or a pulldown when the permitted settings and access cannot provide a controllable start and finish. Use an overhand grip when it fits the station and your intended goal. Parallel neutral handles can be a deliberate alternative, but identify that change rather than treating it as the same overhand test. Keep the same handles, knee contact and range when comparing assisted sessions.
Perform a Controlled Overhand Pull-Up From Entry to Exit
Unassisted Overhand Pull-Up
Use a secure, rated fixed bar with enough body clearance and an intended way to reach it and return to firm foot support. This tutorial defines the eventual unassisted movement; it does not instruct someone who cannot yet control it to complete eight difficult attempts. A purpose-built access step is different from loose furniture or jumping for an unreachable bar.
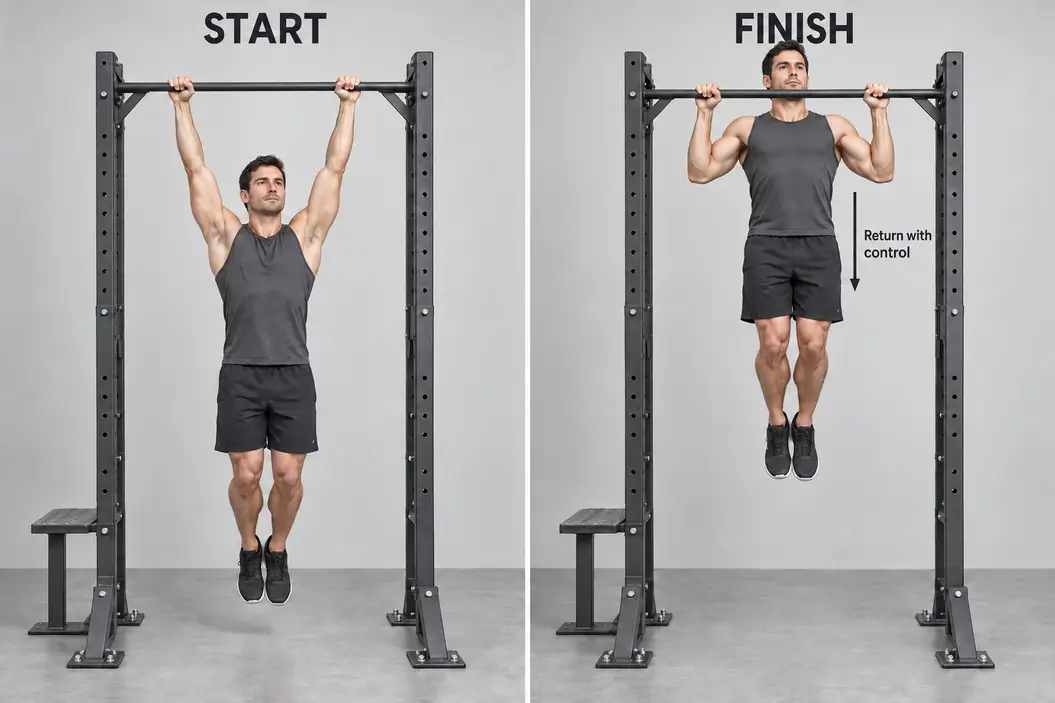
- Inspect the bar, grips, fixed access and surrounding space. Establish the way back down before leaving foot support. Ask for suitable instruction when access or the return is uncertain; do not rely on a fatigued drop to the floor.
- From the intended access position, take a full overhand grip at a comfortable width. Keep fingers and thumbs around the bar, check head clearance and avoid forcing a very wide grip. Secure both hands before taking body weight away from the feet.
- Transfer into a controlled overhead start, keeping the feet clear of the floor, steps and other supports during the working movement. The elbows are comfortably straight, the trunk is steady and the shoulder blades can move; do not collapse into a painful passive hang.
- Begin the pull by bringing the upper arms down as the elbows bend. Let the shoulder blades coordinate with the arms rather than keeping them permanently pinched or pressed down. Avoid a leg swing, knee drive or jump to start the repetition.
- Bring the chin above bar height through the pull, without reaching the face forwards, throwing the head back or driving the chest into the bar. A neutral neck and controlled body matter more than forcing a higher finish.
- Lower the body steadily to the same comfortable straight-elbow start. Keep the grip secure and allow the shoulder blades to follow the overhead reach. Do not drop through the final part or bounce directly into another pull.
- Repeat only when another repetition can meet the same standard and a controlled exit remains available. For the first-repetition check described later, stop after that one attempt rather than turning it into an unplanned maximum-repetition set.
- Return the feet to the intended secure support using the rehearsed route, confirm stable standing and then release the hands. When the pull cannot be completed, lower from the position reached under control and use that same exit; do not keep kicking or reach for a loose object.
One controlled rise and return is one repetition. A chin that reaches the bar only through a neck stretch, a push from the feet or a large swing does not meet this guide's unassisted definition. That observation is not a diagnosis or a claim that other deliberately taught sporting techniques have no purpose. Use a shorter recorded practice range or more suitable assistance when the complete movement is not available. Do not make a prolonged unsupported hang a compulsory preliminary test. A different grip or support can be useful, but it changes what the record describes.
Check What Changed Before Reducing Assistance
Look for a specific change rather than labelling the whole attempt weak or unsafe from one still frame. The lats, other shoulder movers, elbow flexors and grip all contribute, while the trunk helps control the body. Feeling the arms work does not show that the back is inactive.
| What you notice | Check first | Useful response |
|---|---|---|
| The lower start becomes progressively shorter | Assistance, fatigue and the original comfortable elbow range | End the set and use enough assistance to reproduce the intended movement. |
| The chin reaches only by stretching the neck or swinging | The finish you intended, grip fit and current demand | Keep the head controlled; do not count the altered finish as the same repetition. |
| The machine pad bounces or the feet push on steps | Knee contact, available travel and the demonstrated setup | Stop and restore the intended support rather than add momentum. |
| Grip opens or a handle feels insecure | Hand contact, grip surface, fatigue and equipment condition | Return through the controlled exit; report damaged equipment rather than test it again. |
| Shoulders are held rigidly down throughout the return | Whether a stability cue has stopped normal shoulder-blade movement | Allow controlled movement with the arms instead of forcing a fixed shoulder position. |
| The first set falls below the planned minimum after less assistance | The size of the change and whether effort or range also changed | Restore appropriate assistance for remaining suitable work; the short set still happened. |
Normal shoulder-blade movement is not automatically a shrugging fault. Nor does one painful position identify a particular damaged tissue. Concerning symptoms take priority over technique experiments. For repeated losses late in otherwise comparable sets, review actual rest and earlier training before adding work. The guide to reps dropping between sets covers that separate decision. Upper A already includes pressing and rowing before its vertical pull, so a fresh pull-up test and a late-session result are not identical conditions.
Use the Existing Upper A Pull-Up or Pulldown Allocation
The Upper/Lower Split Workout Plan includes this unchanged fourth exercise in its seven-exercise Upper A session. It follows bench or machine pressing, chest-supported rowing and overhead pressing. This is one extract from the source, not three more sets to append to the workout.
| Exercise | Sets & Reps | Rest | Tempo | Target Muscles | Notes |
|---|---|---|---|---|---|
| Weighted Pull-Up or Lat Pulldown | 3 sets of 6–10 reps | 2–3 min | 2-1-1-1 | Lats, Upper Back, Biceps | Use assistance or external load so every set remains inside the range. |
Although the exercise name includes Weighted Pull-Up, its note expressly allows assistance. This guide selects the kneeling-machine implementation when it fits. The source does not specify a machine, assistance setting or deadline for an unassisted repetition, and it does not require adding external weight before bodyweight repetitions are manageable.
Keep the source's effort and tempo meaningful
For the assisted example, choose assistance that permits the repetition range with about two good repetitions in reserve, within the source's moderate-compound guidance. That is an illustrative effort choice, not a measured reserve or permission to force another rep to prove the estimate. A new user may need an easier learning session rather than the full allocation. Read 2-1-1-1 as a roughly two-second lowering return, one second at the controlled overhead start, about one second pulling up and one second at the controlled finish. The first moving phase is the pull even though the notation lists lowering first. Keep breathing, and do not rush an unready movement, force an endpoint or crash the pad to satisfy a timer. Take the source's two to three minutes between working sets, with more recovery when needed for control and the next setup. Keep genuine light preparation separate. A demanding attempt that misses the range is still performed work, even though it does not complete the prescribed row.
Upper B and the rest of the plan remain separate
Upper B has a different second-row choice of Neutral-Grip Lat Pulldown or Pull-Up for three sets of eight to twelve. Do not export Upper A's six-to-ten target to that session. Follow the source's full schedule, preparation and recovery rules; this guide adds no daily pull-up challenge or new weekly allocation. A deliberate change of exercise order to prioritise pull-up skill is a wider plan adjustment, not something hidden inside this row extract. The following record keeps the Upper A context comparable. The later optional single attempt is labelled separately because it changes the repetition prescription.
Reduce Assistance Only When the Whole Record Qualifies
Build repetitions within the range before making the assisted movement harder. Under the source's progression rule, all three working sets must reach ten with the intended effort, range and control before considering a suitable reduction in assistance. Check recovery and handling too. A higher total alone does not qualify the change, and no weekly increase or second successful session is compulsory. The fictional record below uses one counterweighted machine with kg-labelled assistance, unchanged grips and knee support, the source tempo and rest, comparable preceding work and body-mass context, and approximately two good repetitions remaining at the end of each set. Its figures are invented settings and outcomes, not recommended starting assistance or a promised sequence of visits.
| Exposure | Assistance in sets 1 / 2 / 3 (kg-labelled) | Controlled reps in sets 1 / 2 / 3 | Total reps | Next decision |
|---|---|---|---|---|
| 1 | 40 / 40 / 40 | 8 / 7 / 6 | 21 | Keep the setting while building within the range. |
| 2 | 40 / 40 / 40 | 10 / 10 / 10 | 30 | The repetition condition is met; check effort, handling and recovery before less assistance. |
| 3 | 35 / 40 / 40 | 4 / 8 / 8 | 20 | The reduction is too demanding for the first set. Restore suitable assistance for only the two remaining sets. |
| 4 | 37.5 / 37.5 / 37.5 | 7 / 6 / 6 | 19 | A permitted smaller adjustment is now available; retain it only while the range and control remain suitable. |
The totals are 21, 30, 20 and 19. Exposure 3 contains three working sets, not a failed test followed by three fresh sets. Its assistance changes are visible. Exposure 4 is one possible later result after a finer permitted setting becomes available, not a prediction that 37.5 will produce those repetitions. Trying that smaller change remains conditional on reviewing the unsuccessful trial and current recovery; retaining the workable 40 setting is also a valid choice.
Read the setting in the right direction
On this counterweighted design, moving from 40 to 35 reduces the labelled assistance by 5 kg and makes the task harder; moving back to 40 adds assistance. The move from 40 to 37.5 is a smaller labelled reduction of 2.5 kg. Neither difference is a direct measurement of the force supplied at your knees throughout a repetition. Do not subtract the displayed assistance from body mass and report the result as a measured pull-up load, or translate it into a pulldown setting. Gym-machine weight differences explains why machine numbers need their own context. Use only the machine's permitted adjustment system; no loose add-on weights or improvised selectors. An ordinary assistance change on the same setup remains part of its progression history. A new machine, grip, knee-support arrangement or movement range changes the comparison and needs a clearly recorded baseline. Reaching a small assistance number is not proof that an unassisted attempt will succeed.
Plan an Optional First-Repetition Check Without Repeated Maximal Attempts
A first-repetition check is optional. Consider it only when you can control the overhead start and return, have learnt the unassisted setup and secure exit, and assisted practice is no longer dominated by lost grip, swinging or an unreliable range. There is no validated assistance number, hang duration or rep total in this guide that certifies readiness. Practical coaching can help decide whether an attempt is sensible. Choose a session in which ordinary preparation and the preceding work leave you ready, not a day when you are exhausted or trying to test pain. If the intended grip, access or controlled return cannot be established, keep suitable assisted work or postpone the check. More failed trials are not required to establish that the present attempt is too demanding.
One attempt replaces part of the example; it is not a warm-up loophole
For this separate teaching example, deliberately replace the first of Upper A's three vertical-pull working sets with at most one controlled unassisted attempt. At most two suitable assisted working sets remain afterwards. This is an authored change to that session, not successful completion of the unchanged three sets of six to ten or a scientifically established equivalence between one attempt and one normal set.
- Decide before starting that this session uses the optional check. Confirm the station, grip and exit, complete genuinely light preparation, and retain the limit of one attempt rather than adding trials after all three normal sets.
- Enter the taught unassisted start only when it can be controlled. Begin one smooth pull. If the body cannot rise without kicking, an uncontrolled strain or loss of grip, end the attempt and return through the rehearsed route; do not keep retrying immediately.
- If the chin clears the bar through the intended pull, lower under control and finish. If it does not, record the actual attempt without labelling a jump, neck reach or shortened return as a completed unassisted repetition. Symptoms mean stop and seek appropriate help.
- Rest for the source's two to three minutes, and longer when needed. Continue only if control and recovery permit: use suitable assistance for up to two remaining sets of six to ten at the source tempo and the example's intended effort. The safer decision can be fewer sets or no further pulling.
- Record the trial separately from the assisted work and choose the next session deliberately. A successful single does not establish readiness for three sets of six, and an unsuccessful attempt does not erase the assisted progress already made.
Do not repeat the check at every visit merely because the previous one failed. Return to comparable manageable practice, resolve any observed limitation and reassess when there is a useful reason. This is not a fixed-week progression or an instruction to push to absolute failure.
Keep the Attempt and the Remaining Work in the Same Record
The table separates the usual assisted session from the deliberately modified single-attempt example. These are upper limits for appropriate remaining work, not a requirement to finish despite fatigue, symptoms or unfamiliar equipment. Record what happened before deciding what remains.
| Situation | Work already recorded | What remains in this example |
|---|---|---|
| No working set or demanding attempt has begun | 0 working bouts | Choose the normal three assisted sets, OR the planned one-attempt adaptation; not both. |
| The optional unassisted attempt has ended | 1 attempt, with 0 or 1 completed unassisted rep | At most 2 suitable assisted working sets; the unchanged source row has not been completed. |
| A normal assisted first set stops at four reps | 1 performed working set | At most 2 further suitable sets after the load or recovery is adjusted. |
| All three normal assisted sets are complete | 3 working sets | No additional unassisted test in this bounded example. |
| Symptoms or unreliable control end the trial | The actual partial attempt or work | Stop; there is no catch-up debt or compulsory remaining pulling. |
A successful single followed by eight and seven assisted repetitions gives 1 + 8 + 7 = 16 completed movements, recorded as one unassisted rep and fifteen assisted reps. It is not sixteen unassisted pull-ups, an equal-dose replacement for the source session, or evidence of how much muscle was trained. An unsuccessful trial with no complete repetition still involved an attempt. Record zero completed unassisted reps and the effort actually made; do not rename it a warm-up to add a fresh three-set allocation. One attempt plus three new assisted sets would be four work bouts rather than this example's cap of three. The guide to counting workout sets explains why performed-work counts and muscle-specific stimulus are different questions.
After the first successful repetition
Keep the result without treating it as graduation from assistance. Continue assistance when the workout's required range cannot yet be met unassisted at the intended effort. Over time, a deliberately revised prescription may include more unassisted practice, but the single result alone does not authorise extra daily sets, added weight or replacement of every vertical pull in the week.
Keep Bands, Lowering-Only Work and Pulldowns in Their Proper Roles
There is no compulsory ladder in which everyone must complete hangs, shoulder-blade pulls, bands and negatives before using an assisted machine or attempting a pull-up. Each method changes the task, and adding them all can create a second training allocation without solving the original limitation.
A band is a different assistance system
Elastic assistance changes as the band stretches. Band colour and a printed resistance range are not a universal machine setting or a direct amount to subtract from body weight. A usable setup needs a compatible rated bar and band, intact attachments, an approved mounting arrangement and a controlled way to get into and out of the tension. This page does not teach a band-mounting method. Do not improvise a foot loop, stand on loose furniture or stretch a damaged band around your body from a short comparison. Obtain equipment-specific instruction or use the fully taught options that are actually available.
A lowering-only repetition is not the same as a full pull-up
Lowering from an elevated start leaves out the upward pull. It also requires a suitable way to reach the top and leave the station. This guide does not prescribe jumping to the bar, prolonged forced lowering or catching a falling body when grip runs out. Such work needs a deliberately specified setup and dose rather than being added automatically after assisted sets. Small shoulder-blade movements and controlled hanging practice can have their own uses, but they do not by themselves demonstrate a complete elbow-bending pull-up. Do not turn a supposed hang-time target into permission for a painful or uncontrolled position.
A different pull can remain useful
A pulldown may be the more practical vertical pull when the assisted station is unsuitable. Rows also train the back, but they do not reproduce this fixed-bar overhead task. Use the back exercise selection guide for those wider roles rather than adding every exercise named here. For a longer-term first-pull-up goal, access to a suitable fixed bar and appropriate instruction will eventually matter. There is no pulldown load that automatically certifies the skill, and neither a device's number nor a body-weight target is a reason to crash-diet or force a test.
Know When to Stop and What to Review Before Returning
Stop for pain, spreading symptoms, persistent tingling, unexpected weakness, slipping hands or uncontrolled movement. Use the established exit where possible and get appropriate help. Do not use repeated grip changes or less assistance to diagnose the problem. Recurring symptoms or difficulty with ordinary activities warrant clinical advice. Seek urgent medical advice for sudden or very bad shoulder pain, inability to move the arm, a changed shape or marked swelling, persistent pins and needles, loss of feeling, or an unusually hot or cold arm. Pain after a fall, severe pain in both shoulders, or feeling feverish or unwell also needs urgent assessment. Use the appropriate local service rather than treating this as a technique problem. Seek emergency help immediately for tight or squeezing chest pain, pain spreading from the chest to the arms, neck or jaw, severe difficulty breathing, or someone who is unresponsive. These examples are not an exhaustive checklist or clearance to train through other concerning symptoms.
Review an ordinary non-painful limitation
When the issue was equipment access, an oversized assistance change or normal fatigue, identify that specific problem. Restore a workable setup, sufficient recovery and manageable practice before another hard set. Keep a suitable assisted version while it serves the plan; less assistance is not obligatory at every visit. If symptoms or injury were involved, follow individual professional guidance. This page does not diagnose the cause, provide rehabilitation clearance or set a return date. Equipment damage also requires the facility's response, not another trial with a different selector setting.
Pull-Up Progression FAQs
Why can I do pulldowns but not one pull-up?
The equipment, support and movement differ. A pulldown lets you select its resistance while seated; a pull-up requires moving your body towards fixed hand support. A strong pulldown result is not a guaranteed bodyweight-pulling result. Practise the chosen task with suitable assistance when that goal and setup fit.
Does more weight on an assisted machine make it harder?
On the counterweighted knee-pad design taught here, a larger assistance setting makes it easier. That is different from increasing resistance on a pulldown. Check the actual station's instructions rather than applying this direction to every machine.
What assistance setting should I start with?
Use enough permitted assistance to control the setup, pull, return and exit within the chosen workout's range and effort. No universal number is supplied. A new user may need an easier learning session before attempting the source's full working allocation.
How many weeks will the first pull-up take?
This guide does not promise a deadline. Starting capacity, equipment, practice, recovery and the rest of the plan differ. Judge repeatable execution and the actual record rather than force a test because a calendar week has arrived.
Must I hang for thirty seconds first?
No compulsory hang duration is used here. You need control of the overhead position, grip and secure exit for the task attempted. A long hang does not prove that an upward pull is available, and pain or slipping is a reason to stop rather than finish a timer.
Is a chin-up the same as this overhand pull-up?
Not exactly. A chin-up usually uses palms facing towards you, whereas this baseline uses palms facing away. Neutral handles are another arrangement. Keep the selected grip visible in the record and learn a change deliberately; one grip is not universally easier or more suitable for every person.
Should I practise pull-ups every day?
Not as an addition to the example here. The source plan already allocates pulling within its full schedule. More visits or repeated attempts are not automatically better practice when grip, technique or recovery deteriorates.
Do I have to use bands or negatives?
No. They are not prerequisites in this pathway, and a brief description is not a complete setup instruction. Use the taught assisted option when suitable, or retain an appropriate pulldown rather than improvise equipment or add unfamiliar hard work.
Can I subtract assistance from my body weight?
Do not call the result a measured training load. The displayed setting belongs to that machine, while support and movement conditions matter. Keep assistance and relevant body-mass context separate without transferring the result to another station or a pulldown.
Does one successful repetition mean I should stop using assistance?
No. One rep does not establish three sets of six to ten at the intended effort. Retain assistance for the prescribed work when needed, and make any longer-term change to the practice dose deliberately rather than treating the milestone as a complete new workout.
What happens if the first unassisted attempt fails?
Return under control through the planned exit and record the attempt. Do not immediately repeat failures or erase the effort. In the separately authored example, at most two suitable assisted sets remain; symptoms or lost control mean stopping, not filling the allowance.
Should I lose weight just to get a pull-up?
This guide does not prescribe weight loss. Body mass is part of bodyweight exercise, but a performance milestone does not establish that dieting is appropriate. Focus on controllable practice and adequate recovery rather than dehydration, restrictive eating or an arbitrary target weight.