
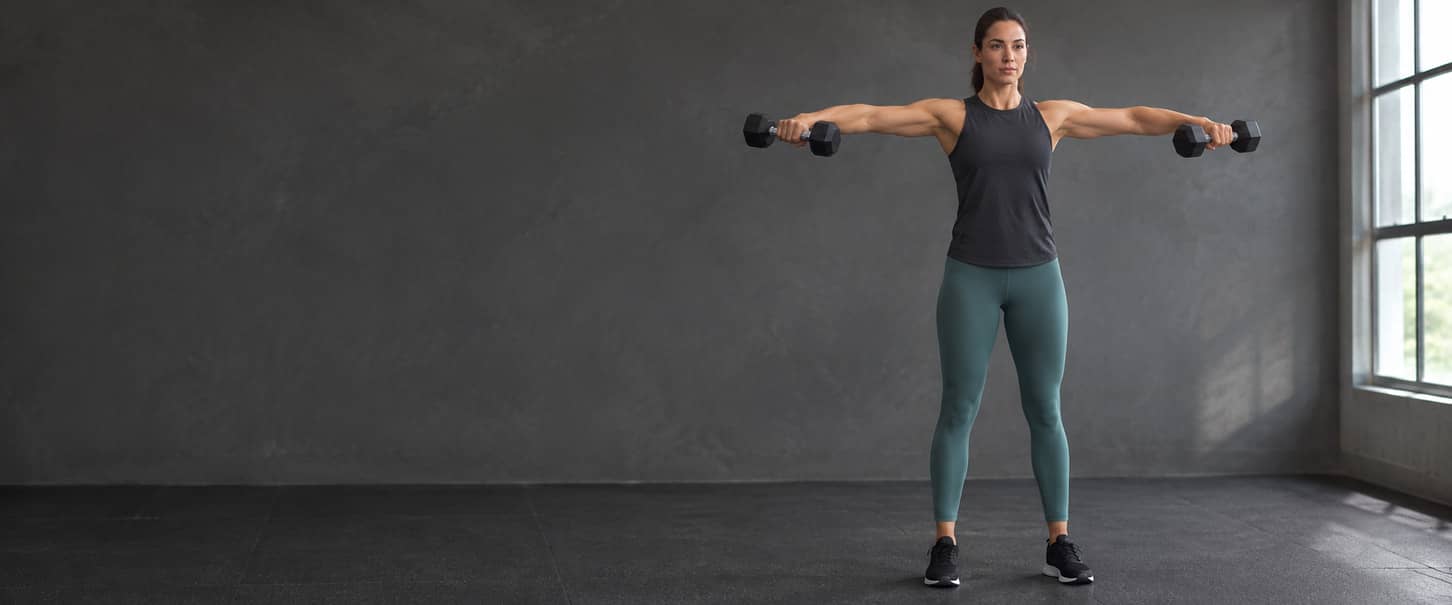
Lateral Raise: Find a Setup You Can Control and Progress
For a lateral raise, lift the upper arms away from your sides through a comfortable arc, keep a small consistent elbow bend and lower the resistance under control. Let the shoulder blades move with the arms rather than pinning them down. Choose a load that does not require a body swing or a progressively shorter movement. This guide teaches a standing dumbbell raise and a single-arm low-cable raise, then explains how to check the arm path, cable setup and weight increments. A heavier dumbbell, higher cable setting or stronger sensation does not by itself show that the exercise has improved. Lateral raises emphasise the side of the shoulder, but other shoulder and shoulder-blade muscles also contribute. Use the movement within the work already allocated by your workout plan. It is not a complete shoulder workout, a posture correction or a way to diagnose pain.
Choose Dumbbells, a Cable or a Fitted Machine
Start with the setup you can use securely and repeat. You do not need all three versions in the same session. The useful difference is often handling, available increments or support rather than the equipment name.
| Available option | Useful when | Check before choosing it |
|---|---|---|
| A pair of dumbbells | You want a simple two-arm raise without a station | The lightest suitable pair, the next increment, clear arm travel and a controlled pickup and set-down. |
| One adjustable cable outlet | One-arm work and an adjustable line of pull fit the plan | A compatible handle, clear cable route, manageable starting resistance and a setup you can mirror on the other side. |
| A dedicated lateral-raise machine | Its intended support and guided path fit you | The actual seat or standing position, pads or handles, travel and permitted adjustments; not every machine fits every person. |
The two full tutorials below use dumbbells and a cable. For a fitted machine, use the existing machine lateral-raise instructions. A short selection row is not a substitute for learning the station's controls and exit.
Do not treat cable resistance as a growth guarantee
An eight-week study in 24 trained adults compared one-arm dumbbell and cable raises over matched ranges and found similar changes in lateral-deltoid thickness. Its cable pulley was set roughly level with the starting hand, rather than at the low outlet taught here. That does not establish that every cable setup, machine or partial-repetition version works equally well, or require you to copy the study's training-to-failure protocol. Choose a version that fits your available equipment and permits consistent training. You do not need to buy a cable machine or abandon a productive dumbbell raise because another version feels harder near the start.
How to Do a Standing Dumbbell Lateral Raise
Standing Dumbbell Lateral Raise
Use a manageable dumbbell in each hand and clear enough space for both arms, the weights and a controlled set-down. This version raises both arms together. Keep the knees and torso steady without forcing a rigid pose.
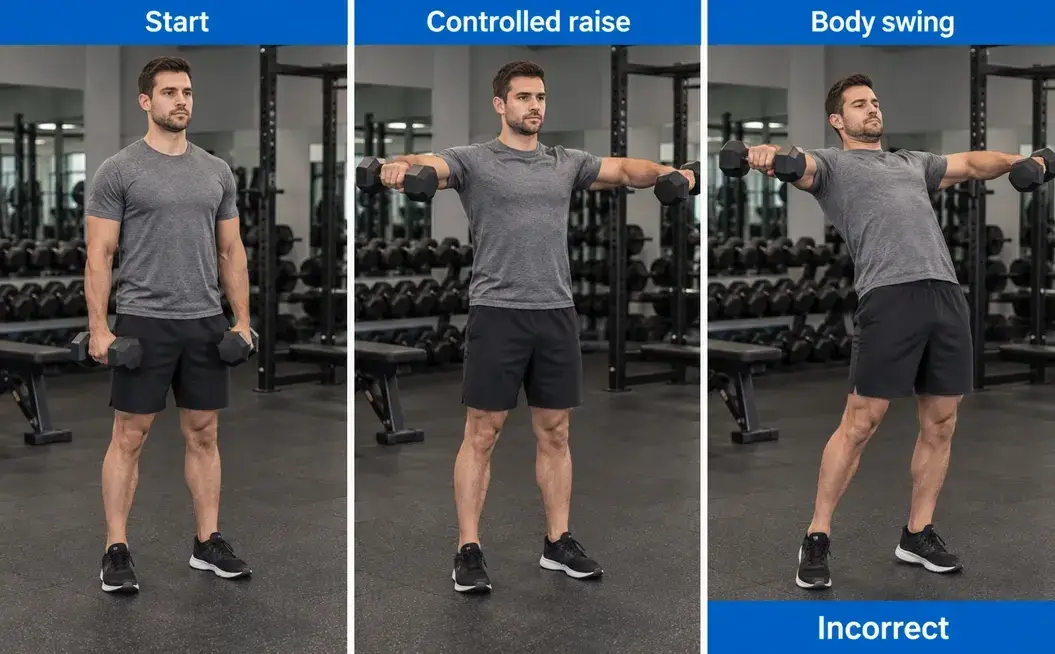
- Pick up the dumbbells securely and stand with comfortable, stable foot spacing. Hold each handle with the fingers and thumb around it, with the weights beside or slightly in front of the thighs.
- Set a small comfortable elbow bend and keep the wrists aligned with the forearms. Rehearse a few light repetitions to choose the arm path and endpoints before the working set.
- Raise the upper arms outwards, usually a little forward of a line directly out to your sides. Keep the elbow bend broadly unchanged rather than curling the weights towards your shoulders.
- Raise to a comfortable, repeatable height. Around shoulder level is a useful reference for this version, not a compulsory endpoint or a universal safety ceiling. Allow the shoulder blades to move with the arms; do not force the thumbs down.
- Lower steadily along the same arc without dropping the weights onto the thighs or swinging into the next repetition. Breathe throughout the set rather than holding one breath across several repetitions.
- End before another repetition needs a body swing, a sudden shoulder hike or a shortened arc. Lower the weights and set them down securely before changing the load or setup.
Reduce the load when the first repetitions already require compensation. A deliberately shorter range or more bent-arm version can be a different manageable exercise, but give that change its own description rather than counting it as unchanged progress. Record the load per dumbbell, not an unexplained combined weight. Keep the same arm path, elbow bend, range and intended effort when comparing sessions. The demonstration shows one workable example, not the exact joint angles every reader must copy.
Keep the Elbow Bend and Raising Range Consistent
A lateral raise is upper-arm movement, not a contest to lift the hands as high as possible. Watch what happens to the upper arm, elbow and torso together. Raising the hands by bending the elbows more does not reproduce the same arm path.
A bent elbow changes the lever
With a similar upper-arm position, bringing the dumbbell closer to the shoulder changes its leverage. That can make a heavier number easier to move without demonstrating more strength in the original version. A bent-arm raise is not inherently wrong; changing into it halfway through a set makes the comparison unclear. Keep a comfortable bend that you can reproduce. Do not lock the elbows painfully straight or keep bending them further to finish. When grip, wrist position or elbow comfort is the limiting issue, reduce the demand and check the setup rather than trying to hold the original load at any cost.
Shoulder-blade movement is not automatically cheating
The shoulder blade normally moves as the arm rises. Do not try to keep it permanently down and back, and do not assume that feeling the upper trapezius means the side deltoid has stopped working. Look instead for a sudden change, such as a shoulder hike or torso movement that replaces the raise you intended.
Choose a repeatable upper endpoint
Use an arc you can raise and lower under control without pain or a forced wrist or arm twist. A slightly forward path can be useful, but there is no single degree marking to impose on every shoulder. Find the path with light resistance rather than rotating a heavy dumbbell until a painful position feels tolerable. If the first repetitions reach your selected endpoint and later repetitions stop much lower, record that loss of range and end the set. A deliberately programmed partial raise is a separate choice; it does not turn accidental shortening into completion of the original target. Making the range longer is also a change to rehearse before adding weight.
How to Set Up a Single-Arm Cable Lateral Raise
Single-Arm Low-Cable Lateral Raise
Use one permitted low outlet and a compatible single handle. Stand side-on with the working arm farther from the column. Begin with the handle just in front of the working-side thigh, with the cable clear across the front of your body rather than behind your back or between your legs. Learn the station's handling before using working resistance.
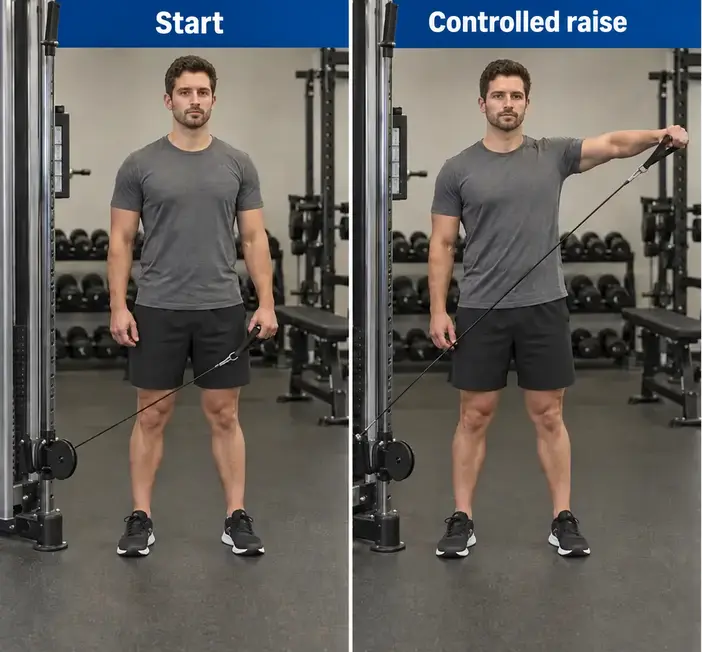
- With the stack resting, connect and check the handle, lock the permitted low pulley setting and select manageable resistance. Follow the equipment instructions; do not alter the pin or carriage while it is loaded.
- For right-arm work, stand with the column on your left and take the handle in your right hand. Establish stable feet and a near-upright torso. Use the free hand only on an intended fixed support when that support belongs to the chosen setup.
- Rehearse the handle's route at light resistance. Keep the cable clear in front of the body and away from the ankles, sharp edges and trapping points. Start with the handle just in front of the working-side thigh, without forcing it farther across your body.
- Set a small comfortable elbow bend and a neutral wrist. Raise the working upper arm away from the torso through the chosen arc, allowing normal shoulder-blade movement without leaning away to add travel.
- Finish at the controllable endpoint established in practice, often around shoulder level. Do not lift farther by bending the elbow more, twisting the wrist or heaving the torso.
- Lower along the same path, keeping control of the handle and stack. Do not allow the cable to jerk the arm inward or the weights to crash together. One raise and controlled return is one repetition for that arm.
- Settle the resistance and follow the station's return procedure before releasing the handle or changing sides. Mirror the setup for the other arm, then complete its assigned work and recovery. Do not reach into a moving stack or change the pulley under tension.
Use less resistance or another suitable station when you cannot control the starting pull or return. Do not stand progressively farther away to make each set harder, and do not assume that moving the pulley creates a better exercise. The next section explains which settings need to stay comparable. This is a near-upright low-outlet version. Leaning-away, behind-body, cuff-loaded and other cable raises need their own setup instruction; they are not created by silently changing one step in this tutorial.
Check Cable Height, Distance and Resistance Before Comparing Sets
A dumbbell pulls downwards under gravity. A cable pulls along the line towards its outlet. Changing the pulley height or your position changes that line, so the same stack number can feel different without a change in the displayed load. Cable tension is not the same quantity as shoulder torque or muscle force.
| Setting | Setup to repeat | What a change means |
|---|---|---|
| Outlet height | The actual low setting used for the taught version | A higher outlet changes the line of pull, so compare progress at that setting separately. |
| Distance and stance | Where you stand relative to the column, without leaning farther away | A different body position changes the cable angle and possibly the balance demand. |
| Handle, support and starting reach | The same compatible handle, any permitted fixed hand support and the handle just in front of the working-side thigh | A cuff, extra support or deeper across-body reach is a different setup, not an automatic improvement. |
| Station and travel | The exact machine, displayed unit and enough usable cable travel | Another station's displayed load is not directly comparable; stop if the cable or stack reaches a travel limit. |
Example: the number stayed the same, but the setup changed
Suppose a later set uses the same stack setting but you stand farther from the column and start with the hand farther across your body. A change in repetitions cannot be attributed to strength alone because the exercise changed too. Return to the established setup when the purpose is comparison. If the new arrangement is deliberate and suitable, describe it as a new version and begin with manageable resistance. Do not chase a permanently taut-looking cable by walking beyond a clear, stable working area. Check the permitted setup and available travel with the resistance at rest. If the cable rubs, catches, pulls the arm into an uncontrolled start or runs out of travel, stop and refit the setup or choose another option.
Different resistance does not establish a better result
The turning demand from an external load depends on its direction and distance from the joint, not just the mass printed on it. A dumbbell's contribution to that demand is generally smaller when it hangs close beneath the shoulder and larger as it moves farther out. That does not mean the shoulder muscles are completely inactive at the start. Keep equipment changes separate in your records. The explanation of gym-machine weight differences covers why displayed loads do not form one universal scale. No force conversion or muscle-growth percentage can be inferred from the cable angle or a stronger stretch sensation alone.
Check Swinging, Shrugging and Shortened Repetitions
Describe the first change you can actually see, then decide whether to reduce the load, restore the setup or stop. A tired muscle, a painful shoulder and a cable that catches are not the same problem.
| What you notice | Check first | Useful response |
|---|---|---|
| The hips or knees start the raise | Whether the same arc is possible with lighter resistance | End the swinging set and use a manageable load; do not count the heave as the same repetition. |
| The elbow bends more on later repetitions | Whether the upper arm reaches the same endpoint without drawing the weight closer | Restore the chosen bend with less load, or name a deliberate bent-arm version separately. |
| The shoulder suddenly hikes while the arm stops rising | Whether the change appears only with fatigue or excessive resistance | Reduce the demand and compare light repetitions; do not try to freeze all shoulder-blade movement. |
| Later repetitions finish much lower | The last repetition that reached the intended endpoint | Record the shorter attempts, stop and review the load or recovery before the next set. |
| The wrists twist into a forced thumbs-down position | Grip, load and whether the arm path is comfortable without that twist | Use a comfortable wrist and arm position; do not force rotation to chase isolation. |
| The torso leans farther from the cable | The original stance, support and distance from the column | Settle the resistance and restore the chosen setup before continuing. |
| The cable catches or the stack hits a travel limit | The unloaded route, attachments and equipment settings | Stop and follow the station's instructions or ask staff; do not pull harder through an obstruction. |
| Sharp pain, persistent tingling or unexpected weakness appears | Whether the exercise can be stopped and the resistance settled securely | Stop the set and seek appropriate assessment rather than using another heavy attempt as a test. |
A normal amount of shoulder-blade movement does not identify a shrugging fault, and a video cannot diagnose the cause of pain. A coach can help compare execution; concerning symptoms need the appropriate healthcare assessment.
Test One Setup Change Without Turning It Into Another Workout
Use this check when the issue is execution rather than pain, damaged equipment or an uncontrolled load. Set the weights down or settle the stack first. The comparison should use a few manageable repetitions, not several extra hard sets.
- Choose one question, such as whether the elbow bend stays the same or the torso remains steady.
- With light resistance, have a coach observe a few repetitions or use a permitted video from a fixed view. Note the starting setup and intended endpoint.
- Change one relevant feature: reduce the load, restore the original stance or make a small comfortable change in arm path. Do not change all three at once.
- Repeat after enough recovery to make a useful comparison. Keep the camera view and the question the same; do not reproduce a painful movement for the recording.
- Keep a change only when it improves control without creating another problem. Note it briefly, then return to the planned work or stop when the exercise remains unsuitable.
Place any camera outside the lifting and walking area and respect gym rules and other people's privacy. Do not watch a screen by turning your head during the raise. A different camera angle can make the endpoint look different, so video is a comparison aid, not a measurement of joint forces.
Check effort as well as repetitions
A repetitions-in-reserve estimate describes how many more repetitions you could perform to the same standard. It does not count repetitions that need swinging, a larger elbow bend or a shorter arc. Use the reps-in-reserve guide for the wider explanation. Do not test failure to prove every estimate. A lighter load that restores the chosen movement is useful information, not proof that one muscle was weak or that the earlier movement caused an injury.
Use the Existing Upper/Lower Lateral-Raise Allocation
The Upper/Lower Split Workout Plan already includes lateral raises. The row below is exercise five of seven in Upper A, unchanged. It is an extract from that workout, not a second shoulder session to add afterwards.
| Exercise | Sets & Reps | Rest | Tempo | Target Muscles | Notes |
|---|---|---|---|---|---|
| Cable or Dumbbell Lateral Raise | 2 sets of 12–20 reps | 60–120 sec | 2-1-1-1 | Lateral Delts | Raise through a comfortable arc without swinging the torso. |
For the bilateral dumbbell example here, each set raises both arms together. Follow the source's two sets, rest interval and selected effort target. Its stable-isolation guidance allows a range of effort rather than requiring every set to reach failure. Rehearsal and warm-up work do not become extra working sets.
Read the raise tempo in the right order
The four-part 2-1-1-1 notation lists a two-second lowering phase, a one-second pause at the lower start, a one-second raise and a one-second controlled upper pause. From the arms-down starting position, the first movement is the raise even though the notation lists lowering first. Do not bounce off the thighs or force a painful endpoint to satisfy the pause. The source uses double progression: add acceptable repetitions within the range, then consider a suitable increase when both working sets reach twenty with the intended effort and technique. The next load must still permit the prescribed work. A heavier pair is not compulsory merely because it is the next pair on the rack.
Keep the remainder of the workout intact
Choose the cable or dumbbell option, not both full allocations. Keep the preceding presses and pulls in mind when judging fatigue and leave the remaining workout order unchanged. This one row does not prescribe daily lateral raises, a new weekly set target or a change to every shoulder exercise. The next example uses dumbbells. A single-arm cable implementation needs an explicit per-arm and recovery arrangement; that later example is identified separately rather than attributed to wording the source row does not contain.
Progress When the Next Dumbbell Jump Is Too Large
Consider a hypothetical lifter using the two-set Upper A allocation above. The intended effort for this illustration is about two good repetitions in reserve, within the source plan's isolation guidance. The arm path, elbow bend, endpoints, tempo and rest stay comparable. These are invented results, not starting weights or a timetable to copy.
Work out what the next pair actually changes
Moving from 6 kg to 8 kg in each hand adds 2 kg per dumbbell. The relative increase is 2 divided by 6, multiplied by 100: approximately 33.3%. Moving from 6 kg to 6.5 kg adds 0.5 kg per dumbbell, approximately 8.3%. Those percentages describe mass changes, not muscle growth, shoulder force or a universal safe-increase limit. Even the smaller jump may be unsuitable. Use a complete compatible pair or only a secure manufacturer-permitted loading system; do not attach loose objects to make up the difference.
| Session | Load per dumbbell in set 1 / set 2 (kg) | Accepted reps in set 1 / set 2 | Decision |
|---|---|---|---|
| 1 | 6 / 6 | 18 / 17 | Keep the current pair; both sets remain below the upper target. |
| 2 | 6 / 6 | 20 / 20 | Both sets meet the range, effort and technique conditions; consider a suitable increment. |
| 3 | 8 / 6 | 10 / 16 | The first set stops below the range at the intended effort. Reduce the load for the one remaining planned set; do not add a replacement set. |
| 4 | 6 / 6 | 20 / 20 | Retain the useful load while looking for a suitable smaller increment or a separately planned alternative. |
| 5 | 6.5 / 6.5 | 14 / 12 | A suitable finer pair is now available; both sets meet the range and intended effort. Keep this load and rebuild repetitions. |
Session 3 contains two working sets, not a failed test followed by two fresh sets. Its first set is performed work even though ten repetitions do not meet the planned minimum. Record the different loads; there is no need to repeat the full allocation to erase the unsuccessful increase. Stop altogether when pain, loss of control or poor recovery makes the remaining work unsuitable. Session 5 is one possible later result after a finer pair becomes available. It is not a prediction that 6.5 kg will produce those repetitions. Session 4 returns to 6 kg because a suitable smaller increment is not yet available, not because two successful sessions are required before increasing the load.
Choose the next action rather than forcing the jump
When the current pair remains appropriate, keep it and work within the existing range. A secure permitted finer increment may provide the next step. A cable or fitted machine can be considered when its actual increments suit the task, but it starts a new load record; do not translate 6 kg dumbbells into a 6 kg stack setting. Do not shorten the arc or bend the elbows progressively more to lift a heavier weight. Keep this example within two sets of 12–20 repetitions unless the workout plan is deliberately revised. Persistent late-set problems also deserve a recovery review; the guide to reps dropping between sets covers those checks. Progress is judged within the chosen exercise and the complete plan, not by a compulsory increase at every visit.
Switch to One-Arm Cable Work Without Adding Hidden Sets
Changing from a bilateral dumbbell raise to a single-arm cable raise changes how the work is organised. It also changes the equipment and resistance, so choose a manageable cable load independently rather than copying the dumbbell number. The Upper/Lower plan allows cable raises but does not specify how to alternate arms. In this example, perform two sets of 12–20 repetitions per arm using the same 2-1-1-1 tempo. Rest 60–120 seconds after each arm before starting the next arm or set, allowing longer when needed for control. Complete the first arm, rest, complete the other arm, rest, then repeat once. Settle the resistance before switching and keep the same starting-arm order when comparing sessions. Each arm receives two sets. That is four one-arm sets in total, not four sets per shoulder.
| Arm | Sets | Hypothetical reps per set | Repetitions for that arm |
|---|---|---|---|
| Left | 2 | 15 | 30 |
| Right | 2 | 15 | 30 |
In this illustration, each arm performs 2 times 15, or 30 repetitions; there are 60 one-arm repetitions across both arms. Fifteen is an example within the chosen range, not a new fixed target. Equal counts do not establish equal resistance, effort or muscle growth between cable and dumbbell work.
Replace the unperformed work, not the training record
Choose the version before starting where possible. After one bilateral dumbbell set, each arm has already completed one set. If continuing with cable work is appropriate, perform only one remaining set per arm, using the per-arm rest above. Select the cable resistance independently and keep the completed dumbbell set in the record. Starting two new sets on each arm would add work, not replace it. For each arm, both working sets must reach twenty with the intended effort and technique before considering a suitable increase for that arm. One arm qualifying does not qualify the other, and different loads do not diagnose an injury or imbalance. For broader outlet, attachment and support choices, use the cable exercise library.
Know When to Stop or Choose Another Exercise
Stop the set when the weight cannot be lowered securely, the cable catches, the grip fails or the intended movement requires an uncontrolled heave. Settle the resistance before investigating the equipment. Reducing a load is appropriate for a load problem; it is not a repair for a damaged attachment.
Pain is not a reason for another heavier test
Stop for sharp or worsening pain, persistent tingling, unexpected weakness or a sudden loss of control. Seek appropriate assessment for recurring or persistent symptoms instead of repeatedly changing angles to diagnose the problem. This guide does not identify injured tissue or provide a rehabilitation programme. Seek urgent medical advice for sudden or severe shoulder pain, inability to move the arm, a visibly changed shoulder shape, marked swelling, pins and needles that do not go away, or loss of feeling. Use the appropriate local urgent-care service. These examples are not a checklist that makes every other symptom safe to train through.
A different option can be a useful decision
A fitted machine may simplify handling, while dumbbells may avoid a cable route that does not fit. Neither is guaranteed to be pain-free or suitable for every person. Choose a version for which you have complete instructions and start with manageable resistance. The shoulder exercise selection guide covers the wider roles of presses, raises and posterior-shoulder work. Replacing a lateral raise with a press or reverse fly changes the task; the exercises are not interchangeable merely because they involve the shoulder. Review that choice within the complete workout plan and any professional advice that applies to you.
Lateral Raise FAQs
What muscles do lateral raises work?
They emphasise the lateral deltoid while other shoulder and shoulder-blade muscles assist. The exact contribution changes with the movement. Feeling another muscle work does not establish that the side deltoid is inactive.
Are cables better than dumbbells?
Not for every person or setup. They change the line of pull and may offer useful increments, while dumbbells are simple to set up. Choose by fit, handling and repeatable progression rather than assuming constant cable tension guarantees better growth.
Should I raise my arms above shoulder height?
Around shoulder level is a practical reference for the versions taught here, not a universal safety ceiling. Do not force extra height or a painful endpoint. A deliberately different range needs appropriate instruction and a separate comparison.
How much should I bend my elbows?
Use a small comfortable bend that stays broadly consistent. There is no exact angle everyone must copy. Bending farther to finish a heavy set changes the lever and does not demonstrate the same raise.
Should the arms move directly out to the sides?
A path slightly forward of that line can be comfortable. Rehearse it with light resistance and keep it repeatable. Do not force one anatomical plane or turn the raise into a front raise simply to lift more.
Should my thumbs point down?
Do not force a pouring motion or uncomfortable rotation. Keep a comfortable grip and wrist position with controlled upper-arm movement. A compulsory thumbs-down cue is not needed to perform the versions taught here.
Why do I feel my traps during lateral raises?
The shoulder-blade muscles normally contribute. Check for a sudden shoulder hike or body heave that replaces the chosen movement, rather than trying to prevent all scapular motion or diagnosing a problem from sensation alone.
What weight should I start with?
Choose a manageable load that permits the intended range, effort and controlled return. The example's dumbbell weights are not recommendations. A cable's lowest setting may still be too heavy, so another station or version may fit better.
What should I do when the next pair is too heavy?
Keep the useful current load, consider a secure permitted finer increment or plan another suitable implementation. Do not compensate by swinging, shortening the arc or adding extra hard sets. Compare any new equipment against its own starting record.
Does a set on each arm count as two sets per shoulder?
No. One set on the left and one on the right give each shoulder one set. Follow the actual per-arm allocation and recovery rather than using a combined count that doubles the work on paper.
Do I need both dumbbell and cable raises in one workout?
Not automatically. They can be alternatives for the allocated lateral-raise work. Using both full prescriptions adds work and needs a reason within the complete plan.
Are lateral raises a treatment for shoulder pain?
This is a general technique guide, not a treatment plan. Do not test a painful shoulder with repeated heavier sets. Seek appropriate help for persistent or concerning symptoms and follow any individual rehabilitation instructions.