
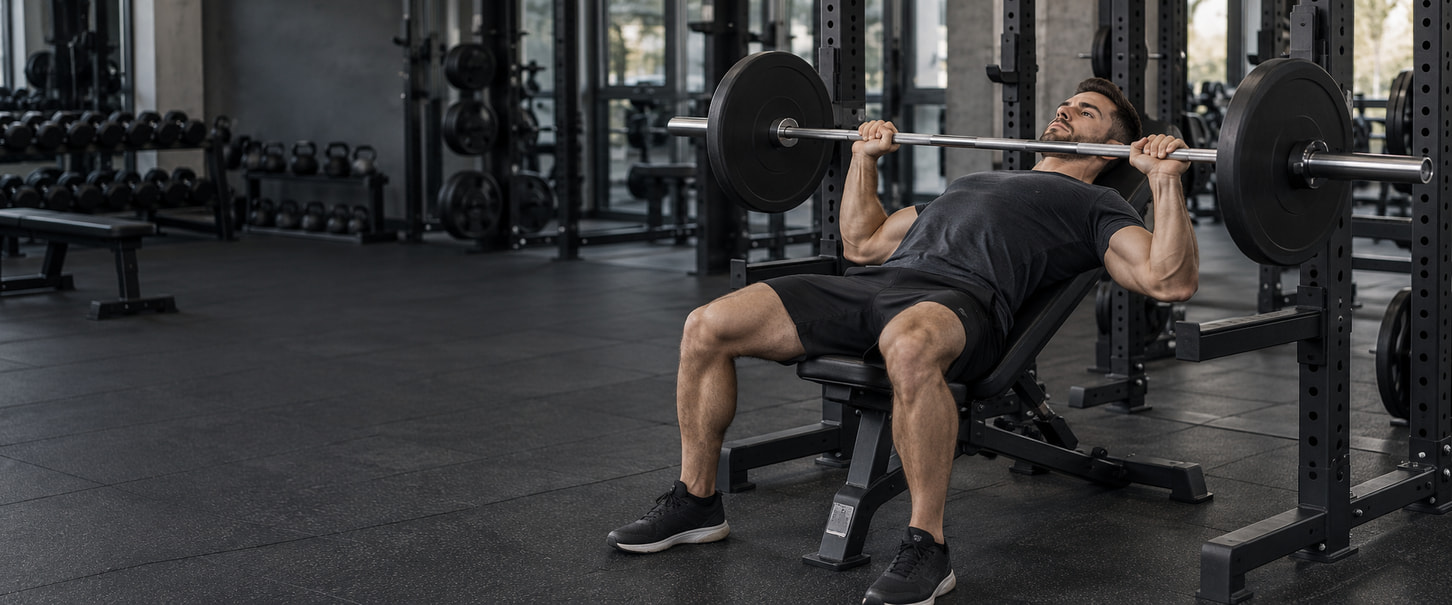
Incline Bench Press: Technique and Equipment at a Glance
An incline press uses a raised backrest or a purpose-designed inclined machine path to train the chest with anterior-deltoid and triceps assistance. A securely locked backrest around 15–30 degrees above horizontal is a practical starting range to explore when it fits; it is not a universal optimum. The first fully taught implementation is the Incline Barbell Bench Press. Readers using dumbbells can go directly to the Incline Dumbbell Bench Press tutorial. Free-weight versions require a stable adjustable bench, a compatible rack or manageable dumbbells, clear working space, and a controlled way to enter and exit the supported position. Smith and incline chest-press machines require station-specific fitting, safety controls, and separate load records. Choose equipment you can set up, press, return, and leave under control.
| Variation | Useful feature | Essential setup check | Load record |
|---|---|---|---|
| Incline Barbell Bench Press | Shared-bar practice and small total-load increments. | Compatible rack, locked bench, safeties and reachable hooks. | Total bar-plus-plate mass; angle and grip. |
| Incline Dumbbell Bench Press | Independent hand paths and grip choices. | Two manageable weights; controlled entry and set-down. | Mass per dumbbell; angle and grip. |
| Smith Machine Incline Bench Press | Guided bar travel with station-specific catches. | Correct bench orientation, bar path, hooks and safety stops. | Exact machine and plate loading; known carriage resistance separately. |
| Incline Chest-Press Machine | Supported pressing on a designed inclined path. | Manufacturer-intended setup, fitted seat/handles and exit control. | Exact machine, settings and displayed resistance. |
Use the selected tutorial to learn that press. Broader press, fly, dip, and push-up selection belongs in the chest exercise selection guide. One fitting incline press can occupy an existing slot; this table is not four exercises to perform, a weekly prescription, or a reason to add work to a complete plan.
Best Incline Bench Angle: 15, 30, or 45 Degrees?
Explore a securely locked backrest at about 15–30 degrees above horizontal when a low, chest-focused incline fits your body and goal. Around 45 degrees can also be a valid choice; the best fitting setting is not automatically the lowest or steepest option. The number describes the backrest’s inclination, not elbow flare or the exact effective angle of your torso after padding, body position, and individual build are considered. A numbered bench notch is not portable to another bench. Set and lock the backrest before loading or positioning the working weight. Keep the selected setting long enough to compare repeatable technique and performance, and record the angle or bench notch together with the exact bench identity.
| Backrest setting | How to use it | What it does not establish |
|---|---|---|
| Flat (0 degrees) | Use as the horizontal-press comparison, not as an incline setting. | It does not exclude the clavicular region. |
| Low incline (about 15–30 degrees) | A practical starting range to explore for a chest-focused incline when the bench and lifter fit. | Neither this range nor exactly 30 degrees is a proven universal growth optimum. |
| Moderate incline (around 45 degrees) | A legitimate incline option when support, arm path and loading remain appropriate. | It is not automatically incorrect or inferior to 30 degrees. |
| Steeper than 45 degrees | Expect a progressively different pressing task; reassess whether a steeper press matches the goal. | There is no abrupt angle that turns the chest off or guarantees a shoulder-only exercise. |
These four settings are reference points, not exhaustive bins, four required exercises, or instructions to change the angle between sets. A steeper backrest can alter the arm path, anterior-deltoid demand, support, and usable load without acting as an on-off switch for the chest. A meaningful angle change creates a new comparison, so keep the previous record and establish the new setting before judging progress. Short-term muscle-excitation studies and longer-term training studies answer different questions. Acute electrical activity can show that regional emphasis changed under a tested setup, but it does not rank long-term growth. Longitudinal findings from one implement and protocol do not establish a universal dumbbell angle. The available evidence therefore supports choosing a usable, repeatable incline, not declaring 30 degrees superior to 45 degrees for muscle growth or treating 45 degrees as automatically wrong.
How to Do the Incline Barbell Bench Press
Incline Barbell Bench Press
Use the incline barbell bench press for an inclined chest press with one shared bar. Set a stable adjustable bench inside a compatible rack with usable hooks and safety supports; the bench, bar, plates, working range, and rerack route must fit before working weight is added. Rehearse the complete setup with an unloaded or genuinely manageable training bar before beginning working sets.
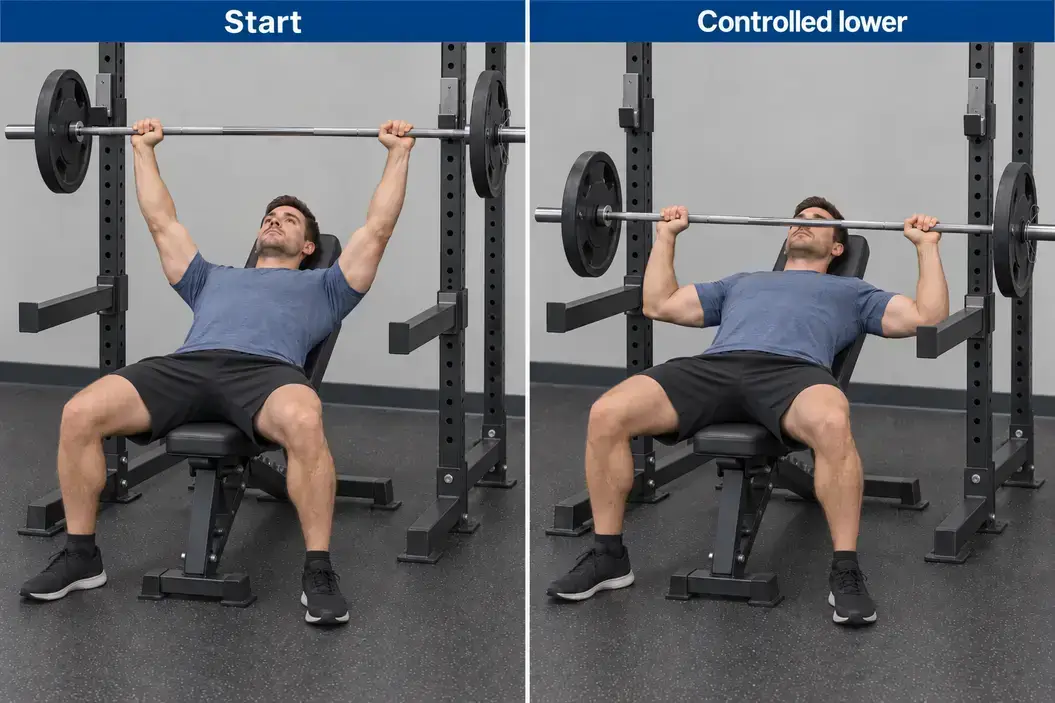
- Lock the bench at the selected modest incline, center it in the rack, and clear the working area. With an unloaded or genuinely manageable training bar, establish a hook height and tested safety-support position that permit the intended working range while providing an appropriate catch. Get qualified setup help when the rack cannot provide both; do not lower or remove protection merely to force a deeper repetition.
- Lie with the head, upper back, and pelvis supported and the feet planted on a secure surface. Establish a comfortable repeatable arch and shoulder-blade position against the pad, and keep the body from sliding. Neither maximal arching nor pressing the lower back completely flat is required; a materially changing arch or lost support ends the comparison.
- Take a full overhand grip with the thumbs around the bar and use symmetric hand positions. Choose a width that lets the wrists and forearms support the bar through the intended lower position without forcing one universal elbow angle, extreme flare, or extreme tuck.
- Agree on lift-off, assistance, and rerack signals with a competent spotter. Unrack the bar, move it clear of both hooks under control, and settle it above the shoulder and upper-chest region before beginning the descent. Do not treat a bar that is still crossing the hooks as the top of a working repetition.
- Lower steadily toward a repeatable upper-chest-region point or an earlier controllable endpoint that fits the selected angle, grip, and body proportions. Keep the forearms supporting the bar and keep it away from the throat and collarbones. Do not copy a compulsory flat-bench touch point, bounce the bar, or force contact after support or position has changed.
- Press to a balanced top above the shoulder region without lifting the hips, sliding on the pad, or changing the torso angle to finish. A free bar may travel slightly back toward the shoulders during the ascent; neither a perfectly vertical line nor an exaggerated J-curve is mandatory for every lifter.
- End the set while an orderly rerack remains available. With the bar controlled near the top, guide it into both hooks, confirm that both sides are supported, and only then release the grip. Safeties and planned spotting assistance are backups, not permission to practice solo failed repetitions.
Regress by using a lighter training bar or less total load when the unrack, range, support, or rerack is the limiting factor. Choose the taught dumbbell or a fitted-machine alternative when this rack arrangement cannot provide a usable range and appropriate catch, rather than removing protection. Do not use plate dumping, a roll-of-shame escape, or solo failure testing as the setup plan. Progress only while the bench angle, grip, body support, lower endpoint, and rerack remain consistent. Add technically acceptable repetitions within the actual plan range before using a manageable increase in total bar load. A barbell-specific performance goal requires practice with the barbell; it does not justify converting a dumbbell or machine number into a barbell prescription. Record total bar-plus-plate mass and units, bench setting, rack and safety positions, grip, working range, completed repetitions, actual rest, estimated effort, and any spotting or lift-off assistance. These cues define a repeatable general-training implementation; they do not guarantee prevention of every injury or replace individual rack instructions and competent setup help.
How to Do the Incline Dumbbell Bench Press
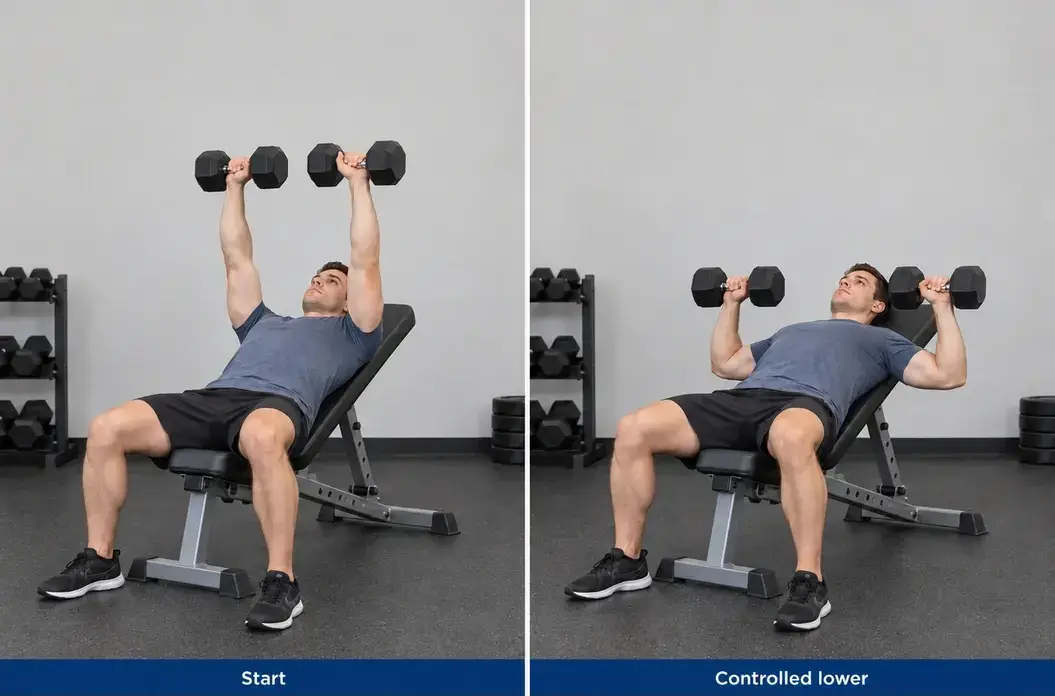
Incline Dumbbell Bench Press
Use the incline dumbbell bench press when independent hand paths suit the planned inclined press. Unlike a shared bar, each hand controls a separate implement, so the bench must lock securely and both dumbbells must remain manageable during positioning, pressing, and set-down, not only through the strongest part of the repetition.
- Choose the same modest incline you intend to use for later comparisons, lock the adjustment, and inspect the dumbbells or adjustable-weight retention system. Clear the floor and plan how both weights will enter and leave the supported position before starting.
- Sit with the dumbbells controlled close to the body. Rehearse any thigh-assisted positioning with light weights as a handling skill, or use competent assistance, then settle onto the pad. Do not throw a heavy pair toward the shoulders; reduce the load or choose a fitted station when the entry cannot be controlled.
- Plant the feet and retain head, upper-back, and pelvic contact with the bench. Use a natural repeatable arch and active stabilization rather than forcing the lower back flat or exaggerating extension. Take full comfortable grips (commonly pronated or slightly turned inward) with the wrists supported above the forearms. A slightly turned-in or neutral grip may fit, but it is not a pain cure.
- Press both dumbbells toward balanced positions above the upper-chest and shoulder region. Let each hand follow a controllable independent path without colliding the weights or forcing both arms into one narrow track. Stop the set before the hips lift, the torso slides, or increasing back extension finishes the press.
- Lower both dumbbells through repeatable paths to a comfortable endpoint that can be reversed without the shoulders rolling away from support. Keep the forearms supporting the weights and do not force the dumbbells below the torso or copy another lifter’s depth.
- Finish while entry and exit control remain available. Use the practiced controlled return to supported sitting or a trained assisted set-down. Do not force a loaded sit-up, twist out from beneath the weights, drop them, or continue into a failed repetition that cannot be exited safely.
Regress to a lighter pair or another taught press when positioning, range, or set-down is unsuitable. A floor press can preserve a pressing opportunity, but its floor-limited range and support do not recreate the incline geometry. Progress repetitions within the actual plan range before using the smallest manageable increase per dumbbell. Keep the bench angle, grip, lower endpoint, support, and typical rest stable; changing the angle or implement starts a separate comparison. This teaching version uses both arms together and does not prescribe unilateral sets or a conversion from a barbell load. Record the load per dumbbell with lb or kg, bench setting or measured inclination, grip, lower and upper endpoints, completed repetitions, actual rest, estimated effort, and any entry, support, or exit change.
Smith Machine and Incline Chest-Press Machines
Smith machines and purpose-designed incline chest-press machines both guide the resistance, but they are not the same setup. A Smith station guides a shared bar along fixed rails while the user positions a separate bench. An incline chest-press machine supplies its own seat, supports, handles, and designed torso-to-handle path. In either case, fit the actual station before adding meaningful resistance.
Smith Machine Incline Bench Press
Use the Smith machine incline bench press only when the bench position, guided bar travel, hook system, and safety stops can be fitted to the intended press. Straight and angled rails, hook actions, bench orientation, and starting carriage resistance differ among stations.
- Read the actual station instructions or ask trained facility staff to demonstrate its hooks, safety stops, permitted bench orientation, and rail direction. Rehearse with a manageable carriage before adding plates; the unloaded carriage can already be too heavy for a controlled setup.
- With the bar secured and resistance at rest, position and lock the bench so the bar can reach the selected lower point and a balanced top without forcing the shoulder path. Account for whether the rails are straight or angled. Do not copy a universal facing direction from another machine or move the bench during a loaded repetition.
- Set both mechanical safety stops at the verified usable catch position and rehearse how the hooks engage and disengage on that model. Guided travel and hooks do not replace the stops. If the intended working range and an appropriate catch cannot coexist, use another station or exercise.
- Establish stable foot, pelvic, upper-back, and head support and take a full comfortable symmetric grip. Unhook only with the demonstrated station-specific action, then settle the bar under control before beginning the descent.
- Lower along the rail to the selected controllable endpoint, then press along the same guided path without sliding, lifting away from the bench, bouncing, or forcing a bar path that does not fit.
- Finish before fatigue threatens reliable rehooking. Engage both hooks using the station procedure, confirm that the carriage is supported, and only then release the grip. Do not assume one universal wrist-twist direction or practice a generic failed-repetition escape.
Regress by removing added plates or choosing a station with a manageable starting carriage resistance. Progress repeatable repetitions before using the smallest practical plate increase on that same setup, while bench placement, angle, grip, range, stops, and hook procedure remain consistent. Record the exact Smith station, straight or angled rail direction, facing orientation, bench placement and inclination, grip, added plates and units, completed repetitions, actual rest, estimated effort, and any manufacturer-stated carriage resistance as a separate value. Do not assume every Smith carriage weighs 20 kg or 45 lb, and do not convert its plate total into an equivalent free-bar load.
Incline Chest-Press Machine
Use a purpose-designed incline chest-press machine when its supported pressing path, handles, and permitted adjustments fit. Its incline action comes from the handle path relative to the supported torso, so the machine can provide an inclined press without looking like a free-weight bench set to the same visible angle.
- Identify the manufacturer-intended incline chest-press mode and read the station instructions, load limits, adjustment rules, and any assisted-start or release controls. A shoulder-press station is not automatically interchangeable with an incline chest-press machine.
- With the resistance resting, adjust the permitted seat height, handle position, and starting range so the handles are reachable without forcing the upper arms far behind the torso. Choose a manageable displayed resistance; plate-loaded levers and numbered stacks use different mechanisms.
- Use any designed entry assistance only as instructed. Place the feet, pelvis, and back on their intended supports, establish full comfortable grips, and avoid a forced reach or a setup that pulls the body away from the pads.
- Press along the station’s guided path while retaining the intended support and controlled wrist and elbow alignment. Independently moving levers still use a defined bilateral implementation here; do not add unplanned one-arm sets.
- Return both handles to the selected reachable endpoint without crashing the stack, leaning away from the backrest, or chasing a deeper stretch than the fitted range permits.
- Bring the resistance fully to rest and follow the manufacturer’s exit procedure before changing settings or leaving. Select another press when the permitted adjustments cannot make the path usable.
Regress by reducing the displayed resistance or using a permitted shorter starting range. Progress through repeatable bilateral repetitions before the smallest suitable increment on that exact machine. Keep a separate history for the station identity, seat, handle and start-range settings, grip, displayed resistance and unit, range, completed repetitions, actual rest, and estimated effort. Machine support can simplify handling, but it does not remove active stabilization or guarantee safety or superior growth. Read why gym machine weights differ for the broader loading explanation. Displayed resistance, Smith-carriage mass, added plates, and free-bar mass do not share an automatic conversion, so choose and progress resistance on the actual station being used.
Muscles Worked and Incline vs. Flat Bench Press
Incline pressing trains the pectoralis major through overlapping clavicular and sternocostal regions, with the anterior deltoids and triceps assisting the press. The clavicular region is commonly described as the upper chest, but it is not a separate muscle that the incline press isolates from the rest of the pectoralis major. Rotator-cuff and scapular muscles help organize the shoulder, while the trunk and lower body help maintain the selected support and pressing position. Front-deltoid and triceps participation is expected. Feeling either muscle work does not prove the chest is inactive, and a lower acute electrical signal in one tested region does not mean that region stopped contributing. Short-term muscle-excitation studies can describe a particular setup, but they do not create a long-term growth ranking or prove that one bench angle is best for every lifter. Incline and flat presses change the torso-to-arm relationship, movement skill, support, range of motion, and load that can be controlled. A flat press usually allows a different bar or hand path and often a different working load, while an incline press shifts the pressing geometry and can change regional emphasis. Those differences require separate records rather than a fixed incline-to-flat percentage or an automatic load conversion. Neither version universally replaces the other or wins for hypertrophy. Keep a suitable incline press when it fills the allocated role, without adding every other bench angle. A specific flat-bench performance goal still warrants appropriate flat-bench practice because improvements in one press do not remove the skill requirement of the other. Incline pressing also does not replace all lateral- or posterior-shoulder work. Use the shoulder exercise guide when the complete plan needs broader pressing-overlap and deltoid-selection context, rather than adding shoulder work automatically from this incline-press section.
Grip, Bar Path, Range of Motion, and Breathing
Use the setup that keeps the load supported through a repeatable range and leaves a controlled return available. Grip width, elbow path, lower endpoint, breathing, and assistance should fit the selected bench angle, equipment, and lifter rather than copy one universal incline-press position.
Grip and forearm support
Use symmetric full grips on a bar and full comfortable grips on dumbbells or machine handles. Choose a width and hand orientation that let the wrists remain supported by the forearms through the selected range, with the elbows following a comfortable repeatable path. There is no mandatory grip width or exact elbow angle for every lifter. A slightly turned-in dumbbell grip may fit some people, while a bar requires both hands to share one implement. Neither choice is a pain treatment or proof of superior chest involvement. Reduce the demand or change to a fitting taught option when the wrists, forearms, or elbows can no longer support the load as intended.
Lower endpoint and free-bar path
Use a repeatable lower endpoint around the upper-chest region or an earlier controllable point that fits the bench angle, body proportions, grip, and equipment. Contact with the neck or collarbones is not a target, and forcing the bar or dumbbells to touch the body is not a test of correct form. Stop the descent before support, shoulder position, or forearm alignment changes. A free bar can travel slightly back toward the shoulders during the press; it does not need one perfectly vertical line or an exaggerated J-curve. A Smith machine constrains the bar to its own straight or angled rails, so its bench placement and path must fit that station. Do not force a free bar to copy Smith geometry or prescribe one trajectory for every machine.
Bench contact and breathing
Keep the head, upper back, pelvis, and feet supported in the selected setup. A stable natural arch can remain while the torso stays fixed; it is different from the hips lifting, the body sliding, or the arch increasing to finish a repetition. Bench support does not mean every joint is frozen: the shoulders and shoulder blades still coordinate with the press while the main contact points remain repeatable. Brace before moving the load and keep breathing controlled. For moderate work, breathing in during the lowering phase and breathing out through the press is a practical starting cue. It is not a rule that overrides individual medical restrictions, the need to maintain stability, or a lifter's established safe breathing strategy. Bracing does not require a prolonged maximal breath-hold on every repetition.
Spotting, entry, and a controlled exit
Arrange competent assistance before the set when a lift-off, dumbbell handoff, or rerack may be needed. Agree on the signal, the amount of help, and the intended return so the assistant does not unexpectedly take the load or leave the lifter without support. Machine entry and exit follow the documented controls of that specific station rather than a generic procedure. Finish while the bar can still reach both hooks, the dumbbells can return to sitting or an assisted set-down, or the machine resistance can return to rest. This guide teaches planned setup and controlled return, not emergency self-rescue. Stop and settle the load when grip, support, range, equipment security, or control fails. Sharp, worsening, or radiating pain, numbness, or unexpected weakness warrants appropriate assessment rather than another test set, a diagnostic exercise, or a rehabilitation prescription.
Common Incline Bench Press Mistakes
Judge incline-press form by observable setup, support, range, and load-control changes, not genetics, the presence of a pump, one fixed elbow angle, maximal depth, or a comfortable natural arch. A securely fitted 45-degree setting can be appropriate; the error is choosing or changing a setup for the wrong reason or losing the standard during the set.
| Observable problem | Practical correction |
|---|---|
| Bench moves or the backrest is not locked | Stop, unload, secure the bench and recheck the adjustment before another set. |
| Hooks require an excessive reach or shrug to unrack | Adjust the permitted rack or bench position and rehearse a manageable unrack. |
| A steeper angle is chosen only because it is assumed to mean more upper-chest growth | Return to a suitable repeatable setting; compare fit and performance, not an angle ranking. |
| Wrists or elbows stop supporting the load through the selected path | Reduce load and adjust a comfortable grip/path without forcing a universal elbow angle. |
| Hips lift or torso position changes to finish the repetition | End the set and reduce demand; keep the normal arch and support repeatable. |
| The lower endpoint drifts, bounces or becomes shorter as fatigue rises | Keep a reproducible controllable endpoint; stop before the selected range is lost. |
| Smith hooks/stops are unfamiliar or the bench is misaligned | Rehearse the actual station with facility help and a manageable carriage before adding plates. |
| A materially different bench angle, machine, grip, or range is logged as unchanged performance | Record material setup changes and establish a separate baseline when needed. Increasing the weight with the same exercise setup remains progression of that exercise. |
Keep pelvis contact without forcing a flat back
Pelvis lifting from the seat changes the support and effective torso angle; it is different from keeping a comfortable natural back arch while the main contact points remain stable. Use the same supported position throughout the repetition rather than flattening the lower back forcefully or extending farther to finish the load.
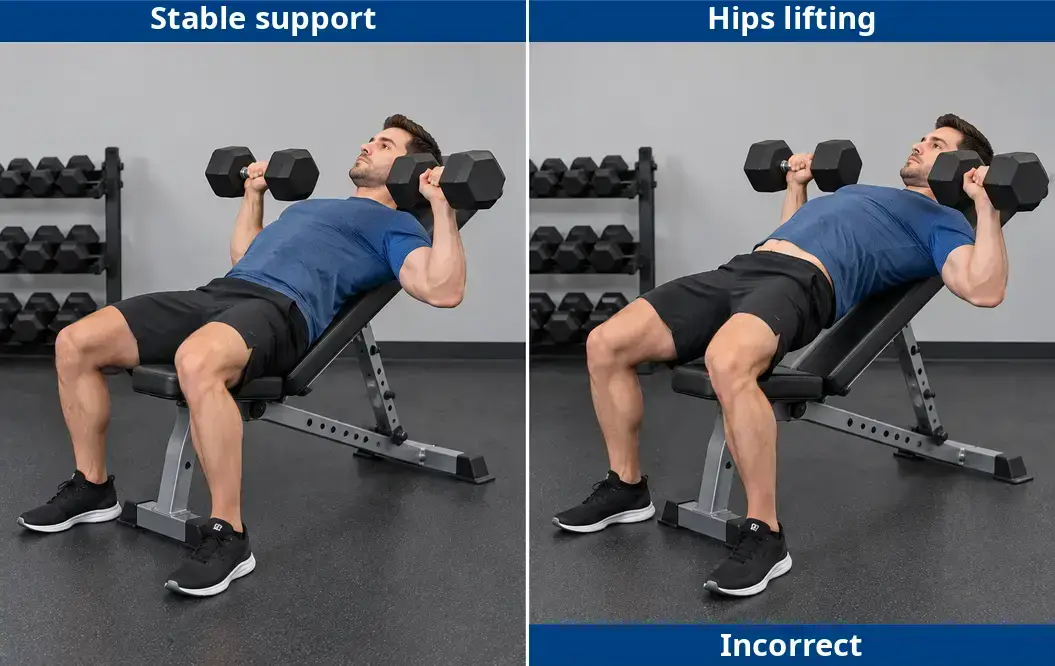
- Keep the pelvis in contact with the seat or bench pad through the lowering and pressing phases.
- Maintain a repeatable torso and back position without sliding or increasing the arch as fatigue rises.
- Keep both feet supported in the chosen position so they stabilize the setup instead of rescuing a failed repetition.
- End the set or reduce the load when the resistance causes the pelvis, torso angle, or foot support to change.
Normal muscular effort and local fatigue can occur while the setup remains controlled. Stop and settle the load for lost support or control; sharp, worsening, or radiating pain, numbness, or unexpected weakness warrants appropriate assessment rather than another test repetition.
Sets, Reps, and Progression for Incline Pressing
Follow the allocation and progression rules in your actual complete plan. When one Incline Barbell Bench Press slot is appropriate, the two rows below show alternative ways to organize that single exercise: choose the strength-practice example or the muscle-building example, not both. Each option uses three bilateral working sets, so combining the rows would create six sets and a different prescription. The second row is the muscle-building example used in the progression illustration later in this section.
| Exercise | Sets & Reps | Rest | Tempo | Target Muscles | Notes |
|---|---|---|---|---|---|
| Incline Barbell Bench Press: strength-practice example | 3 sets of 5–8 reps | 2–4 minutes | 2-1-X-0 | Pectoralis major, anterior deltoids, triceps | About 2–3 technically sound reps in reserve; secure rack and controlled rerack. |
| Incline Barbell Bench Press: muscle-building example | 3 sets of 8–12 reps | 2–3 minutes | 2-1-1-0 | Pectoralis major, anterior deltoids, triceps | About 2–3 technically sound reps in reserve; keep the same angle, grip and range. |
Rehearse the setup with a manageable bar and use 1–3 progressively heavier, non-fatiguing warm-up sets when needed. That is a coaching example rather than a mandatory or scientifically optimal warm-up count, and those sets remain outside the three working sets. A newer lifter may need a lighter implement or fewer working sets while establishing a secure unrack, press, and rerack. Choose a working load that permits the lower repetition target with approximately 2–3 technically sound reps in reserve. Estimate how many additional repetitions you could complete with the same range, support, and technique, and finish while a controlled exit remains available. Perform straight sets, use the rest range shown, and take additional recovery before the next set or exercise when needed. Record the actual rest rather than rushing to preserve a schedule. Read the four-part tempo as lower–pause–press–top pause. A 2-1-1-0 repetition lowers for about two seconds, pauses for one second at the controlled lower position, presses for about one second, and uses no deliberately prolonged top pause. A 2-1-X-0 repetition keeps the same lowering and lower pause, then uses controlled acceleration intent during the press. X is not forced speed, bouncing, added leg drive, or a failed repetition, and zero never means dropping the load. Record total bar-plus-plate mass in lb or kg with the same bench angle, grip, and lower endpoint. Work from the actual implement and setup instead of a generic starting-weight chart or a one-repetition-maximum test.
Progress the three-set muscle-building example
The constructed example below applies only to the Incline Barbell Bench Press muscle-building example: 3 sets of 8–12 repetitions. Exposures A–C use the same total bar load with comparable bench setup, grip, range, rest, and intended effort. Exposure D is a hypothetical result after a heavier total bar load is selected. These are teaching exposures, not measured client results, numbered calendar weeks, or promised visit-to-visit progress.
| Exposure | Set 1 | Set 2 | Set 3 | Decision |
|---|---|---|---|---|
| A | 10 | 9 | 8 | Keep the same load and build controlled repetitions. |
| B | 12 | 12 | 11 | Keep the load; the last set has not reached 12. |
| C | 12 | 12 | 12 | Eligible for the smallest suitable increase only if effort and technique also qualify. |
| D | 8 | 8 | 8 | One possible result after the increase, not a required or predicted outcome. |
Exposure A stays at the same load while controlled repetitions are built. Exposure B also stays because the final set has not reached 12. Exposure C qualifies only when all three sets retain the intended effort, technique, range, support, and controlled exit. Exposure D shows one possible heavier-load outcome; it is not a required result or a starting-weight recommendation. In this original teaching example, one qualifying exposure illustrates the decision. The complete plan being followed keeps its own progression rule. If the smallest available increase makes eight controlled repetitions or the safe setup unavailable, return to the previous load and continue progressing there, or use a secure documented loading alternative with its own baseline. Do not attach unsecured objects to manufacture a smaller increment. The Bench Press Calculator estimates flat barbell-bench performance within its own assumptions. It does not prescribe an incline-barbell starting load or convert a flat result into dumbbell, Smith-machine, or other machine resistance. When following an existing workout plan, use that plan’s tempo and progression rules rather than automatically replacing them with these examples.
Use Incline Pressing in Your Workout Plan
The Push Pull Legs Workout Plan provides a real source example. The row below is the second exercise in one occurrence of Push A: Chest-Emphasis Workout. It is not the complete six-row Push session, the whole plan, or a weekly incline-press allocation.
Push A: one selected source row
| Exercise | Sets & Reps | Rest | Tempo | Target Muscles | Notes |
|---|---|---|---|---|---|
| Incline Dumbbell Press | 3 sets of 8–12 reps | 2–3 minutes | 3-1-1-0 | Upper chest, triceps, anterior delts | Use a bench angle and depth that remain comfortable and repeatable. |
The source generally uses approximately 1–3 technically sound reps in reserve for this work, and its wider scheduling, preparation, recovery, and progression rules remain controlling. The tempo 3-1-1-0 means lower for three seconds, pause for one second at the controlled lower point, press for one second, and use no deliberately prolonged top pause. Keep that source-specific three-second lowering rather than replacing it with section 9’s original two-second examples. These are three bilateral working sets. Both hands press within each set, so the row remains three exercise sets rather than six. Warm-ups and every omitted Push A row remain outside this extract, and the plan’s available scheduling modes prevent one Push A occurrence from being treated as an automatic weekly total.
Constructed barbell replacement illustration
The source row names Incline Dumbbell Press; it does not present an Incline Barbell Bench Press “or” choice. The comparison below is therefore a constructed substitution illustration, not an edit to the PPL workout or a source-approved alternate prescription. When a suitable barbell replacement is deliberately selected for this one incline slot, retain 3 sets of 8–12 reps, 2–3 minutes of rest, and the source tempo of 3-1-1-0 for this illustration. Select a new manageable total bar-plus-plate load, verify the rack, bench, safeties, range, and rerack, and review how the replacement fits the complete plan. Do not convert the dumbbell load into a barbell number or assume equal difficulty, fatigue, muscle involvement, or stimulus.
| Use of the allocated incline slot | Working sets for that slot | Interpretation |
|---|---|---|
| Original Push A: Incline Dumbbell Press | 3 | One bilateral incline exercise already in the source plan. |
| Constructed replacement: Incline Barbell Bench Press instead | 3 | One replacement exercise; select a fresh total-bar load and review suitability. |
| Unplanned addition: both versions | 3 + 3 = 6 | Doubles this slot’s exercise-set count; it is not a one-for-one replacement. |
Choosing either the original dumbbell press or the constructed barbell replacement leaves this incline slot at three working sets. Performing both creates six allocated exercise sets and adds work. These counts apply to this incline slot, not the full week; review the complete plan before replacing the exercise or adding sets.
Incline Bench Press Alternatives and Equipment Limits
Choose an alternative that solves the actual equipment, handling, or fit constraint. Another implement can preserve an incline-press slot when it still provides a secure supported incline and manageable resistance. A floor press or push-up can preserve general pressing work, but that changes the movement goal and starts a separate setup and performance record.
| Constraint | Practical choice | What changes |
|---|---|---|
| No suitable barbell rack, but an adjustable bench and dumbbells are available | Incline Dumbbell Bench Press | Independent implements and entry/exit demands; no barbell-load conversion. |
| Dumbbell positioning is the limiting factor | A fitted Smith or incline chest-press station | Guided path and station-specific safety controls and resistance. |
| No exercise bench is available | A suitable push-up or dumbbell floor press from the Chest guide | Preserves a pressing option, not an identical incline angle or range. |
| Incline pressing remains unsuitable after ordinary setup adjustments | Another tolerable press selected within the complete plan; assessment for concerning symptoms | The goal may require a different movement, not progressively steeper/deeper attempts. |
Preserve the incline role only when the replacement still fits
Switching from a barbell to dumbbells, a fitted Smith station, or a purpose-designed incline chest-press machine can retain an inclined pressing role. The new implement still needs its own secure entry, support, range, exit, and manageable resistance. Start a separate load and setup record rather than converting the old barbell, dumbbell, carriage, or machine number. When no suitable incline setup exists, a regular push-up or dumbbell floor press can provide general pressing within an appropriately adjusted plan. Neither recreates the raised backrest, intended inclined machine path, or the same lower range. A hands-elevated push-up usually reduces the bodyweight demand and is different from a feet-elevated push-up; neither should be labeled automatically equivalent to inclined free-weight pressing. Do not prop a bench, hands, feet, or body on loose furniture to manufacture an angle.
Keep a complete no-bench plan separate from this substitution
The 5-Day Dumbbell Workout Plan supplies its own complete schedule and explicit no-bench branch. Use it as a complete plan, not an addition to your current routine. Changing one incline exercise still requires checking the rest of the plan you are following. Choose from equipment that is secure and resistance that remains manageable through setup and exit. If incline pressing repeatedly produces concerning symptoms despite ordinary fitting changes, stop serially testing steeper, deeper, or heavier versions and seek appropriate assessment.
Incline Bench Press FAQs
What is the best angle for an incline bench press?
Explore a securely locked backrest at about 15–30 degrees above horizontal when a low chest-focused incline fits. Treat that range as a practical starting point, not a measured universal optimum. Use the setting you can support, repeat, and load with a controlled entry and exit, and record the actual bench or notch because one bench’s markings do not transfer automatically to another.
Is 30 or 45 degrees better for the upper chest?
Both can be legitimate settings. Thirty degrees may suit a lower incline, while 45 degrees creates a steeper pressing task that may change anterior-deltoid contribution, range, and usable load. Acute muscle-excitation differences under one tested setup do not prove that 30 degrees produces more long-term growth for every lifter or implement, and 45 degrees is not inherently a mistake.
What muscles does the incline bench press work?
It trains the pectoralis major, including the clavicular region commonly called the upper chest, with anterior-deltoid and triceps assistance. Shoulder, scapular, trunk, and lower-body support also help maintain the selected pressing position. Regional emphasis can change, but the exercise does not isolate a separate upper-chest muscle.
Is incline bench press better than flat bench press?
Neither is universally better. Incline and flat pressing change the torso-to-arm geometry, movement skill, support, range, and load that can be controlled. Use incline when it serves the current chest-pressing role; retain appropriate flat-bench practice when improving flat-bench performance is a specific goal. One useful angle does not require adding every other angle.
Should I use a barbell, dumbbells, or a Smith machine?
Choose the implement that matches the goal and can be set up and exited securely. A barbell suits shared-bar practice and total-load progression; dumbbells allow independent hand paths but require manageable positioning and set-down; a Smith machine provides a guided rail path only when the bench, hooks, and safety stops fit that station. Keep separate load histories because free-bar mass, per-dumbbell load, and Smith carriage or plate loading are not automatically equivalent.
Where should the bar touch on an incline bench press?
Lower toward a repeatable upper-chest-region point or an earlier controllable endpoint that fits the bench angle, grip, body proportions, and rack setup. The throat and collarbones are not targets, and forced contact is not a test of correct technique. Stop the descent before support, wrist and forearm alignment, or shoulder position changes.
How much weight should I use on incline bench press?
Rehearse the exact implementation and choose a load that reaches the plan’s lower repetition target with the intended effort margin and a controlled return or rerack still available. Do not calculate incline load from a fixed percentage of flat bench, combine two dumbbell numbers without labeling the per-hand load, or convert a Smith or machine setting into a free-bar prescription. Record performance on the actual setup and progress from that baseline.
How many sets and reps should I do, and how often?
Use the sets, repetition range, effort, rest, and frequency allocated by the complete plan. This guide’s two incline-barbell examples are alternatives for one exercise slot, not a combined six-set routine or a weekly schedule, and the PPL row keeps its own source prescription and progression rules. Choose complete workout plans for the wider schedule rather than building a week from isolated examples.
Can I do incline bench press without a bench?
Not as the same free-weight incline exercise without suitable locked incline support. A regular push-up or dumbbell floor press can preserve a general pressing option when the complete plan is adjusted, but neither recreates the raised backrest, intended incline path, or the same lower range. Do not prop the body or weights on loose furniture to manufacture an angle.
What should I change if I feel it mainly in my shoulders?
Some anterior-deltoid effort is normal and does not prove the chest is inactive. Check whether the angle is steeper than needed, the load permits the selected range, the grip and elbow path remain comfortable, and the head, upper back, pelvis, and feet keep their support. Reduce the demand or change one relevant variable at a time, then establish a new comparison if the setup changes. Sharp, worsening, or radiating pain, numbness, or unexpected weakness warrants appropriate assessment rather than repeated exercise experiments. Next action: choose the implement, lock the angle, rehearse the setup, use the assigned sets, and record comparable performance.